Transcription of © 2012 CASIO COMPUTER CO., LTD. Operation Guide 5302
1 Congratulations upon your selection of this CASIO watch has built-in sensors that measure direction and results are indicated by the watch's hands and displays. These features make this watch useful when hiking, mountain climbing, or when engaging in other such outdoor ! The measurement functions built into this watch are not intended for taking measurements that require professional or industrial precision. Values produced by this watch should be considered as reasonable representations only. When engaging in mountain climbing or other activities in which losing your way can create a dangerous or life-threatening situation, always use a second compass to confi rm direction readings. Note that CASIO COMPUTER CO., LTD. assumes no responsibility for any damage or loss suffered by you or any third party arising through the use of this product or its This Manual Depending on the model of your watch, display text appears either as dark fi gures on a light background, or light fi gures on a dark background.
2 All examples in this manual are shown using dark fi gures on a light background. Button operations are indicated using the letters shown in the illustration. Note that the product illustrations in this manual are intended for reference only, and so the actual product may appear somewhat different than depicted by an to check before using the watch1. Check the Home City and the daylight saving time (DST) the procedure under To confi gure Home City settings (page E-13) to confi gure your Home City and daylight saving time !Proper World Time Mode data depends on correct Home City, time, and date settings in the timekeeping Mode. Make sure you confi gure these settings Set the current Confi guring Current Time and Date Settings (page E-15).The watch is now ready for About This ManualE-3 Things to check before using the watchE-7 Mode Reference GuideE-12 TimekeepingE-13 Confi guring Home City SettingsE-13 To confi gure Home City settingsE-14 To change the daylight saving time (summer time) settingE-15 Confi guring Current Time and Date SettingsE-15 To change the current time and date settingsE-18 Hand Home Position AdjustmentE-18 To adjust home positionsE-20 Using the Digital CompassE-20 To perform a digital compass operationE-23 To perform bidirectional calibrationE-25 To perform magnetic declination correctionE-26 To store a direction angle reading in Bearing MemoryE-29 To set a map and fi nd your current locationE-30 To fi nd the bearing to an objectiveE-31 To determine the direction angle to an objective on a map and head in that direction (Bearing Memory)
3 E-5E-34 Taking Temperature ReadingsE-34 To enter and exit the Thermometer ModeE-34 To take temperature readingsE-36 To calibrate the temperature sensorE-37 Specifying Temperature UnitE-37 To specify the temperature unitE-38 Checking the Current Time in a Different Time ZoneE-38 To enter the World Time ModeE-38 To view the time in another time zoneE-39 To specify standard time or daylight saving time (DST) for a cityE-40 To swap your Home Time and World Time CitiesE-41 Using the StopwatchE-41 To enter the Stopwatch ModeE-41 To perform an elapsed time operationE-41 To pause at a split timeE-42 To measure two fi nishesE-43 Using the Countdown TimerE-43 To enter the Countdown Timer ModeE-43 To specify the countdown start timeE-44 To perform a countdown timer operationE-44 To stop the alarmE-6E-45 Using the AlarmE-45 To enter the Alarm ModeE-46 To set an alarm timeE-46 To test the alarmE-47 To turn an alarm and the Hourly Time Signal on and offE-47 To stop the alarmE-48 IlluminationE-48 To illuminate the display manuallyE-48 To change the illumination durationE-50 To enable or disable the auto light switchE-52 Button Operation ToneE-52 To enable or disable the button Operation toneE-53 TroubleshootingE-57 Specifi cationsE-7 Mode Reference GuideYour watch has 7 modes.
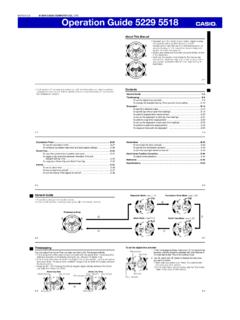
4 The mode you should select depends on what you want to do this:Enter this mode:See: View the current date in the Home City Confi gure Home City and daylight saving time (DST) settings Confi gure time and date settingsTimekeeping ModeE-12 Determine your current bearing or the direction from your current location to a destination as a direction indicator and angle value Determine your current location using the watch and a mapDigital Compass ModeE-20 Determine the temperature at your current locationThermometer ModeE-34 View the current time in one of 48 cities (31 time zones) around the globe World Time ModeE-38 Use the stopwatch to measure elapsed timeStopwatch ModeE-41 Use the countdown timerCountdown Timer ModeE-43 Set an alarm timeAlarm ModeE-45 Operation Guide 5302MO1409-ED 2012 CASIO COMPUTER CO., a Mode The illustration below shows which buttons you need to press to navigate between modes. To return to the timekeeping Mode from any other mode, hold down D for about two Time ModeStopwatch ModeCountdown Timer ModeAlarm ModeMode dial handWorld Time ModeStopwatch ModeCountdown Timer ModeAlarm ModeMode dial handE-9 The mode dial hand indicates the watch s current ModeTimekeeping ModeDigital Compass ModeMode dial handMode dial handThermometer ModeTimekeeping ModeDigital Compass ModeMode dial handMode dial handE-10 General Functions (All Modes)The functions and operations described in this section can be used in all of the timekeeping Mode Access To enter the timekeeping Mode from any other mode, hold down D for about two Return Features The watch will automatically return to the timekeeping Mode if you do not perform any button Operation for a particular amount of time in each NameApproximate Elapsed TimeAlarm, Digital Compass3 minutesThermometer1 to 2 minutesSetting screen (digital setting fl ashing)
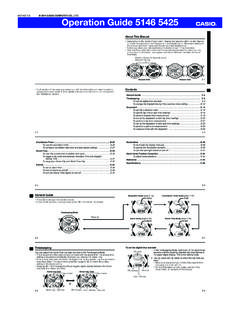
5 3 minutesInitial ScreensWhen you enter the Alarm, World Time, or Digital Compass Mode, the data you were viewing when you last exited the mode appears fi and B buttons are used on the setting screen to scroll through data on the display. In most cases, holding down these buttons during a scroll Operation scrolls through the data at high Meters The upper digital meter (Digital Meter A) indicates the seconds count in the timekeeping Mode (page E-12), World Time Mode (page E-38), and Timer Mode (page E-43). In the Stopwatch Mode (page E-41) it indicates the 1/10-second count. While viewing bearing memory contents in the Digital Compass mode (page E-27), it shows a bearing pointer. In all modes (except when a fl ashing setting screen is displayed), the lower digital meter (Digital Meter B) shows the current timekeeping Mode time (fl ashing) and World Time time (not fl ashing).Example:Digital Meter ADigital Meter BHTWTWT: Current World Time time (London, 1:08 )HT: Current timekeeping Mode time (Tokyo, 10:08 )E-12 TimekeepingUse the timekeeping Mode to set and view the current time and date.
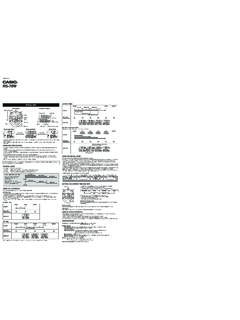
6 Each press of A in the timekeeping Mode will change screen contents as shown below. Digital Meter A shows the seconds ScreenTime ScreenDay of weekSecondsHour : MinutesMonth DayHour handSecond handDigital Meter ADigital Meter BMinute handMode dial handPMindicatorE-13 Confi guring Home City SettingsThere are two Home City settings: actually selecting the Home City and selecting either standard time or daylight saving time (DST).To confi gure Home City settings1. In the timekeeping Mode, hold down A until ADJ appears in the upper display. When you release A (after ADJ appears), SET will be fl ashing in the lower display. This is the setting mode. The watch will exit the setting mode automatically if you do not perform any Operation for about two or three Use E (East) and B (West) to scroll through the available city codes. Keep scrolling until the city code you want to select as your Home City is shown in the upper display.
7 For details about city codes, see the City Code Table at the back of this Press D. This will cause DST to appear in the lower screen and the DST setting of the currently selected Home City to appear in the upper to toggle the DST setting between daylight saving time (ON)and standard time (OFF). Note that you cannot switch between standard time and daylight saving time (DST) while UTC is selected as your Home code and city nameDST indicatorCity code and city nameDST indicatorE-145. After all of the settings are the way you want, press A to exit the setting screen. The DST indicator appears to indicate that daylight saving time is turned After you specify a city code, the watch will use UTC* offsets in the World Time Mode to calculate the current time for other time zones based on the current time in your Home City.* Coordinated Universal Time, the world-wide scientifi c standard of timekeeping . The reference point for UTC is Greenwich, change the daylight saving time (summer time) setting1.
8 In the timekeeping Mode, hold down A until ADJ appears in the upper display. When you release A (after ADJ appears), SET will be fl ashing in the lower Press D. This will cause DST to appear in the lower screen and the DST setting of the currently selected Home City to appear in the upper Press E to toggle the DST setting between daylight saving time (ON) and standard time (OFF).4. After all of the settings are the way you want, press A to exit the setting screen. The DST indicator appears to indicate that daylight saving time is turned guring Current Time and Date SettingsYou can use the procedure below to adjust the timekeeping Mode time and date settings if they are the digital Home City data should cause the analog time setting to change accordingly. If the analog time does not indicate the digital time, check the home positions of the hands and make adjustments if necessary (page E-18).To change the current time and date settings1.
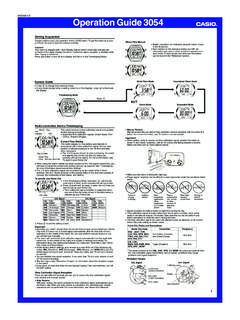
9 In the timekeeping Mode, hold down A until ADJ appears in the upper display. When you release A (after ADJ appears), SET will be fl ashing in the lower codeCity codeOperation Guide 5302E-162. Press D to move the fl ashing in the sequence shown below to select the other CodeDSTI lluminationDurationButton Operation Tone On/OffDayMonth12/24-HourFormatSecondsHou rYearMinutes The following steps explain how to confi gure timekeeping settings When the timekeeping setting you want to change is fl ashing, use E and/or B to change it as described do this:Do this:Change the city codeUse E (East) and B (West).Toggle between daylight saving time (ON) and standard time (OFF). between 12-hour (12H) and 24-hour (24H) the seconds to 00(If the current seconds count is between 30 and 59, one is added to the minute count). the hour or minutesUseE (+) and B ( ).Change the year, month, or dayE-174. After all of the settings are the way you want, press A to exit the setting For information about selecting a Home City and confi guring the DST setting, see Confi guring Home City Settings (page E-13).
10 While the 12-hour format is selected for timekeeping , a P (PM) indicator will appear for times from noon to 11:59 No indicator appears for times from midnight to 11:59 With 24-hour format, time is displayed from 0:00 to 23:59, without any P (PM) indicator. The watch s built-in full automatic calendar makes allowances for different month lengths and leap years. Once you set the date, there should be no reason to change it except after you have the watch s battery replaced. The day of the week changes automatically when the date changes. Refer to the pages shown below for more information on timekeeping Mode Button Operation tone on/off: To enable or disable the button Operation tone (page E-52)- Illumination duration setting: To change the illumination duration (page E-48)E-18 Hand Home Position AdjustmentStrong magnetism or impact can cause the hands of the watch to be off. Home position adjustment is not necessary when the analog time and digital time are the same time in the timekeeping adjust home positions1.