Transcription of A Tutorial Introduction to Control Systems Development …
1 A Tutorial Introduction to Control Systems Development and implementation with dSPACE. Nicanor Quijano and Kevin Passino Dept. of Electrical Engineering The Ohio State University 2015 Neil Ave. Columbus, OH 43210. Santhosh Jogi dSPACE Inc. 22260 Haggerty Road Suite 120. Northville, MI 48167. Abstract: The objective of this document is to provide a Tutorial Introduction to the dSPACE software, the dSPACE DS1104 controller board, and their use in Development and implementation of a simple temperature Control system . It is intended for use as a quick-start guide to dSPACE hardware/software for a university course. Full details on the dSPACE hardware and software can be found in the dSPACE documentation. Created: 1/18/02. Version: 3/29/02. Table of Contents 1 Control Desk Environment .. 3. 2. Design and implementation of a Simple Experiment with 5.
2 Temperature Control Problem and Physical Connections ..6. Creating a New Experiment ..7. Interfacing dSPACE Software to the Digital to Analog and Analog to Digital Conversion 10. Analog to Digital Conversion (ADC) and Signal 13. Digital to Analog Conversion (DAC) and Initialization / 15. Real-time and the Structure of a Real-Time Program .. 17. Controller Development in Simulink ..18. Simulink for Controller 18. Building the Simulink Model .. 19. Graphical User Interface to the Capturing Data ..28. Data Capture with the Plotter .. 28. Data Capture Without the Plotter .. 32. 3. Exercise: Implement a Temperature Control system in 34. 4. Notes and Tips for Signal Conditioning .. 37. 1 Control Desk Environment You should sit in front of a computer with dSPACE software and the DS1104. board. Our intent in this first section is to lead you through how to start up the software and understand its main functions.
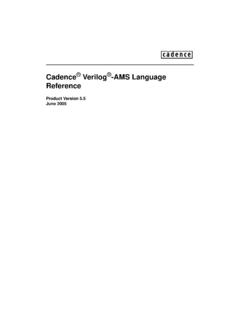
3 In the next section we will show how to use the software and hardware to implement a very simple Control system . First, from the PC operating system , the following shortcut enables access to the dSPACE ControlDesk environment: If the shortcut does not exist on the desktop please launch ControlDesk from the dSPACE Tools folder under Start / Programs . Either way, once you access it, you will find the following window: Navigator Tool Window ControlDesk is a user-interface. The DS1104 board is considered a platform on which a simulation is run, just as Matlab is also a platform to run non-real-time simulations on. That is why you will see icons for both the DS1104 and MATLAB in the Platform tab of the Navigator. They are both simulation platforms that ControlDesk can interface to, however for this document we will focus on using ControlDesk with the DS1104.
4 From this environment, you will be able to download applications to the DS1104, configure virtual instrumentation that you can use to Control , monitor and automate experiments, and develop controllers. Notice that in the view shown above (default window settings for the ControlDesk) you see three regions. The region in the upper left corner is called the Navigator; it has three tabs (Experiment, Instrumentation, and Platform). As mentioned earlier, the Platform tab shows the different simulation platforms that ControlDesk can interface to. You will see Matlab as one platform, and the DS1104 board as the other platform. Notice that the DS1104 is listed under Local system . There are different ways in which dSPACE. hardware can be connected to the PC that is running Controldesk, and Local system . refers to whether the dSPACE hardware is in an expansion slot in the PC itself.
5 If you added another dSPACE card to the PC it would be registered in ControlDesk and would show up under Local system . If you right-click over the Matlab icon in the Platform tab you will have access to Matlab/Simulink, however use this method ONLY if you are interfacing ControlDesk to a simulation running in Matlab. For this document please launch Matlab separately, in the normal fashion. The Instrumentation tab will show a list of currently open Layouts (GUI panels that you will construct), and the associated graphical instruments on those layouts. From the Instrumentation tab you can open property dialog boxes for any instrument on any layout. In the region on the bottom (Tool Window), when you select the Log Viewer tab, you are provided with error and warning messages. The File Selector tab presents you with view similar to Windows Explorer as it allows you to browse through the file system of the PC, and choose and download applications with a drag and drop action.
6 The (Python) Interpreter tab (which uses the Python programming language), handles Python commands and scripts for ControlDesk Automation and TestAutomation. Other tabs will appear depending on what you do in the ControlDesk ( , when you compile a model as discussed below). The File Selector will only display certain file types. It will show *.mdl (Simulink model files), *.ppc (Compiled object files for execution on the DS1104), and *.sdf ( system Description File) files. The *.sdf file contains references to the executable file (either *.mdl or *.ppc), a Variable Description file (*.trc) and the platform the simulation is built for (Simulink, DS1104 or other dSPACE hardware). Thus, in order to load an application to a specific platform you would select it in the File Selector then drag and drop it onto the respective icon in the Platform window.
7 In general, the file that we drag and drop on the DS1104 is either the *.ppc (Compiled object file for the DS1104) or the *.sdf ( system Description files); either will have the same effect. The Function Selector displays groups and respective functions of the available Python modules, and allows you to generate function calls that you can copy to Python scripts. It is part of the Function Wizard and belongs to ControlDesk TestAutomation. The Variable Manager (labeled with the name of the open .sdf/.trc file), containing the Variable Browser and the Parameter Editor, provides access to the variables of an application. Each opened .sdf/.trc file adds a new tab to the Tool Window. The large gray region in the upper right portion of the screen is a general work area. In this area you can create and display layouts, as well as bring up an editor to write text files, Python scripts or c code.
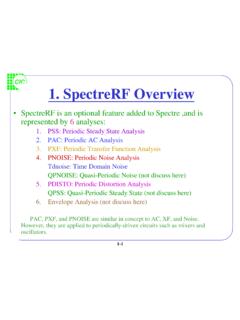
8 2. Design and implementation of a Simple Experiment with dSPACE. In this section we present a very simple example of how to design and implement a Control system for a single input single output (SISO) temperature Control problem. Temperature Control Problem and Physical Connections We are going to use a temperature process, where a temperature sensor is used, and the actuator of our experiment will be a lamp. The block diagram for a simple on-off controller is shown below. ON-OFF Process Controller (Lamp). Set point Degree Temperature Celsius Sensor Voltage Physically, we are going to connect the following, with the lamp placed within about a half centimeter of the sensor: Controller implemented using DS1104. some of the dSPACE features Analog Output Lamp that we may find in the (DACH1, pin P1A. Simulink blocks.)
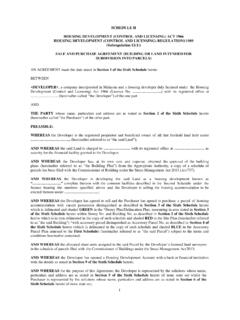
9 In this case, 31). we will build a simple on-off controller, using the signum function, a couple of constants DS1104 Temperature (one of them for the set point), Analog Input sensor and other useful elements. (ADCH5, pin P1A. 16). The circuits for the connection of the lamp and temperature sensor are shown below. High current/voltage Darlington drivers 5 Volts DS 2003. D1. Common Analog DIODE. Output Q1 DS2. 2N1070 1. 2. PIN RESISTOR. P1A 31 LAMP. Q2. 6 Volts - 2N1070 A. E-5 base k 3k RESISTOR RESISTOR. 5 Volts Temperature sensor Analog LM Input 35. PIN. P1A 16. The objective of the temperature Control system is to regulate the temperature at a fixed value in the face of ambient temperature disturbances ( you blowing on the physical experiment). Creating a New Experiment In ControlDesk, you create new experiments via the menu: File > New Experiment (note that we adopt the convention that italics are used for menu items and > is used to indicate a submenu).
10 Using ControlDesk to interact with a real-time program running on the DS1104 requires the simultaneous use of a number of files. These files are the generated executable program (*.ppc), variable description file used to relate to variables and parameters in the model (*.sdf), virtual instrument panels that you construct called layouts (*.lay), and possibly others depending on what actions you are performing. A ControlDesk experiment is the way you associate all these files to a single entity, thus the next time you need to run the same test you only need to load the experiment, which will automatically cause all the associated files to be loaded as well. When you create a new experiment via the above menu command, you get the figure below (well, a blank one; this one shows what was filled in) and you have to specify the experiment's name, and the working root directory.