Example: bankruptcy
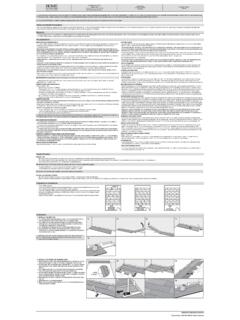
Assembly and Installation Instructions
screws, it is important to drill 3/16" pilot holes where the lag screws are to be attached. Use two 5/16" x 1-5/8" lag screws to connect the brackets securely to the jamb or the header. (Fig. 1, View B) Install the lag screws in the slots closest to the flag bracket if possible. Before proceeding to Step 2, make sure the carriage bolt(s) and the
Tags:
Information
Domain:
Source:
Link to this page:
Documents from same domain

Bottom Mount Refrigerator
images.thdstatic.comDimensions are for planning purposes only. For complete details, see Installation Instructions packed with product. Specifications subject to change without notice. Ref. W10635370B 2/15 2¹⁄₂" (6.3 cm) ¹⁄₂" (1.25 cm) To ensure proper ventilation for your refrigerator, allow for a ¹⁄₂" (1.25 cm) space on each side and at the top.
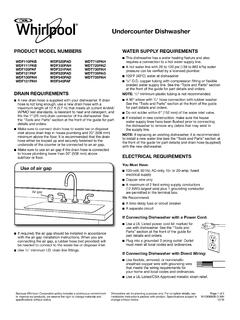
Undercounter Dishwasher
images.thdstatic.comsupply line. NOTE: If replacing an existing dishwasher, it is recommended to install a new water line (see the “Tools and Parts” section at the front of the guide for part details) and drain hose (supplied) with the new dishwasher. ELECTRICAL REQUIREMENTS You Must Have: 120-volt, 60 Hz, AC-only, 15- or 20-amp, fused electrical supply

LAUNDRY ACCESSORY GUIDE
images.thdstatic.comLAUNDRY ACCESSORY GUIDE. This quick reference guide to laundry accessories will help to make sure you have what . you need for a successful installation in just 3 easy steps. ... If your home was built before 1996 and has only a 3-wire connection, purchase a 3-prong dryer power cord. LG recommends a 4-wire connection and a 4-prong dryer power cord.

Unfinished Cabinetry orders deliver to the store within 3 ...
images.thdstatic.comTake in-stock cabinets home today or order through Express Options®. Express Options orders deliver to the store within 3 weeks; see an Associate or the Special Services Desk to place your order.* Most products are available when ordered through Express Options. In-Stock selection varies by store. Product Selection Unfinished

Electric Tankless Water heaters
images.thdstatic.comYour new electric tankless water heater features advanced water flow rate and temperature sensors designed to modulate power to the heating elements to maintain a user-selected output water temperature between 80°F (27°C) and 140°F (60°C) (subject to incoming water temperature and power of the selected heaters). ...

PERFORMANCE tankless electric water heaters offer ...
images.thdstatic.comPERFORMANCE™ tankless electric water heaters RHEEM PART NUMBER GPM RATING OF INSERTS PROVIDED CONNECTION SIZE RTE10001A 1.0, 1.5, 2.0 1/2" NPT RTE10001B 2.0, 3.0, 4.0, 5.0 3/4" NPT Optional Inline Flow Regulator • Enhanced outlet temperature control • Install on the outlet side of the heater • Limit maximum volume to the specified flow

PRODUCT GUIDE Interior & Exterior Doors (JPG013)
images.thdstatic.comInformation for Replacement weatherstrip Product Identification Weatherstrip Location Weatherstrip Type Color Amount Needed 1. Determine amount needed by measuring each piece to be replaced. Note the location on the door of each type of weatherstrip. 2. For each type of weatherstrip, add all measurements, then add an additional 10%. 3.

Heavy Electric Utility Heater Model: EG7500DGP “USER’S ...
images.thdstatic.com“USER’S MANUAL AND OPERATING INSTRUCTIONS” MODEL: Before the first use of this heater, please read this USER’S MANUAL very carefully. This USER’S MANUAL has been designed to instruct you as to the proper manner in which to assemble, maintain, store, and most importantly, how to operate the heater in a safe and efficient manner.
CONCRETE SUBFLOOR REQUIREMENTS NEW …
images.thdstatic.comApproved subfloors include concrete, plywood, OSB, particleboard, chipboard, hardwood (solid, engineered, parquet), tile (ceramic, terrazzo, stone, asbestos, peel and stick), non-cushion sheet vinyl, metal, VCT, DRIcore. Adhered and sound vinyl sheet goods, linoleum and resilient (VCT) tiles: Old vinyl and linoleum tiles or sheet goods normally ...

Electric Residential Hybrid Water Heater
images.thdstatic.comElectric Residential Hybrid Water Heater The purpose of this manual is twofold: one, to provide the installer with the basic directions and recommendations for the proper installation and adjustment of the water heater; and two, for the owner– operator, to explain the features, operation, safety precautions, maintenance and
Related documents

Aeronca 7AC Pilot Operating Handbook
www.blueridgesportflight.comPilot Operating Handbook, Champ 7AC 4-2 Covenant Aviation Check pitot/static tube 4.1.1.5 Landing Gear Bolts, nuts, tires, and brake cables Check strut to wheel cable Check fabric for damage 4.1.1.6 Windshield Check for Cleanliness. NOTE: Do not use abrasives or harsh chemicals, especially

CONVENTION - ICAO
www.icao.intpilot in regions open to civil aircraft shall be so controlled as to obviate danger to civil aircraft, Article - 9 ... cable thereafter at some designated airport within its territory. Article 10 Landing at Except in a case where, under the terms of this cuetoms

Quick Start Guide - Cisco
www.cisco.comcable. Ethernet (Yellow) SPA122 Only Can be used to connect to a device on your network, such as a computer, using an Ethernet cable. Internet (Blue) Connect to a broadband network device (DSL or cable modem) or a network router, using an Ethernet cable. Power Connect to a power source, using the provided power adapter.

D A VID BACH’S THE AUTOMATIC MILLIONAIRE
lifemanagement4filipinos.weebly.comHow To Use Your Pilot’s Guide How can you get the most out of your Pilot’s Guide? By using it in conjunction with the audio program. For each session, do the following: 1. Preview the section of the Guide that goes with the audio session. 2. Listen to the audio session at least once. 3. Complete the exercises in this Guide

QUIETCOMFORT 35 II - Bose
assets.bose.com(Shanghai) Pilot Free Trade Zone EU Importer: Bose Products B.V., Gorslaan 60, 1441 RG Purmerend, The Netherlands Taiwan Importer: Bose Taiwan Branch, 9F-A1, No.10, Section 3, Minsheng East Road, Taipei City 104, Taiwan Phone Number: 886 2 2514 7676
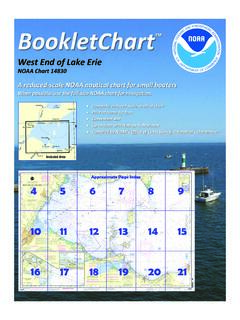
West End of Lake Erie - National Oceanic and Atmospheric ...
www.charts.noaa.govCaution. A subma rine cable crosses the inner end of Moseley Channel; vessels are cautioned not to drag anchor in this area. Sandusky is a customs port of entry. Toledo is a customs port of entry. Quarantine is enforced in accordance with the regulations of the U.S. Publ ic Health Service. (See Public Health Service, chapter 1.) Harbor regulations.

Tow-Pro Wiring Kit - Ford Ranger / Everest
www.redarc.com.au" Using a Ø2mm drill bit, drill out the pilot hole in the locations specified on the template (1)." Drill out the top hole to Ø3.5mm and the bottom hole to Ø10mm." Remove any plastic ribs interfering with the hole from behind. 5 3 2 1 1 " " " " Plug the Cat 5 …

STANDARD LIST OF MEDICAL EQUIPMENT & THEIR TS
www.who.int1. Patient cable 2. 6 chest limb electrodes 3. 4 limb electrodes 4. 4 strap electrodes 5. 6. 1 bottle ECG Gel 7. 2 rolls of paper or Z-Fold 8. Carry bag Standards CE; EC Marked US FDA; ISO certification 9 Operating theatre light (5 spotlights) 3 Surgical Lighthead with five Projectors , Ceiling Suspended Light intensity (Ec) at least150 000 lx
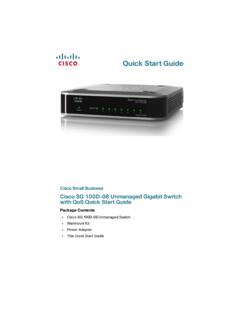
Quick Start Guide - Cisco
www.cisco.comCisco SG100D-08 Unmanaged Gigabit Switch Quick Start Guide 6 STEP 3 Insert a screw into each hole, leaving a gap between the surface and the base of the screw head of at least 0.1 inches (3 mm). STEP 4 Place the unmanaged switch wall-mount slots over the screws and slide the unmanaged switch down until the screws fit snugly into