Transcription of CATERPILLAR 3114, 3116, 3126 INJECTOR SLEEVE …
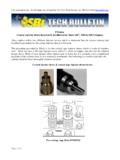
1 Irontite by Kwik-Way Inc. 500 57th Street, Marion, IA 52302 USA 800-423-3384 319-377-9421 FAX 319-377-9101 CATERPILLAR 3114, 3116 , 3126 injector sleeve REMOVAL & INSTALLATION 2-VALVE COPPER INJECTOR SLEEVED ENGINES SLEEVE Removal (1) Install the SLEEVE hold down clamp (437-6551-15) trough the inside of the SLEEVE . Install washer and nut onto stud sticking out from face of head and tighten. The clamp will keep the SLEEVE from turning while tapping the SLEEVE . Using tap (437-5331-36) and the tap & cutter guide bushing (437-6551-40) thread the upper end of the worn SLEEVE then remove. (2) With the assembled SLEEVE puller (437-6552-30), thread the threaded puller screw (437-6551-27) into the threaded end of the SLEEVE . Release the SLEEVE clamp by unscrewing the nut at the bottom end of the clamp. Then activate the assembled SLEEVE puller by turning the SLEEVE puller nut to pull the worn SLEEVE out of the INJECTOR hole.
2 (3) Very carefully clean out the INJECTOR hole. M ake sure to clean out any small rings of copper that may still be in the INJECTOR hole. Installing the Replacement INJECTOR SLEEVE (1) Brush the outside of the INJECTOR SLEEVE and the inside of the INJECTOR hold with a light coating of Ceramic Seal (468-9120-16). (2) Tap the new SLEEVE lightly to make sure that it is down flush with the bottom of the INJECTOR hole. (3) With the roll-in tool (655143) operating at about 50/100 RPM and the rollers covered with light oil all the time, let the tool feed on itself all of the way to the bottom of the SLEEVE . This should expand the larger end of the SLEEVE . (4) Using the slide hammer assembly (437-6995-25) with the tip expander driver (437-6551-25) and the tip expander (437-6551-21), tap the driver until the tip expander bottoms on the nose of the INJECTOR SLEEVE . Then withdraw the expanding unit. This should expand the smaller end of the replacement SLEEVE .
3 It may be helpful to use anti seize compound on the expander tip. Cutting the Seat in INJECTOR SLEEVE (1) On newly installed sleeves this operation is no longer mandatory, however it may be desired to insure proper INJECTOR seating. (2) On existing (used) sleeves, to clean up pitting or carbon tracking if required, use the SLEEVE seat cutter (437-6553-56) and the tap & cutter guide bushing (437-6551-40) keeping the cutter well lubricated with Tap-0 (468-9920-08) in a machining center at about 100 rpm s to removal minimal stock from SLEEVE . Revised 07-24-09 Irontite Products IncPO BOX 9877, Cedar Rapids, Iowa 52409 USA800-553-5953 - +1 319-377-9421 - +1 319-377-9101 (FAX)141204