Transcription of Model A Ford starter convert to 12 Volt - Diablo A's
1 Conversion of a Model A ford starter for 12 Volt operation By Dick Harrell Gra-Neva A s This presentation details converting a Model A starter for operation on a 12 Volt system. While a standard 6 volt starter will operate on a 12 volt system, I believe excessive stress placed on the starting system will, in time, cause unwanted starting system failures. I have heard several Model A ers boast of several years of successful operation of a 6 volt starter operating on 12 volts, but I have also heard of owners who have had multiple failures. A conservative, safe, and inexpensive practice is to modify your starter for 12 volt operation. It really isn t fun to burn up your starter switch or go fishing in the flywheel housing for broken starter drive (Bendix) bolts!
2 Excessive current flows when a 6 volt starter is connected to a 12 volt source. This high current causes a very high torque to be developed by the starter armature. These two factors, high current and high torque, place excessive stress on most all starter system components. A conversion of the starter for 12 volt operation will reduce the current by about 30% and provide adequate torque for good starting. Advantages of the 12 volt starter conversion are: 1) Reduces starting current and starter torque to safe values. 2) Extends the life of the starter switch. 3) Extends the life of the brushes and armature commutator. 4) Reduction of torque will extend the life of the starter drive (Bendix) and the flywheel ring gear.
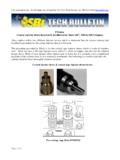
3 5) Low cost to convert . The results are reliability, and a conservative increase in starter performance giving a slightly higher cranking speed for quicker starts. The table below is a comparison of current for various combinations of starters and batteries. starter Battery Current 6 volts 6 volts 225 amps 6 volts 12 volts 320 amps 12 volts 12 volts 220 amps The method of conversion is to change the starter field circuit from a series-parallel circuit to a straight series circuit. See figure 1, the original starter circuit and figure 2, the circuit after modification. When a conversion is desired you need two starters. This conversion requires two pairs of left hand coils for the first starter and two pairs of right hand coils for the second starter .
4 Explanation: For the purposes of these discussions, view the starter field coil assembly from the brush end with the stud positioned at 12:00 o clock. Take the two original sets of four coils and label the coil pairs left hand (lh) and right hand (rh). Separate the lh and rh pairs and rearrange the coil sets such that you have 2 lh pairs together and 2 rh pairs together. Do not disturb the coil to coil jumpers on the far end of the coil pairs. A Jig for positioning field coils The jig will hold the coils in their correct position while forming and soldering jumpers and brushes. This jig can be made from an old starter housing, a set of 4 pole pieces, and 4 pole piece screws.
5 Cut about 2 off the brush end of the hosing except for a 1 wide section at the stud position. This jig is not necessary; it just makes positing the field coils easier. Modification of the right hand coil assembly Refer to figure 3. The first connection is from the stud to coil 1. As only one conductor is now connected to the stud, cut a long piece coil conductor from an old coil to fill the space. Do not solder the stud until the modified coil assembly is installed in the starter housing. The next connection will be made from coil 2 at 3:30 to coil 3 at 6:30. Form a loop on the coil 3 conductor to accept an insulated jumper from coil 2.
6 Jumpers should be made from 8 gauge stranded wire. Make this jumper about longer than required. This extra length will make alignment of the coils and pole pieces easier on final assembly. Shorten a brush lead to about 3 and connect to coil 4 at 9:30. The other brush requires an extension from coil 4 at 9:30 to the 7:30 position where the other brush is connected. To make this extension use an insulated jumper from coil 4 conductor to about 7:30 where the other brush is soldered. Use some bare copper wire to bind this connection prior to soldering. Important note: As one of the bolts used to assemble the starter passes between coils 3 and 4, form this extension so that it will not rub or be in contact with the bolt.
7 It is best to position this extension to pass the bolt to the center rather than the outside of the case. Test to be sure that the brushes will reach to the 4:30 and 10:30 positions. Now the starter coil connections may be soldered with the exception of the stud. Do not use a torch, use a soldering iron rated at 200 watts or more. Be sure that that the solder flows throughout the connection. Reinstall the coil assembly and pole pieces in the starter housing. Now solder the stud. Take care to reinstall the fish-paper insulator along the inside wall. This fish-paper should go under the coils but not extend under the pole pieces. Test fit the armature to check for drag on the pole pieces.
8 Place the armature in from the brush end, install mounting end plate and front (brush) plate, and make sure you installed the washer on the commutator end. The armature should turn freely with no drag. If the armature is dragging on the pole pieces possibly the bushings are worn or the pole pieces are not fully seated. Test for a short circuit, measure from the stud to the case with an ohmmeter, reading should exceed 50k ohms. Position the pole pieces for best contact with the case. Poor positioning will reduce the electromagnetic field developed by the field current and give poor starter performance. Complete the starter assembly. If your starter is in poor condition replacement of bushings, brushes, and turning the commutator may be required.
9 The starter bendix drive should be cleaned and repaired if necessary. Always use new bendix drive lock washers when reassembling. Modification of the left hand coil assembly Refer to figure 4. Coil 1 is connected to the stud at 12:00 as in the right hand assembly. At 8:30 connect a jumper from coil 2 to coil 3 at 5:30. At coil 4 form the coil conductor at 10:30. Connect both brushes to this point. All connections except the stud should now be soldered. Complete the assembly as in the right hand coil assembly discussion. Notes: Use brush assemblies with 4 lead length. Repair the insulation of the coils as required. Use cotton tape or cotton bias tape.
10 Use solid wax to impregnate insulation repairs and also wax the inside of the coils to aid in seating the pole pieces. The stud height above the case should measure 3/8 +- 1/16 . Thoroughly clean all connections to a bright finish then tin these surfaces. The joint should be mechanically sound prior to final soldering.