Transcription of Chapter 2 - Setting Excel Options
1 Microsoft Excel 2010 - Level 3 Watsonia Publishing Page 15 Setting Excel Options Chapter 2 Setting Excel Options All of Microsoft Excel s settings are located in the Excel Options dialog box. The Excel Options control the behaviour and appearance of Excel , enabling you to adjust the operation of the spreadsheet package to suit the way you work. In this session you will: gain an understanding of Excel Options learn how to personalise Excel learn how to set the default font learn how to set formula Options gain an understanding of Save Options learn how to set Save Options learn how to set file locations learn how to set the display Options . INFOCUS WPL_E832 Microsoft Excel 2010 - Level 3 Watsonia Publishing Page 16 Setting Excel Options UNDERSTANDING Excel Options All of Microsoft Excel s settings are accessible in the one dialog box, Excel Options .
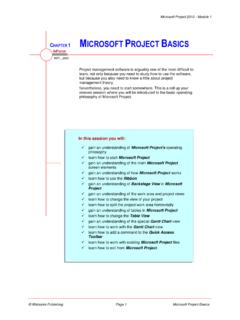
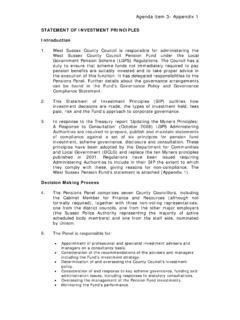
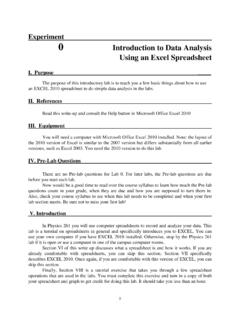
2 You can access this dialog box by clicking on the File tab and clicking on Options . The Excel Options dialog box provides a list of Setting categories (down the left-hand side) that you can click on to access the related settings. Category Description Popular These settings control some of the most popular Options , including the display and enabling of the Mini toolbar and Live Preview, as well as Options for personalising Microsoft Office. Some settings in this category affect all applications in Microsoft Office. Formulas The Formulas Options allow you to control the calculation of formulas, the performance of the worksheet in terms of calculations, and error handling. Proofing Proofing Options control the autocorrect and spelling settings. Save The location and format used when spreadsheets are saved are controlled by the Save settings. Language These settings control the language(s) used for spelling, help and screen tips.
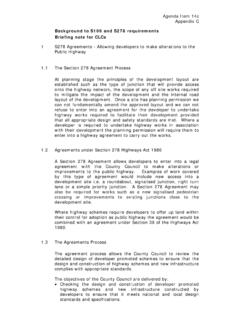
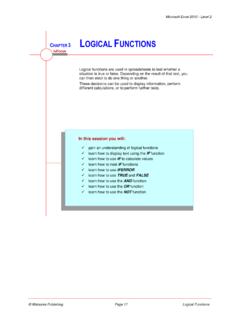
3 Advanced The Advanced settings control a wide range of Options , many of which will be familiar to those who have used the Tools > Options settings in earlier versions of Excel . Customise Ribbon These settings control the content of the Ribbon. Quick Access Toolbar These settings control the content of the Quick Access Toolbar. Add-Ins Add-ins are special programs that bring additional functionality to Microsoft Excel . Trust Centre The settings that protect your spreadsheets are stored in the Trust Centre. Categories Settings Microsoft Excel 2010 - Level 3 Watsonia Publishing Page 17 Setting Excel Options PERSONALISING Excel Try This Yourself: Before starting this exercise ensure that you have a blank spreadsheet Click on the File tab of the Ribbon, then click on Options to display the General page of the Excel Options dialog box Click in User name and type your name If text already appears in the field, triple-click in the field to select it, then type your Click on [OK] to save the settings Any new spreadsheet you create from now on will display your name as the Author For Your To personalise Excel : 1.
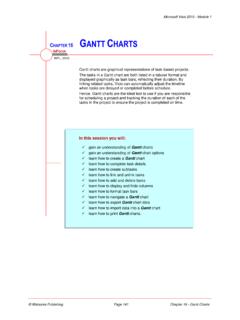
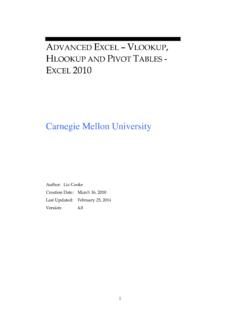
4 Click on the File tab of the Ribbon 2. Click on Options 3. Enter relevant details in User name Handy to In situations where workbooks are shared, the information that you enter in User name will be used by Microsoft Excel to show others who has a workbook open. The User name also appears in pre-set header and footer Options . 1 2 Every time you work in a Microsoft Office application, user information is added to the file behind the scenes. Some of this information is found on the Popular page of the Excel Options dialog box. The entries in these fields are used in various functions in Excel such as tracking changes and comments. User name is also used as the Author in Document Properties. Microsoft Excel 2010 - Level 3 Watsonia Publishing Page 18 Setting Excel Options Setting THE DEFAULT FONT Try This Yourself: Before starting this exercise ensure that a blank spreadsheet is Click on the File tab and click on Options Click on the drop arrow for Use this font to display a long list of available fonts The default is Body Font which is taken from the default theme and is Click on Arial Black then click on [OK] A message box will indicate that you must restart Excel for the changes to take Click on [OK] then close and restart Excel The new workbook will display Arial Black column and row Type Heading in the first cell and press The text, too, is in Arial Repeat steps 1 to 4 to restore the default Setting to Body Font For Your To set the default font: 1.
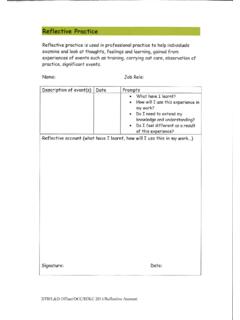
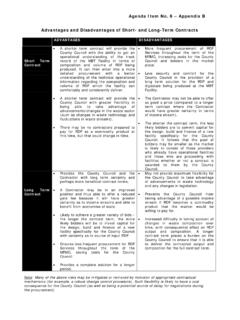
5 Click on the File tab and click on Options 2. Click on the drop arrow for Use this font and select the font 3. Click on [OK] 4. Click on [OK] then close and restart Excel Handy to The font that appears in the column and row headings and in the spreadsheet itself can be changed by applying an alternative theme or theme font. The Themes group of commands appears on the Page Layout tab on the Ribbon. 2 5 The default font is the font used for all text and values displayed or entered into a spreadsheet. The standard font used in Microsoft Excel 2010 is Calibri, 11pt, but you can select an alternative font if you need to. The font settings are located on the Popular page of the Options dialog box and affect only new workbooks. 6 Microsoft Excel 2010 - Level 3 Watsonia Publishing Page 19 Setting Excel Options Setting FORMULA Options Try This Yourself: Before starting this exercise ensure that a blank spreadsheet is Click on the File tab of the Ribbon and click on Options , then click on Formulas Click on Manual in Workbook Calculations, under Calculation Options , so that it appears selected Click on [OK] Type 1 in cell A1 and 2 in cell A2, then click on A3 and double-click on AutoSum on the Home tab to create and insert a SUM formula The total of 1 and 2 is Click on A1 and type 4, then press With manual recalculation, the total will not change until you tell Excel to Press to update the total Repeat steps 1 to 3, clicking on Automatic under Workbook Calculation to restore the calculation settings For Your To set formula Options : 1.
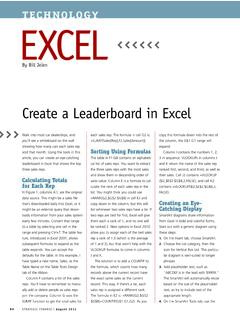
6 Click on the File tab and click on Options 2. Click on Formulas 3. Make the required changes 4. Click on [OK] Handy to A great innovation is the inclusion of Formula AutoComplete. This automatically displays help when you build a formula, especially where functions are involved, helping you complete functions accurately. 1 4 Formulas are such a big part of using spreadsheets that Excel has devoted an entire Options category to formula settings. They include Calculation Options , Working with formulas, Error Checking and Error checking rules. To help you understand what the settings do, Excel includes information icons which display relevant help when you hover over them. 5 6 Microsoft Excel 2010 - Level 3 Watsonia Publishing Page 20 Setting Excel Options UNDERSTANDING SAVE Options If you thought that saving a spreadsheet was as simple as clicking on the Save tool or pressing + , you d be right from your perspective.
7 From Excel s perspective, however, there is a whole lot more that goes on when you save a spreadsheet. The operation is controlled by the save settings that appear in the Excel Options dialog box. Save Settings Save files in this format Excel allows you to save your spreadsheets in a wide range of formats. Whatever you select here will be the format that Excel uses automatically to save the file unless you specify a different format when you save. Save AutoRecover information every 10 minutes Excel automatically creates a spreadsheet recovery file at the interval that you specify in minutes. You can specify a time from 1 to 120 minutes. If Excel crashes for any reason, the latest AutoRecover file will open when you next start Excel . You can then save the changes. AutoRecover file location This is the folder that the AutoRecover files are stored in. Default file location This is the folder that spreadsheets are automatically stored in.
8 It is also the folder that is opened when you click on the File tab of the Ribbon and select Open. This is the same folder as that shown in File Locations. Save date and time values using ISO 8601 date format Saves dates and times in Open XML files using the ISO 8601 format. Times are rounded to the nearest ISO 8601 time value supported by Excel . Excel 2007 requires a converter to open Open XML files with data saved in the ISO 8601 format. AutoRecover exceptions Allows you disable AutoRecover for a specific file. Save checked-out files to This specifies whether or not to save checked-out files to your computer or to the server. It is used for sharing spreadsheets. Server drafts location This specifies the local server drafts location that is used if your checked-out files are stored locally. Visual appearance Controls the colours that will be used when a file is opened in an earlier version of Excel .
9 Microsoft Excel 2010 - Level 3 Watsonia Publishing Page 21 Setting Excel Options Setting SAVE Options Try This Yourself: Before starting this exercise ensure that a blank spreadsheet is Click on the File tab of the Ribbon and select Options , to display the Excel Options dialog box, then click on Save Click on the drop arrow for Save files in this format and click on Excel 97-2003 Workbook (*.xls) Click on [OK] to save the changes Click on the File tab of the Ribbon and select Save Notice that Save as type is automatically set to Excel 97-2003 Workbook (*.xls).. Click on [Cancel] Repeat steps 1 to 4 and change Save files in this format back to Excel Workbook (*.xlsx) For Your To set save Options : 1. Click on the File tab and select Options 2. Click on Save 3. Change the settings as required and click on [OK] Handy to The Save as type Setting can be changed at the time that you save a file, but by making the change in Excel Options , the format you need will appear automatically, saving you time and reducing the likelihood that you ll use the wrong format accidentally.
10 1 4 The Save settings in Excel reside in the Excel Options dialog box. They can be used to modify the way Excel saves spreadsheets, enabling you to create backup copies automatically or specify a different default save format. This is great if you need to save all of your spreadsheets in Excel 97-2003 Spreadsheet format for compatibility reasons. Microsoft Excel 2010 - Level 3 Watsonia Publishing Page 22 Setting Excel Options Setting THE DEFAULT FILE LOCATION Try This Yourself: Before starting this exercise ensure that a blank spreadsheet is Click on the File tab of the Ribbon and click on Options , then click on Save Select the text in the Default file location and write the path down so that you can restore it later Type C:\Course Files for Excel 2010 Click on [OK] to apply the Setting Click on the File tab and select Open to display the Open dialog box Excel now automatically looks in the course files folder.