Transcription of Dell P2418HT User’s Guide
1 Model: P2418 HTRegulatory model: P2418 HTtDell P2418 HTUser s GuideNOTE: A NOTE indicates important information that helps you make better use of your : A CAUTION indicates potential damage to hardware or loss of data if instructions are not : A WARNING indicates a potential for property damage, personal injury, or 2017-2020 dell Inc. All rights reserved. This product is protected by and international copyright and intellectual property laws. dell and the dell logo are trademarks of dell Inc. in the United States and/or other jurisdictions. All other marks and names mentioned herein may be trademarks of their respective 11 Rev.
2 A04 ContentsAbout Your Monitor ..5 Package Contents .. 5 Product Features .. 6 Identifying Parts and Controls .. 7 Monitor Specifications.. 10 Plug-and-Play.. 19 LCD Monitor Quality and Pixel Policy.. 19 Setting Up the the Cables .. 20 Attaching the cable Cover ..21 Attaching the Stand .. 22 Using the Tilt and Swivel .. 25 Connecting Your Monitor.. 26 Organizing Your Cables .. 27 Removing the Monitor Stand.. 28 Wall Mounting (Optional).. 29 Operating the on the Monitor .. 30 Using the Front Panel Controls .. 30 Using the On-Screen Display (OSD) Menu.. 33 Contents | 34 | Contents Troubleshooting.
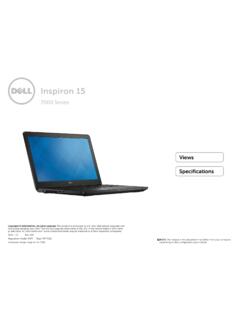
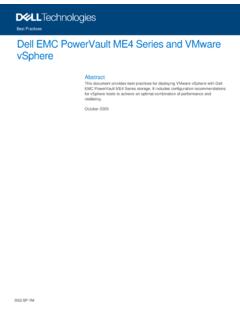
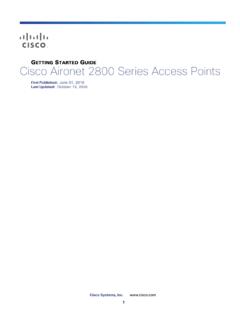
3 47 Self-Test .. 47 Built-in Diagnostics .. 48 Common Problems.. 49 Product Specific Problems ..51 Touchscreen Problems .. 52 Universal Serial Bus (USB) Specific Problems .. 52 Appendix ..54 Safety Instructions .. 54 FCC Notices ( only) and Other Regulatory Information .. 54 Contacting dell .. 54EU product database for energy label and product information sheet.. 55 Setting Up Your Monitor .. 55 Maintenance Guidelines.. 57 About Your Monitor | 5 About Your Monitor Package ContentsYour monitor ships with the components shown below.
4 Make sure that you have received all the components and contact dell if something is missing. NOTE: Some items may be optional and may not ship with your monitor. Some features or media may not be available in certain Stand riser Stand base cable cover Power cable (varies by country)6 | About Your MonitorUSB upstream cable (enables the USB ports on the monitor)DP cable (DP to DP)VGA cable cable sleeve Quick Setup Guide Safety,Environmental,and Regulatory Information Product FeaturesThe dell P2418HT monitor has an active matrix, thin film transistor (TFT), liquid crystal display (LCD), and LED backlight.
5 The monitor features include: cm ( ) active area display (Measured diagonally) 1920 x 1080 (16:9 aspect ratio) resolution, plus full-screen support for lower resolutions. Tilt and swivel adjustment capability. Removable pedestal and Video Electronics Standards Association (VESA ) 100 mm mounting holes for flexible mounting solutions. Extensive digital connectivity with DP, VGA, HDMI, and USB helps future-proof your monitor. Plug and play capability if supported by your system. Optimize eye comfort with a flicker-free screen and ComfortView feature which minimizes blue light emission.
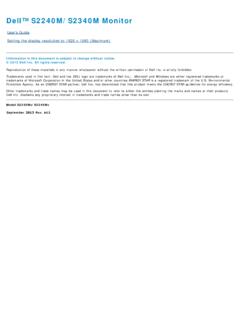
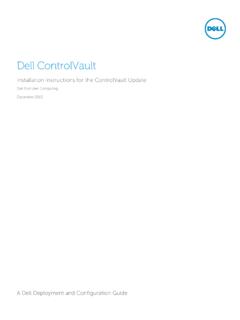
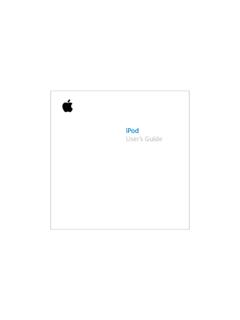
6 On-Screen Display (OSD) adjustments for ease of set-up and screen optimization. Security lock slot. Supports Asset Management Capability. Arsenic-Free glass and Mercury-Free for Panel only. Energy Gauge shows the energy level being consumed by the monitor in real time. W in Standby Mode. About Your Monitor | 7 Identifying Parts and ControlsFront viewLabelDescription1 Function buttons (For more information, see Operating the Monitor)2 Power on/off button (with LED indicator)8 | About Your MonitorBack View LabelDescriptionUse1 VESA mounting holes (100 mm x 100 mm-behind attached VESA cover)Wall mount monitor using VESA-compatible wall mount kit (100 mm x 100 mm).
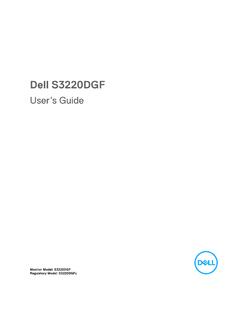
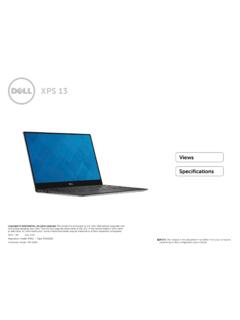
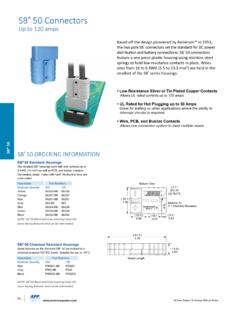
7 2 Regulatory labelLists the regulatory lock slotSecures monitor with security cable lock (sold separately).4 Stand release buttonRelease stand from , serial number, and Service Tag labelRefer to this label if you need to contact dell for technical hookUse to route routing labelShows how to route management slotUse to organize cables by placing them through the ViewUSB downstream portPort with battery icon supports BC About Your Monitor | 9 Bottom ViewLabelDescriptionUse1AC power connectorTo connect the monitor power connectorConnect your computer with HDMI cable (optional purchase).
8 3DP connector Connect your computer with DP connector Connect your computer with VGA line-out portConnect speakers to playback audio coming through HDMI or DP audio supports 2-channel : The audio line-out port does not support : Excessive sound pressure from earphones or headphones can cause hearing damage or upstream portConnect the USB cable that comes with your monitor to the computer. Once this cable is connected, you can use the USB downstream connectors on the monitor and the touch screen function on the downstream portsConnect your USB device. You can only use this connector after you have connected the USB cable to the computer and USB upstream connector on the monitor.
9 8 Stand lockLock the stand to the monitor using a M3 x 6 mm screw (screw not included).10 | About Your MonitorMonitor SpecificationsScreen typeActive matrix - TFT LCDP anel TypeIn-plane switching TechnologyAspect ratio16:9 Viewable image dimensions cm ( inches) Active Area mm ( inches) mm ( inches) mm2 ( inches2)Pixel mm x mmPixel per inch (PPI)93 Viewing angle Horizontal178 (typical) Vertical178 (typical)Brightness250 cd/m (typical)Contrast ratio1000 to 1 (typical)Dynamic contrast ratio8,000,000:1 Display screen coatingAnti-glare treatment of the front polarizer (3H) hard coatingBacklightWhite LED, EDGELIGHT systemResponse Time 6 ms typical (G to G)Color million colorsColor gamutCIE 1976 (84%), CIE 1931 (72%)NOTE.
10 Color gamut is based on CIE 1976 (84%) and CIE 1931 (72%) test 1 x DP (HDCP ) 1 x VGA 1 x HDMI (HDCP ) 2 x USB downstream port 1 x USB downstream port 1 x USB with BC charging capability at 2A (max) 1 x USB upstream port 1 x Analog audio line out ( mm jack)Border width (edge of monitor to active area) mm (Top) mm (Left/Right) mm (Bottom)Adjustability About Your Monitor | 11 Height adjustable stand 0 to 90 mm Tilt-5 to 60 Swivel-30 to 30 Pivot NACable managementYesDell Display Manager (DDM)CompatibilityEasy Arrangeand other key featuresSecurity Security lock slot ( cable lock sold separately) Anti-theft stand lock slot (to panel)TouchType Projected Capacitive System Panel Diagonal inchActive Area mm ( inches) mm ( inches) mm2 ( inches2)Input Method Bare finger Touch point 10 touch-pointsTouch response time 35 msTouch resolution4096 x 4096 Touch method Fingers Operating systemWindows 10 CertifiedResolution SpecificationsHorizontal scan range30 kHz to 83 kHz (DP/HDMI/VGA)Vertical scan range50 Hz to 76 Hz (DP/HDMI/VGA)