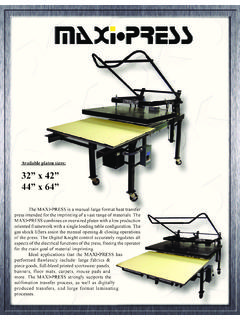
Transcription of Digital Combo Multi-Purpose Press
1 1 Version 1-09 Digital ComboMulti- purpose Press2 ContentsIntroduction ..3 Setup & Suggestions ..4 Normal Operation ..5 Normal Operating Mode ..5 Setting Temperature ..5 Setting Time ..6 Pre- Press Timer ..6 Setting Pressure ..7 Digital Pressure Bar Graph ..7 Guidelines & Standard Settings ..8 ERR Mode ..9 Over-Temp Alarm ..9 Using Attachments ..10 Removing a Heat Platen ..10 Attaching a heat platen ..11 Cap Hold-down Device (For Cap Attachment Only) ..12 Aligning the Pedestal ..12 Optional Forms / Custom Pedestals ..12 How to use the Cap How to use the Mug Attachment.
2 13 How to use the Plate Attachment ..14 Pressing Ceramic Tile ..14 Programmable Presets ..15 How Presets Loading a Preset ..15 Editing/Programming a Preset ..16 A Walkthrough Tutorial for using Presets ..17 User Menus ..18 Entering the user menus & options ..18 Fahrenheit / Celsius ..18 Timer Counter Units ..18 Recorded Pressings (User Odometer) ..19 Pressure Minimum ..19 Pressure Temperature Drop Sense ..20 Keypad Beeper ..21 Alarms ..21 Finished Warning Beep ..22 Prepress Timer ..22 Prepress Alarms ..23 Operator Lockout ..23 Parts / Maintenance / Misc.
3 24 Interchangeable Maintenance ..24 Replacement Parts ..25 Wiring Diagram ..26 Troubleshooting ..27 Troubleshooting (cont.) ..28 Limited Warranty ..293 IntroductionCongratulations on your purchase of the DC16 Digital Combo Press ! This heat Press machine has many exciting features, all of which are meant to help make your heat transfer pressing endeavors as successful and easy as possible. Please take the time now to thoroughly read through this manual to become acquainted with them. It will explain some key features, concepts and methods that will save much time and effort in using this Press and in your heat pressing this manual, many areas and components of this machine will be referred to by specific names.
4 Please refer to the illustrations below in order to become familiar with some of the terminology used in this KnobTop HeadClamp/Linkage Pwr Inlet/On-OffHeat PlatenStop CollarLower TableSilicone PadPedestalGibb PlatesBaseTemperature F/ C IndicatorReady/Heating IndicatorOpen/Timing/Done Bar GraphTEMP keyPRG keyUp/Down Arrow keysDefault Operating Mode of Controller4 Setup & Suggestions Locate the Press on a firm, sturdy work surface. It is recommended but not necessary to bolt the Press to a workbench using the rear mounting holes on the base frame. A stand on lockable casters is available from Geo Knight & Co or your distributor.
5 The height of the bench/work space the Press is located on would be ideally 25 to 30 high. The higher the Press , the more difficult to close/lock. Attach the power cord from the rear to the underside of the top head. There is a power inlet under the top head that the modular cord will plug into. It is HIGHLY RECOMMENDED that the cord be strapped or tied to the back white post of the Press , so that the cord is not pulled on and tugged out of the power inlet where it plugs into the Press . TEST and make sure the cord travels freely when swinging the Press , and that there is no tension or pulling on the inlet socket where the power cord plugs into the head.
6 Make sure the cord can not be pressed by the heater. The Press should remain in the unclamped OPEN position when not in use. Do not leave the heater block closed on the table when not using, unless transporting. The top head should be swung over the pressing table when not in use. Do not leave the platen down on the silicone pad when heating. Always leave the heat platen in the UP OperationNormal Operating ModeThe normal operating mode of the Press will display the current actual Temperature at the top of the screen and the time setting or elapsed time below the temperature.
7 The right side the screen will indicate the heating status by stating HEATING, READY, both of those words, or none at all, depending on if it is cooling down or heating up to the set temperature. READY is shown only if the current temperature is within 5 degrees of the set point temperature. The right side of the screen will also indicate the timing status by stating OPEN, TIMING or DONE. The DONE indicator may remain on in some cases until the Press is opened back the pressure feature is enabled, the pressure bar graph will show the last known pressure exerted when the Press was TemperatureFrom the normal operating mode, simply Press the TEMP key to set the flashing 3-digit number is the temperature setting (not the actual current temp).
8 Use the Arrow Keys to set the desired temperature. Hold them down to increase rapidly, Press both together to set it to 350 TEMP again to lock in the TimeFrom the normal operating mode, simply use the Arrow Keys ONLY to set the time. Do not touch the PRG down either the Up or Down arrow key for more than 2 seconds and the time will increase BOTH Arrow Keys and the time will reset to 00 TimerThere is a second timer available for use, called the Pre- Press Timer . This feature is useful if a multiple-step process is performed.
9 For example: If a product must be pre-pressed for 5 seconds before a main pressing cycle of 20 seconds, the Prepress timer can be set for 5 secs, and the main timer for 20. When the operator closes the Press , the 5-sec time counts down. When the operator opens the Press , the time setting switches to 20 word PREPRESS will be displayed next to the pre- Press time setting when it is active. To set the pre- Press time, simply use the Arrow Keys to set the time. If PREPRESS is not displayed next to the time, quickly close and then open the Press to switch to the prepress turn ON the prepress timer feature, enter the User Options Menus (see page 18) and go to the PPR setting and turn it ON.
10 (see page 22)7 The Digital Pressure Bar Graph indicates a basic 0-9 scale of pressure exerted. The pressure bar graph resets when the Press is closed/locked while timing. If the pressure adjustment has been changed, or a different thickness item has been placed in the Press , the pressure bar graph will not change until the Press is closed and locked and the timer is bar graph is directly related to the amount of pressure, or resistance, being felt and applied to the bottom table. If a thicker item is placed in the Press , and no adjustments are made to the pressure knob, then the amount of pressure clamping down will be greater, and the bar graph will show a higher number.