Transcription of EXTERNAL SLIM DVD DRIVE USER MANUAL
1 0 ENGLISH EXTERNAL SLIM DVD DRIVE USER MANUAL Rev Aug 2009 ENGLISH SAFETY NOTICES Please read carefully and keep this User s MANUAL for future reference. Please carefully note the Cautions and Warnings. 1. Always install electrical equipment close to an electrical outlet and ensure that the outlet is easily accessible. 2. Place power cords where people will not step on or trip over them. Do not place any objects over the power cords. 3. Always install equipment on a stable surface to avoid damages and/or injuries. 4. Do not place computer equipment in direct sunlight, on top of any heating units, or near any electrical appliances that draw large amounts of current. 5. Computer equipment enclosures often have openings for air convection.
2 To protect equipment from overheating, do not cover or block air convection openings. 6. Ensure that the equipment is connected to a power outlet with proper voltage. 7. If computer equipment is not is use for long period of time, it is recommended to disconnect it from the power outlet to avoid damage by transient power surges. 8. Protect electrical equipment from humidity. 9. Always disconnect computer equipment from the electrical outlet before cleaning. Do not use liquid or sprayed detergent for cleaning use a moist cloth. 10. Never pour any liquid into computer equipment openings; internal contact with liquid could cause fire or electrical shock. 11. Keep the area around your computer equipment clear of dust, smoke, and other contaminants. 12. Never open this DRIVE s enclosure. For safety reasons, the DRIVE should be opened only by qualified service personnel.
3 13. Do not drop or jolt the DRIVE . 14. If you see any of the following condition, contact a qualified service personnel: (a) The power cord or plug is damaged. (b) Liquid has penetrated into the equipment. (c) The equipment has been exposed to moisture. (d) The equipment has not worked well or you can not get it to work according to the user s MANUAL . (e) The equipment was dropped and damaged. (f) The equipment has obvious signs of damage. 15. DANGER: Invisible laser radiation when opened. Avoid direct exposure to beam. Complies with FDA radiation performance standards, 21 CFR, subchapter J. laser power : Wave Length: 783 3nm (CD); 658 3nm (DVD). Emission power : mW. laser diode : class 3b. 16. DO NOT STORE THIS EQUIPMENT IN AN ENVIRONMENT WITH TEMPERATURE ABOVE 60 C (140 F). Excessive heat may damage the equipment. 17. The sound pressure level at the operator s position according to IEC704-1:1982 is equal to or less than 70 dB (A).
4 2 ENGLISH CAUTIONS CAUTION: Do not attempt to open the DRIVE for service. Removing the cover may cause exposure to harmful laser radiation and electrical shock. To obtain service, return the defective DRIVE to the vendor where the DRIVE was purchased. Always use the original package for transporting the DRIVE . The original packaging was designed and tested to protect your DRIVE under rough conditions. Keep your CDs and DVDs surfaces clean. Use a soft, dust-free cloth to clean the disc surface before use in the DRIVE can help protect the DRIVE . The copyright laws of each country govern the reproduction of copyrighted materials. The person using this DRIVE may be liable making unauthorized copies of copyrighted works. It is recommended to create an image on HDD during copying process, instead of "copy on the fly mode. Therefore we recommend the user reserving sufficient buffer space for creating a image file (at least 650MB for CD; 5GB for DVD; and if your DRIVE support Double Layer DVD+R or Dual Layer DVD-R writing, then at least 9GB space is needed).
5 Do NOT use a damaged, cracked or low-quality disc as it may shatter during read or write operation when disc is spinning at high speed. ENGLISH TABLE OF CONTENTS INTRODUCTION What You Can Do with the DVD Writer ..4 Format Recording Modes Supported ..5 System Requirement ..6 Features and Controls Front Rear INSTALLATION .. 9 OPERATION Install Device Driver and Using the DRIVE ..10 Software Insert and Remove Disc ..11 Recording & Playing Recording CDs & Playing Playing DVD Movies with Region Code ..12 About Software & LightScribe Guide LightScribe Requirement ..13 Creating and Burning LightScribe Labels ..14 Frequently Asked Questions about TROUBLESHOOTING Read Write Declarations and Acknowledgement .. 18 4 ENGLISH INTRODUCTION This EXTERNAL EXTERNAL DVD/CD writer provides professional quality and performance for writing, rewriting and reading DVD and CD media.
6 It supports Running OPC (ROPC) technology and is compatible with Windows Plug & Play function. In addition, the DRIVE is equipped with innovate technologies to eliminate buffer-underrun errors, so you are free to use your computer for other tasks while the DRIVE is writing to DVD or CD. With an internet connection, you can download the latest firmware, then update this DRIVE so it will support latest technologies. NOTE: The DRIVE s maximum write, rewrite and read speeds are noted on the original package. What You Can Do with the DVD Writer Archive data files onto recordable or rewritable DVDs or CDs Archive images and videos onto recordable or rewritable DVDs or CDs Record digital video or slide shows onto DVD+R, DVD+RW, DVD-R, and DVD-RW discs Read DVD+R, DVD+RW, DVD-R, DVD-RW, CD-R and CD-RW discs Play music CDs Play VCD & DVD movies Access interactive reference materials stored on DVDs Master new software programs on DVDs or CDs Create and burn LightScribe labels* DVD functions: Write to DVD+R and DVD-R (recordable DVD) media Write to double-layer DVD+R (recordable DVD+R9) and dual-layer DVD-R (recordable DVD-R9) media* Write to DVD+RW and DVD-RW (re-writable DVD) media Read DVD-ROM, DVD+R, DVD-R, DVD+RW, DVD-RW, DVD+R9 and DVD-R9 discs.
7 Read or write to DVD-RAM media* CD functions: Write to CD-R (recordable CD) media Write to ultra-speed CD-RW (rewritable CD) media Read CD-ROM and CD-R data media, and CD-RW and CD-DA (audio) media * indicates functions only supported by certain models. To check if your DRIVE supports these functions, check the original packaging for feature listed, or visit us online for detailed specifications ENGLISH Format Compatibility DVD write: DVD+R Version , DVD-R writing), DVD+RW Version , DVD-R Version , and DVD-RW Version , DVD+R9 Version , DVD-R9 Version (for drives that support DVD double/dual-layer) DVD-RAM Version (for drives that support DVD-RAM rewriting) DVD read: DVD-ROM single/dual layer (PTP, OPT), DVD-R, DVD+R, DVD+R9, DVD-R9, DVD-RW, DVD+RW, DVD-RAM (only for drives that support DVD-RAM reading), DVD-Video, DVD-Audio, DVD-CPRM.
8 CD write: Orange Book Part 2 CD-R Volume 1, Part 2 CD-R Volume 2 Multi Speed, Part 3 CD-RW Volume 1 Low Speed, Part 3 CD-RW Volume 2 High Speed, Part 3 CD-RW Volume 3 Ultra Speed CD read: CD-DA, CD-TEXT, CD ROM Mode-1, CD-ROM/XA Mode-2 Form-1 and Form-2, CD-I Ready, Video-CD, Karaoke-CD, Photo-CD, Enhance CD, CD extra, UDF(fixed/variable Packet mode), Multi-session, CD Plus, CD-R, and CD-RW. Recording Modes Supported Track at Once Data can be recorded to disc one track at a time. New tracks can be added later. This mode requires the disc to be closed (through the software application) before music CDs can be played back in a CD player or CD-ROM DRIVE . Disc at Once Data can be recorded to an entire disc in one pass. In this mode, new data can not be added later. Session at Once Data can be recorded to a disc one session at a time.
9 In this mode, new sessions can be written later. This mode allows more disc space to be used than multi-session mode allows, because no gap is created between sessions. Multi Session Data can be recorded to a disc in one session. In this mode, new sessions can be written later. This mode allows less disc space to be used than session-at-once mode allows, because a gap is created between sessions. Packet Writing Data can be added directly to or deleted from rewritable media. (Useful for data backup.) This mode requires software that supports packet writing. 6 ENGLISH SYSTEM REQUIREMENT System Requirements To ensure read/write/rewrite performance, a Windows-based PC system with the following specification is recommended: CPU Pentium 4 or higher Operating System Microsoft Windows 2000/XP/Vista and Windows-7 Memory 128 MB RAM (256 MB recommended for video editing) Hard DRIVE Minimum 800 MB free spaces for creating a CD image file; Minimum 10 GB free spaces for creating a DVD video image file Interface (A second port maybe needed for additional power !)
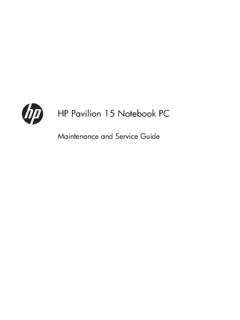
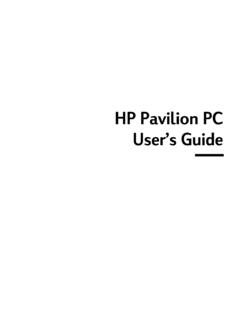
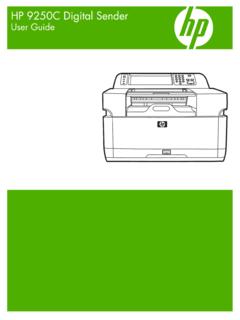
10 See Installation Section for detail) ENGLISH FEATURES AND CONTROLS Front View Tray-Load Type DRIVE Figure: Front view of tray-load type DRIVE A Eject Button Push button to eject the tray. B Status LED Indicator of DRIVE 's status. A blinking LED means the DRIVE is in writing or reading mode. C Emergency Eject Hole Used when tray can not be ejected by pressing Eject Button or when the DRIVE has no power . CAUTION: Always ensure the power to the DRIVE is OFF when performing MANUAL eject. Slot-Load Type DRIVE Figure: Front view of slot-load type DRIVE A Status LED Indicator of DRIVE s status. A blinking LED means the DRIVE is in writing or reading mode. B Eject Button Push button to eject the disc. C Loading Slot The slot where a disc is loaded in. 8 ENGLISH Top-load Type DRIVE Figure: Front view of top-load type DRIVE A Stop Button Press the STOP button to stop the disc from spinning.