Transcription of eZ430-F2013 Development Tool User's Guide
1 eZ430-F2013 Development Tool User's Guide Literature Number: SLAU176D. February 2006 Revised June 2010. 2 SLAU176D February 2006 Revised June 2010. Copyright 2006 2010, Texas Instruments Incorporated Preface .. 4. 1 Kit Contents, eZ430-F2013 .. 5. 2 eZ430-F2013 Overview .. 5. 3 Software Installation .. 6. 4 Hardware Installation .. 6. 5 Flashing the LED Demo Using IAR .. 6. 6 Flashing the LED Demo Using CCS .. 7. 7 Using the MSP430F2013 Target Board and Debugging Interface Independently .. 7. 8 Where To Go For More Information .. 7. 9 Frequently Asked Questions .. 8. 10 Schematics .. 9. SLAU176D February 2006 Revised June 2010 Table of Contents 3. Copyright 2006 2010, Texas Instruments Incorporated Preface SLAU176D February 2006 Revised June 2010. Read This First If You Need Assistance Support for the MSP430 device and the eZ430-F2013 is provided by the Texas Instruments Product Information Center (PIC). Contact information for the PIC can be found on the TI web site at Additional device-specific information can be found on the MSP430 web site at and NOTE: Kickstart is supported by Texas Instruments Although Kickstart is a product of IAR, Texas Instruments provides the support for it.
2 Therefore, please do not request support for Kickstart from IAR. Please consult the extensive documentation provided with Kickstart before requesting assistance. FCC Warning This equipment is intended for use in a laboratory test environment only. It generates, uses, and can radiate radio frequency energy and has not been tested for compliance with the limits of computing devices pursuant to subpart J of part 15 of FCC rules, which are designed to provide reasonable protection against radio frequency interference. Operation of this equipment in other environments may cause interference with radio communications, in which case the user at his own expense will be required to take whatever measures may be required to correct this interference. 4 Preface SLAU176D February 2006 Revised June 2010. Copyright 2006 2010, Texas Instruments Incorporated User's Guide SLAU176D February 2006 Revised June 2010. eZ430-F2013 Development Tool 1 Kit Contents, eZ430-F2013 . One eZ430-F2013 .
3 The hardware is housed inside a plastic enclosure that may be opened in order to separate the MSP-EZ430D target board from the MSP-EZ430U debugging interface. One MSP430 Development Tool CD-ROM which contains several documents including the following related to the eZ430-F2013 : MSP430x2xx Family User's Guide , SLAU144. MSP-FET430 FLASH Emulation Tool User's Guide , SLAU138. MSP-FET430 FLASH Emulation Tool User's Guide Errata, SLAZ027. eZ430-F2013 User's Guide (this document). IAR Embedded Workbench KickStart Version Code Composer Studio MCU Edition 2 eZ430-F2013 Overview The eZ430-F2013 is a complete MSP430 Development tool providing all the hardware and software to evaluate the MSP430F2013 and complete an entire project in a convenient USB stick form factor. The eZ430-F2013 uses the IAR Embedded Workbench or Code Composer Studio Integrated Development Environment (IDE) to provide full emulation with the option of designing a stand-alone system or detaching the removable target board to integrate into an existing design.
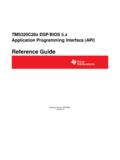
4 The USB port provides power to operate the ultra-low-power MSP430 so no external power supply is required. All 14-pins on the MSP430F2013 are accessible on the MSP-EZ430D target board for easy debugging and interfacing with peripherals. Additionally, one of the digital I/O pins is connected to an LED for visual feedback. The MSP430F2013 includes 16-MIPS performance, a 16-bit Sigma Delta Analog-to-Digital converter, a 16-bit timer, Watchdog timer, brownout detector, a USI module supporting SPI and I2C, and five low-power modes drawing as little as A standby. Figure 1. eZ430-F2013 Development Tool SLAU176D February 2006 Revised June 2010 eZ430-F2013 Development Tool 5. Copyright 2006 2010, Texas Instruments Incorporated Software Installation 3 Software Installation The latest versions of these IDEs are available from the MSP430 web site at 1. Insert the MSP430 CD-ROM into your computer. It should start automatically, and the MSP430 start page will then be displayed. You can also use a browser to open " " that is located in the root directory of the MSP430 CD-ROM.
5 The eZ430-F2013 is compatible with Windows XP. 2. Select Software IAR Workbench Kickstart or Software Code Composer Studio and follow the instructions. 3. Respond to the prompts to install the software. The installation procedure will install IAR and TI files. Finish the installation. 4 Hardware Installation 1. Install IDE of preference, either IAR or CCS. 2. Drivers will be installed automatically during IDE install. 3. Plug in the ez430 emulator. 5 Flashing the LED Demo Using IAR. This section demonstrates how to setup a project for the eZ430-F2013 and download the application to the MSP430F2013. The sample program will blink the LED on the MSP-EZ430D target board. Start the Workbench (Start Programs IAR Systems IAR Embedded Workbench Kickstart for MSP430 V3 IAR Embedded Workbench). 1. Use File Open Workspace to open the file at C:\Program Files\IAR Systems\Embedded Workbench \430\ FET_examples\Flashing the The workspace window will open. 2. Click the msp430x2xx (C SpyBiWire) tab at the bottom of the workspace window that corresponds to the eZ430-F2013 .
6 3. Set the correct device by clicking on Projects Options General Options Target and select the MSP430F2013 from the device list. 4. In the Options windows, go to FET Debugger Setup Connection and select TI USB FET to use the USB Interface. 5. Use Project Rebuild All to build and link the source code. You can view the source code by double-clicking on the project, and then double-clicking on the displayed source file. 6. Use Project Download & Debug to start the C-SPY debugger. C-SPY will erase the device Flash, and then download the application object file to the device Flash. 7. Use Debug Go to start the application. The LED should flash! 8. Use Debug Stop Debugging to stop debugging, to exit C-SPY and to return to the Workbench. 9. Use File Exit to exit the Workbench. Congratulations, you've just built and tested your first MSP430 application. 6 eZ430-F2013 Development Tool SLAU176D February 2006 Revised June 2010. Copyright 2006 2010, Texas Instruments Incorporated Flashing the LED Demo Using CCS.
7 6 Flashing the LED Demo Using CCS. This section demonstrates how to setup a project for the eZ430-F2013 and download the application to the MSP430F2013. The sample program will blink the LED on the MSP-EZ430D target board. Start CCS (Start Programs Texas Instruments Code Composer Studio v4 Code Composer Studio v4). 1. Project Import Existing CCS/CCE Eclipse Project 2. Select Root Directory: C:\Program Files\Texas Instruments\CCSv4\msp430\examples\exampl e projects\msp430x2xx C Example 3. Click Finish. 4. Use Target Debug Active Target to begin the debug session. 5. If there is a device mismatch, click ignore. 6. Use Target Run to start the application. 7. Observe blinking LED. 8. Use Target Terminate All to exit debug session. 9. Use File Exit to exit the IDE. Congratulations, you've just built and tested your first MSP430 application. 7 Using the MSP430F2013 Target Board and Debugging Interface Independently The eZ430-F2013 may be used as a stand-alone Development board.
8 Additionally, the MSP-EZ430D. target board may also be detached from the debugging interface and integrated into another design. The plastic enclosure can be removed to expose the MSP-EZ430U debugging interface and the MSP-EZ430D target board. The MSP-EZ430D target board is disconnected from the debugging interface by gently pulling the two boards apart. The target board can be used in a stand-alone design by interfacing to the 14-pins of the MSP430F2013. Holes in the MSP-EZ430D target board provide direct access to each pin of the MSP430F2013. Please refer to the MSP430F2013 Data Sheet for descriptions of each pin's function. The MSP-EZ430U debugging interface may also be used as a standard Flash Emulation Tool for all devices in the MSP430F20xx family of microcontrollers. Target boards using other supported MSP430F20xx devices may be designed and flashed using the MSP-EZ430U debugging interface. 8 Where To Go For More Information The primary sources of MSP430 information are the device-specific data sheets and User's guides.
9 The most up to date versions of the User's Guide documents available at the time of production have been provided on the CD-ROM included with this tool. The most current information is found at Information specific to the eZ430-F2013 Development tool can be found at MSP430 device User's guides and the FET User's Guide may be accessed from the main page on the CD-ROM under the User's Guides section. The FET User's Guide includes detailed information on setting up a project for the MSP430 using IAR or CCS. Documents describing the IAR tools (Workbench/C-SPY, the assembler, the C compiler, the linker, and the librarian) are located in common\doc and 430\doc. The documents are in PDF format. Supplements to the documents ( , the latest information) are available in HTML-format within the same directories. 430\doc\ provides a convenient starting point for navigating the IAR documentation. Documents describing CCS are located in the CCS "documentation" folder. This folder contains the CCS.
10 User's Guide in PDF format. SLAU176D February 2006 Revised June 2010 eZ430-F2013 Development Tool 7. Copyright 2006 2010, Texas Instruments Incorporated Frequently Asked Questions 9 Frequently Asked Questions 1. What devices can be programmed with the MSP-EZ430U debugging interface? MSP430F200x, 'F201x, 'G2x01, 'G2x11, 'G2x21, and 'G2x31. 2. Does the eZ430-F2013 support fuse blow? The MSP-EZ430U debugging interface lacks the JTAG security fuse blow capability. To ensure firmware security on devices going to production, the USB Flash Emulation Tool or the Gang Programmer, which include the fuse blow feature are recommended. 3. What is the voltage supplied to the MSP-EZ430D target board from the debugging interface? The MSP-EZ430U debugging interface supplies a regulated V to the MSP-EZ430D target board. 4. Can other programming tools interface to the MSP-EZ430D target board? The MSP-EZ430D target board will work with any programming tool supporting the 2-wire Spy Bi-Wire interface.