Transcription of FLIGHT SIMULATOR QUICK START GUIDE - aerosoft2.de
1 FLIGHT SIMULATORQUICK START GUIDEX-Plane 10 Aerosoft GmbH 201223 Developed by: Laminar ResearchCopyright: 2012/ Aerosoft GmbH Airport Paderborn/Lippstadt D-33142 Bueren, Germany Tel: +49 (0) 29 55 / 76 03-10 Fax: +49 (0) 29 55 / 76 03-33 E-Mail: Internet: All trademarks and brand names are trademarks or registered of their respective owners. All rights reserved. 23 QUICK START GuideX-Plane 10 Aerosoft GmbH 201245 ContentQuick START GUIDE .. Installing X-Plane .. Launching X-Plane .. Conguring Essential Yoke/Joystick Functions .. Selecting an Aircraft .. Selecting a Location .. Getting Off the Ground .. Updating X-Plane .. Further Considerations.
2 1745 QUICK START GuideThis chapter is designed to allow a first-time X-Plane user to get the SIMULATOR up and running in as short a time as possible. The goal is to be in the air and flying within ten minutes of completing the installation while still learning the essentials of the chapter will gloss over a great deal of background information, and conguration of many non-essential options will be skipped entirely. It assumes that the computer X-Plane is being in- stalled on is capable of running the SIMULATOR with its default rendering options. Note that the minimum system requirements to run X-Plane are a 2 GHz processor, 1 GB of RAM, and 128 MB VRAM on an independent (non-integrated) video card.
3 However, the recommended specications are a 2 GHz processor, 2 GB of RAM, and 256 MB of VRAM. Of course, X-Plane can take advantage of even faster systems, the process diers between installing on Windows XP and Mac OS X, the dierences have been noted. After getting off the ground initially, you may want to continue reading the full manual, or simply keep it for reference. If you have any issues while following this GUIDE , check the rest of the manual - the problem is very likely addressed there, and you ll save time for both yourself and customer information on installing and conguring X-Plane can be found in Chapters 3 and 4. Detailed information on joystick conguration can be found in Chapter 4, and Chapter 5 contains more information on setting up and ying the 10 Aerosoft GmbH Installing X-Plane1.
4 Insert the first X-Plane DVD into your DVD-ROM drive and wait for it to spin In Windows, if the operating system does not launch the X-Plane installer automatically, click the START menu, then My Computer. Double click on the XPLANE10 DVD, then Installer When the installer window appears, click Continue .4. By default X-Plane will install to the Desktop. Though it can be installed elsewhere, it is strongly recommended that it be placed on the Desktop so that it can be found in the future. For the purposes of this GUIDE , we will assume it is installed there. Click Continue .5. Accept the user agreement and click Continue once Select the scenery you would like to install. Depending on the installer on your disc, either all of the world or none of it will be selected by default.
5 An unselected tile will appear bleached in color, while a selected tile will have its full If you are unsure what areas are currently selected, just click Select None to turn everything off. From there, select the individual tiles you would like to install by clicking on , you can click and drag to select large areas that for regions where no scenery is installed, only oceans and airports will be visible. When you re finished selecting scenery, click Continue to begin installing. For the purposes of the Selecting a Location section later in this GUIDE , be sure to select the two tiles that make up America s West Coast, as we will be traveling to Los Angeles International Airport (KLAX).
6 678. The installer will begin displaying its progress. When the installer prompts you to do so, remove the current disc and insert the next. Note that installation may take anywhere from thirty to sixty minutes per disc, and that only one X-Plane disc can be in the system at once (the installer wont recognize a disc placed in a second DVD-ROM).Installing the complete scenery package will consume about 75 GB of hard can be added or removed at any point in the future by inserting Disc 1 and re-running the installer. When the X-System installer comes up saying \You already have X-Plane 10 installed on this computer, click the Add or Remove Scenery button and proceed just like in step 4 Launching X-Plane1.
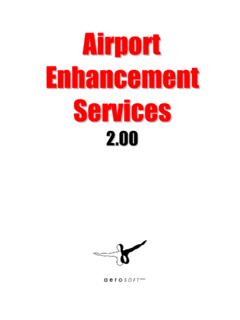
7 Make sure your USB joystick is plugged in. If this isn t plugged in prior to launching X-Plane, the SIMULATOR will not be able to interface with it. To avoid any possible problems, it is recommended that the stick be plugged directly into the machine rather than into a Put Disc 1 into your DVD-ROM drive. Starting X-Plane without this will force X-Plane to run in demo mode Open the X-Plane 10 folder (located by default on the Desktop) and double click on \ in Windows, or \ on a 10 Aerosoft GmbH Conguring Essential Yoke/Joystick FunctionsNote that a mouse may be used to fly if neither a yoke or a joystick is available, though it will (of course) be unrealistic and cumbersome. If the mouse will be used, however, skip to the section Selecting an Aircraft Once the program loads, move your mouse to the top of the screen, causing the menu to : Selecting Joystick & Equipment from the Settings menu [Full size!]
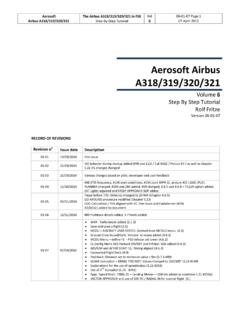
8 ]Figure : The relevant portion of the Joystick & Equipment dialog s Axis tab [Full size!]2. Click on Settings (per Figure ), then Joystick & Equipment. The relevant portion of the dialog box that appears is shown in Figure Move your joystick or yoke forward and back. A green or red bar should move as you do so. Click the drop-down menu next to it and set it to pitch. Do not check the reverse box next to this control unless, when flying, the aircrafts pitch control is working Move your joystick/yoke left and right. The green or red bar that moves should be set to roll. Do not check the reverse box next to this control unless, when flying, the aircrafts roll control is working Twist your joystick (if applicable).
9 The bar that moves should be set to yaw. If you do not assign a yaw axis, X-Plane will attempt to stabilize it for you. Once again, do not check the reverse box unless, when flying, the aircrafts yaw control is working using rudder pedals instead of a twisting joystick, slide them forward and backward and set the green/red bar that moves then to , only when using rudder pedals, press the left pedal down with your toes. The green or red bar that moves should be set to left toe brake. Do the same for the right pedal, and set that green bar to right toe brake. If this is done, you may also skip steps 8 through10 Move your throttle forward and back (on a yoke, this is typically the leftmost lever).
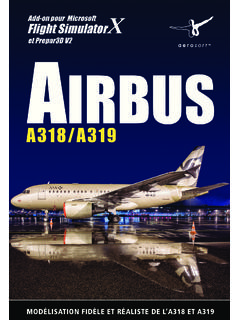
10 Set this bar to throttle. Check the reverse box only if, when flying, the aircrafts throttle control works Move all the joystick s control axes (that is, pitch, yaw, roll, and throttle) through their full range of motion to calibrate the Once again, skip this step and steps 9-10 if the rudder pedals are set up as toe brakes. Click the Buttons: Basic tab at the top of the Press the button on your joystick that you would like to assign to brakes, then release 10 Aerosoft GmbH 2012101110. Using the mouse, click the round button to the left of Toggle brakes regular effort (found near the bottom of the second column and already selected in Figure ).Figure : The Buttons: Basic tab of the Joystick & Equipment menu, with a button set to Toggle brakes regular effort [Full size!]