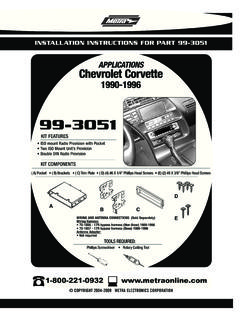
Transcription of GM multi-kit 2006-up 95-3305 or 99-3305 Wiring …
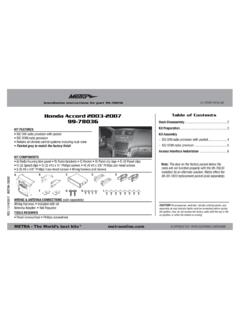
1 METRA - The World s best kits 11/2/2016 INST-3305 Installation instructions for part 95-3305 or 99-3305 CAUTION! All accessories, switches, climate controls panels, and especially air bag indicator lights must be connected before cycling the ignition. Also, do not remove the factory radio with the key in the on position, or while the vehicle is running. COPYRIGHT 2016 METRA ELECTRONICS CORPORATION95-3305: ISO DDIN radio provision99-3305: DIN radio provision with pocket ISO DIN radio provision with pocket95-3305: A1) ISO DDIN radio housing B1) ISO DDIN radio brackets99-3305: A2) Radio housing B2) ISO DIN radio brackets C2) ISO DIN trim plateKIT FEATURESKIT COMPONENTSWIRING & ANTENNA CONNECTIONS (sold separately) Wiring Harness: Please visit for harness options Antenna Adapter.
2 Please visit for antenna adapter options Panel removal tool Phillips screwdriver 7mm & 10mm Socket Wrench Torx driver Allen wrenchTOOLS REQUIREDGM multi -kit 2006 -up95-3305 or 99-3305B2C2A2B1A1 APPLICATIONSSee application list inside cover95-3305 or 99-3305 2 BuickEnclave ..2008-2012 Lucerne .. 2006 -2011 ChevroletAvalanche ..2007-2013 Captiva Sport ..2012-2015 Equinox ..2007-2009 Express ..2008-upImpala .. 2006 -2013 Impala Limited (Fleet) ..2014-2016 Monte Carlo .. 2006 -2007 Silverado** ..2007-2013 Silverado 2500/3500 ..2014 Suburban ..2007-2014 Tahoe ..2007-2014 Traverse ..2009-2012 ApplicationsTable of ContentsGMCA cadia.
3 2007-2012 Savana ..2008-up Sierra** ..2007-2013 Sierra 2500/3500 ..2014 Yukon ..2007-2014 HummerH2 ..2008-2009 PontiacTorrent ..2007-2009 SaturnOutlook ..2007-2010 Vue ..2008-2010 SuzukiXL-7 ..2007-2009**Excluding classic modelsDash Disassembly- Buick Enclave 2008-2012 ..7- Buick Lucerne 2006 -2011 ..3- Chevrolet Avalanche 2007-2013 ..3- Chevrolet Captiva Sport 2012-2015 ..8- Chevrolet Equinox 2007-2009 ..6- Chevrolet Express 2008-up ..4- Chevrolet Impala 2006 -2013 ..3- Chevrolet impala Limited (Fleet) 2014-2016 ..3- Chevrolet Monte Carlo Chevrolet Silverado Pickup (excluding classic models) 2007-2013 ..3- Chevrolet Silverado 2500/3500 2014.
4 3- Chevrolet Suburban 2007-2014 ..3- Chevrolet Tahoe 2007-2014 ..3- Chevrolet Traverse 2009-2012 ..7- GMC Acadia 2007-2012 ..7- GMC Savana 2008-up ..4- GMC Sierra (excluding classic models) 2007-2013 ..3- GMC Sierra 2500/3500 2014 ..3- GMC Yukon 2007-2014 ..3- Hummer H2 2008-2009 ..8- Pontiac Torrent 2007-2009 ..6- Saturn Outlook 2007-2010 ..7- Saturn Vue 2008-2010 ..8- Suzuki XL-7 2007-2009 ..5 Kit Assembly- ISO DDIN radio provision ..9- DIN radio provision with pocket ..10- ISO DIN radio provision with pocket ..1195-3305 or 99-3305 3 Dash Disassembly(Figure B)(Figure A)1. Unclip and remove the trim panel around radio and A/C control.
5 (Figure A)2. Remove (6) 7mm screws to extract radio and A/C control from sub dash. (Figure B) Continue to kit assembly1. Unclip and remove radio trim panel. (Figure A)2. Remove (2) 7mm screws securing switch panel below climate controls. Unplug and remove switch panel. (Figure B)3. Remove (2) 7mm screws securing climate controls. Unplug and remove climate controls. (Figure B)4. Remove (4) 7mm screws securing radio. Unplug and remove the radio. (Figure C) Continue to kit assemblyBuick Lucerne 2006 -2011/Chevrolet Impala 2006 -2013, Impala Limited (Fleet) 2014-2016, Monte Carlo 2006 -2007 Chevrolet Avalanche 2007-2013,Silverado (excluding classic models) 2007-2013, Tahoe/Suburban 2007-2014,Silverado 2500/3500 2014 / GMC Yukon 2007-2014,Sierra (excluding classic models) 2007-2013, Sierra 2500/3500 2014(Figure B)(Figure A)(Figure C) 95-3305 or 99-3305 41.
6 Remove (2) 10mm bolts from below knee bolster under steering column and remove panel. (Figure A)2. Remove (2) 10mm bolts from panel below passenger dash airbag and remove panel. (Figure B)3. Unsnap and remove radio and instrument cluster panel. (Figure C) Note: To access radio it may not be necessary to completely remove radio and instrument cluster panel. 4. Remove (4) 7mm bolts to remove radio. (Figure D) Continue to kit assemblyChevy Express/GMC Savana 2008-up(Figure B)(Figure D)(Figure C)(Figure A)Dash Disassembly95-3305 or 99-3305 51. Press in on sides of the shifter boot to release it from the shifter trim panel.
7 (Figure A)2. Lift the boot up to access the Allen screw securing the shifter knob to the shifter lever. Loosen the Allen screw and remove the shifter knob. (Figure B)3. Remove (1) Torx screw from the shifter trim panel. (Figure C), then using the panel removal tool unsnap the shifter trim panel. Unplug and remove the panel. (Figure D)4. Using a panel removal tool unsnap the radio trim panel. Unplug and remove the panel. (Figure E)5. Remove (4) 7mm screws securing the radio. Unplug and remove the radio. Continue to kit assemblySuzuki XL-7 2007-2009(Figure A)(Figure B)12:02103:5(Figure C)(Figure E)Dash DisassemblyAUXBANDFWDREVSEEKSEEKPASSENGE R AIR BAGAUX(Figure D) 95-3305 or 99-3305 6 Chevy Equinox/Pontiac, Torrent 2007-2009(Figure C)(Figure B)Dash Disassembly1.
8 Unsnap panel below power window switch and remove. (Figure A) Note: This allows you to unplug the window switch Unsnap and remove entire panel surrounding radio and shifter. (Figure B, next page)3. Remove (4) 7mm screws securing radio. Unplug and remove the radio. (Figure C, next page) Continue to kit assembly(Figure A) 95-3305 or 99-3305 1. Unclip the radio trim panel including the climate controls. 2. Unplug the climate controls and remove the Remove (4) 7mm screws securing the radio. Unplug and remove the radio. Continue to kit assemblyBuick Enclave 2008-2012/Chevy Traverse 2009-2012/GMC Acadia 2007-2012/Saturn Outlook 2007-2010 Buick Enclave/Chevy TraverseSaturn OutlookGMC Acadia7 Dash Disassembly95-3305 or 99-3305 81.
9 Unclip and remove the trim panel on top of the radio trim panel. (Figure A)2. Remove (2) Phillips screws exposed under panel previously removed. (Figure B)3. Unclip and remove the radio trim panel including the A/C vents. (Figure B)4. Unclip and remove the trim panel surrounding the shifter including the climate controls. (Figure C)5. Remove (4) 7mm screws securing the radio. Unplug and remove the radio. Continue to kit assemblyHummer H2 2008-2009 Chevrolet Captiva Sport 2012-2015/Saturn Vue 2008-20101. Unclip the radio trim panel including the A/C vents. 2. Unplug any harnesses connected to the panel, and then remove the panel.
10 (Figure A)3. Remove (4) 7mm screws securing the climate Unplug and remove the climate Remove (4) 7mm screws securing the radio. Unplug and remove the radio. Continue to kit assembly(Figure A)(Figure A)(Figure C)(Figure B)Dash Disassembly 95-33059 Kit Assembly(Figure B)ISO DDIN radio provision1. Slide the ISO DDIN radio brackets into the radio housing, aligning the holes in the radio housing to the clips on the brackets. (Figure A)2. Slide the radio into the completed assembly, and then secure using the screws supplied with the radio. (Figure B)3. Locate the factory Wiring harness and antenna connector in the dash and complete all necessary connections to the radio.