Transcription of GUIDE D’INSTALLATION - lamson-home.com
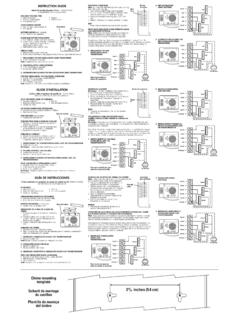
1 INSTRUCTION GUIDE cover rmly to mounting surface. 2. Drill 7/32" hole into wall for plastic anchor. Place anchor into hole and install silver 3. For screw mounting: screw. A) Place Button back cover where desired and mark screw locations. 3. Leave screw head extending about 1/4" from wall. Battery Door Chime RC3410/RC3510D/RC3513D/RC3520/ B) Place Button back cover against mounting surface and screw into marked 4. Slide Receiver base onto screw and lock into slot. RC3610/RC3624/RC3676 locations using screws enclosed (may require drilling pilot holes on hard- Note: The RC3510D and RC3513D Weatherproof Receiver can sit or mount on any Congratulations on a wise purchase! woods). surface, horizontally or vertically, indoors or outdoors. ENCLOSED YOU WILL FIND: RECEIVER BATTERY installation TEST. Chime Receiver 1. Remove front cover and install 4 "C" alkaline batteries in battery compartment. Press Chime Button(s). Receiver should play a tone.
2 Chime Button Be sure that (+) and (-) terminals on each battery match the (+) and (-) contacts Two 3-Volt lithium batteries (installed) shown on the case. FRONT/BACK DOOR CHIME OPERATION. Double-sided tape 2. Replace front cover on Receiver. With two Chime Buttons, scroll and set a different selection for each door. By Screws remembering which tone/melody is played, you can tell which button is pressed. Wall anchor DECORATING OPTIONS FOR DOOR CHIME RC3610 Chime Buttons may also be used as hand-held pagers. Plastic lm (For RC3510D/RC3513D only) 1. Choose the wood trim which you feel complements your d cor. 2. To replace wood trim, remove the four screws from the back of the chime and TO REPLACE BUTTON BATTERIES. TOOLS/SUPPLIES NEEDED: remove trim. 1. Remove Button from back cover by inserting ballpoint Small at head screwdriver 3. Screw on desired trim. pen into round hole at bottom of Button and gently Small Phillips head screwdriver pushing in on tab.
3 Lift Button cover away from the back Ballpoint pen DECORATING OPTIONS FOR DOOR CHIMES RC3410 and RC3610 plate. 7/32" drill bit (if mounting Receiver with wall anchors) Note: It is not necessary to 2. Remove old batteries by placing a small screwdriver or apply wallpaper or paint to ballpoint pen in the slot directly beneath the batteries. BATTERIES NEEDED (not included): the panel of the door chime. Lift the top battery out of the battery compartment. Re- 4 alkaline "C" batteries Wallpaper Application: peat with second battery. (Do not hit Button to remove 1. To remove frame, insert a batteries - this could damage the Button.). MOUNTING BACK COVER OF BUTTON Transmitter small at head screwdriver 3. Replace old batteries with new batteries, positive (+). Note: Mounting Button on aluminum siding or button at notch in frame and gen- side up. metal door frame may reduce range. If button must tly lift away from cover. CAUTION The batteries used in this device may pres- be mounted on metal, try placing a 1/2'' piece of wood 2.
4 Cut a piece of wallpaper (3- ent a risk of re or chemical burn if mistreated. Do not between the button and the metal. 1/2 x 6-3/8 ) to t panel. recharge, disassemble, heat above 100 C (212 F), or incinerate. Replace with If you want to cover the wire hole from your existing 3. Apply wallpaper using UL approved Type CR2032 3 volt lithium batteries from Carlon (RC3395D), Radio button, save mounting of the new Button until after wallpaper manufacturer's Shack, Toshiba, Sharp, NewSun, or Sony only. Use of another battery may present removing the existing button. instructions. a risk of re or explosion. 1. Remove cover from back of Button by inserting ball- Back 4. Snap frame back onto chime. point pen into round hole at bottom of transmitter cover Painting Cover: CHANGING TONE/MELODY SELECTION Press to and gently pushing in on tab. Lift Button cover away 1. To remove frame, insert a small at head screwdriver at notch To change tone to different tone or melody, press once on change from the back plate.
5 In frame and gently lift away from cover. the small raised Button located near the top of the button. tone. 2. For tape mounting: 2. Paint panel, which was inside frame, with color to complement Receiver will play next selection. To continue changing A) Make sure surfaces are free of dust, oil, and your d cor. Allow paint to dry thoroughly. melody or selection, press down once again and wait other substances that could affect adhesion. 3. Snap frame back onto chime. for Receiver to con rm change. B) Attach double-sided tape to Button back Note: If you change the melody or tone too rapidly, the cover. MOUNTING DOOR CHIME RECEIVER Receiver will not play each selection. Only last melody or C) Making sure that the end with the hook-shaped latch is facing down, press Before mounting Receiver test desired location for operation. tone selected will play. Selecting while Receiver is playing will switch system to new 1. Mark screw location onto wall for position.
6 Setting, but Receiver will only nish playing tone or melody already in progress. GUIDE D' installation B) Placez le dos du bouton contre la surface de montage et vissez-le en place 2. Percez un trou de 7/32" po chaque marque. Ins rez un ancrage dans chaque avec les vis fournies (vous devrez peut- tre percer un trou GUIDE dans le trou et posez les vis argent es. bois dur). 3. Laissez la t te des vis d passer d'environ 1/4" po du mur. Carillon piles RC3410/RC3510D/RC3513D/RC3520/RC3610/RC3 624/RC3676. 4. Ins rez la base du r cepteur sur les vis et abaissez la base pour Nous vous f licitons de votre choix judicieux! installation DU R CEPTEUR PILE l'enclencher. 1. Enlevez le couvercle avant et posez 4 piles alcalines C dans le logement. As- Remarque : The RC3510D and RC3513D Le r cepteur tanche peut se monter sur VOUS TROUVEREZ DANS CET ENSEMBLE : surez-vous d'associer le (+) et le (-) de la pile avec les contacts (+) et (-) dans le toute surface, selon l'horizontale ou la verticale, l'int rieur comme l'ext rieur.
7 Un r cepteur de carillon logement. Un bouton de carillon 2. Remettez le couvercle avant du r cepteur. ESSAI. Deux piles au lithium 3 volts (install es). Appuyez sur le bouton de carillon. Le r cepteur devrait faire. Un ruban deux faces Des vis OPTIONS D CORATIVES POUR LE CARILLON DE PORTE - RC3610. 1. Choisissez la garniture de bois qui agr mente votre d cor. CARILLON DE PORTE AVANT/ARRI RE. Des ancrages muraux 2. Pour remplacer la garniture, enlevez les quatre vis au dos du carillon et enlevez Si vous avez deux boutons, r glez chacun une tonalit diff rente. En vous rap- Film de plastique (Pour RC3510D et RC3513D seulement). la garniture. pelant quelle m lodie est jou e, vous saurez quel bouton de porte est press . Les 3. Vissez la garniture voulue sa place. boutons peuvent aussi s'utiliser comme t l avertisseurs de main. LES OUTILS/FOURNITURES N CESSAIRES : Un petit tournevis t te plate OPTIONS D CORATIVES POUR LES CARILLONS DE PORTE - RC3410 et RC3610 REMPLACEMENT DES PILES.
8 Un petit tournevis pointe cruciforme (Phillips). Remarque : Il n'est pas n cessaire de poser un papier-tenture ou de peinturer 1. S parez le bouton du dos en ins rant la pointe d'un Un stylo-bille le panneau du carillon. stylo-bille dans le trou au bas du bouton et en poussant Une m che 7/32" po (si vous utilisez les ancrages muraux). Application de papier-tenture : doucement sur la patte. S parez le bouton du dos. 1. Pour enlever le cadre, 2. Enlevez les piles en pla ant la pointe d'un petit tournevis PILES REQUISES (non fournies) : ins rez la pointe d'un petit ou d'un stylo-bille dans la fente, directement sous les 4 piles alcalines C. tournevis lame plate piles. Soulevez la pile du dessus. Faites de m me avec dans l'encoche puis s - l'autre pile (ne pressez pas le bouton en changeant les MONTAGE DU DOS DU BOUTON. Bouton de parez le cadre soigneuse- piles sinon vous risquez d'endommager le bouton). Remarque : Monter le bouton sur un bardeau l' metteur ment du couvercle.
9 3. Posez des piles neuves, c t positif (+) expos . d'aluminium ou un cadre de porte en m tal peut en 2. D coupez un morceau MISE EN GARDE Les piles de cet appareil peuvent r duire la port e. Si le bouton doit tre install sur du de papier-tenture de la pr senter un risque d'incendie ou de br lure chimique m tal, ins rez une pi ce de bois de 1/2 po entre le grandeur de la devanture si elles sont maltrait es. Ne pas les recharger ni les bouton et le m tal. (89 x 162 mm). ouvrir, les chauffer plus de 100 C (212 F) ou les jeter au feu. Remplacer avec UL. Si vous voulez couvrir le trou de l du bouton existant, 3. Posez le papier-tenture en approved des piles au lithium CR2032 de 3 volts, de marque Carlon (RC3395D), ne montez le nouveau bouton qu'apr s avoir enlev . suivant les directives de Radio Shack, Toshiba, Sharp, NewSun, ou Sony seulement. Utiliser d'autres piles le bouton existant. Dos son fabricant. peut pr senter un risque d'incendie ou d'explosion.
10 1. S parez le dos du bouton en ins rant la pointe d'un stylo-bille dans l'ori ce rond dans le bas de 4. R enclenchez la devanture du carillon en place. Application de peinture : CHANGEMENT DE LA TONALIT /M LODIE. l' metteur et soulevez la patte doucement. Soulevez 1. Pour enlever le cadre, ins rez la pointe d'un petit tournevis Pour changer r gl d'avance, appuyez une fois sur le petit le devant du bouton pour le s parer du dos. lame plate dans l'encoche puis s parez le cadre soigneuse- bouton soulev sur le devant du bouton de le carillon. Le Ap- 2. Montage avec le ruban : ment du couvercle. r cepteur jouera la nouvelle tonalit . Pour continuer de puyez A) Les surfaces doivent tre libres de poussi re, 2. Peinturez le panneau qui se trouvait dans le cadre, d'une changer, appuyez une fois encore sur le petit bouton et pour d'huile ou de toute autre substance qui peut chang- couleur qui s'agence au d cor. Laissez la peinture s cher le r cepteur joue une autre tonalit.