Transcription of Guidelines for Calibrated Scale Bar Placement and Processing
1 Guidelines for Calibrated Scale Bar Placement and Processing Authored by Cultural Heritage Imaging To support highly accurate measurement of 3D data of an object or a site, it is essential for practitioners of photogrammetry to learn the correct Placement and use of Calibrated Scale bars. As you prepare to image a subject, you start by placing the Scale bars on, around, or next to the object or site. When you have taken a series of overlapping images that include the Scale bars, you are ready to process the image set to create a 3D model. Agisoft PhotoScan Pro finds the exact center of the targets on the Scale bars in your photos, enabling highly accurate measurement of any feature of the imaging subject. Scale Bars NOTE: This document provides some tips that work with any target-based Calibrated Scale bars. The set of Scale bars shown here is available from Cultural Heritage Imaging (CHI). This unique Scale bar design was developed and field-tested by a senior team of photogrammetry experts from the US Bureau of Land Management.
2 These bars are Calibrated by CHI staff to 1/10mm accuracy or better, with the actual Calibrated measurement between each target written on the Scale bar. If you are interested in purchasing this set, you can order them from the CHI web site. How to Place Scale Bars Place the Scale bars in a scene or around an object of interest so the targets can be clearly seen in multiple overlapping images. You should consider the Scale bars to be part of the area of interest for your photogrammetry project, and make sure that your set of overlapping images extends beyond the Placement of the Scale bars. The Scale bars have targets that are used as markers when the bars are placed in a scene or around a subject. When your set of overlapping photos includes the bars, these markers serve as reference points for Scale definition, and also help the Processing tool align images accurately. The Scale bars do not need to appear in every photo.
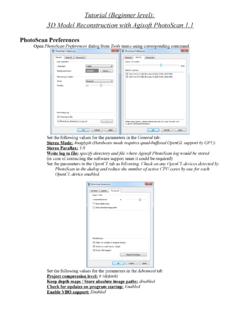
3 They should be well covered by overlapping photos with good geometry so that their Calibrated values can be used to provide accurate Scale for the whole photogrammetry project. Important Note: Do not move the Scale bars during photogrammetric image capture of your project. If a Scale bar is accidentally bumped or moved, remove it from the scene. Do not attempt to place it back in the scene, as it will not be in exactly the same place. Scale bars must be in a constant location relative to your project in order to be used accurately. Examples of Placement The following figures show some ways of placing Scale bars. Figure 1: On the left, three Scale bars in place around a smaller subject. On the right, two Scale bars placed on the outside of a large painting. Two additional Scale bars (not shown) are placed on the far side of the painting. Guidelines for Calibrated Scale Bar Placement and Processing , Version Cultural Heritage Imaging 2015, All Rights Reserved 2.
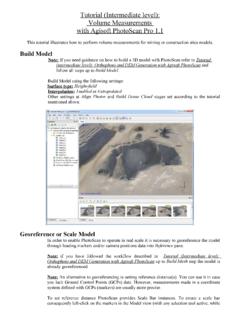
4 Figure 2: Scale bars in place around a small kiosk-style building. Some are placed on the ground around the subject, and some are on the subject. When using Scale bars placed on the ground, outside the primary subject area, you must take additional overlapping photos that include the Scale bars in order to use them for accurate measurement in your project. In larger projects, place the Scale bars as far away from each other as possible so that you can validate the Scale across the entire project. Guidelines for Calibrated Scale Bar Placement and Processing , Version Cultural Heritage Imaging 2015, All Rights Reserved 3. Figure 3: Four Scale bars in place near an area of rock art and inscriptions to be imaged. These Scale bars are placed near, but not covering, the inscriptions that appear above them on the rock. How Many Scale Bars to Use in Your Project While photogrammetry software can add Scale to your project with a single Scale bar, it is advisable to place a minimum of three Scale bars in your project.
5 We recommend four. Two bars provide a basic check, and three or more add confidence and statistical reassurance. Using four bars is ideal, especially for larger projects and outdoor environments, because it is all too easy for a Scale bar to be moved by the wind, kicked, or otherwise displaced during capture. If this happens, the project will still have the integrity of three valid Scale bars. Guidelines for Calibrated Scale Bar Placement and Processing , Version Cultural Heritage Imaging 2015, All Rights Reserved 4. Processing Data with Scale Bars The Processing workflow in Agisoft PhotoScan Pro Version includes these basic steps: Set the Scale bar accuracy Detect the targets on the Scale bars in the image set to generate markers in each photo that includes Scale bars. Create Scale bars objects between specific markers. Add the Calibrated Scale bar distance data for the Scale bar objects. Each of these steps is described further below.
6 More information on placing markers and creating Scale bars can be found in the Agisoft PhotoScan Pro User's Guide, Chapter 4, Referencing and Measurement. Set the Scale Bar Accuracy Beginning with version of PhotoScan Pro, it is possible to set the Scale bar accuracy. The Scale bars from Cultural Heritage Imaging are Calibrated to 1/10 mm accuracy or better. You should set the Scale Bar Accuracy to if you are using these Scale bars. Otherwise, set this value to whatever accuracy is correct for the Scale bars you are using. (the default value is ). Detecting Markers After aligning photos, and optimizing your project, use the Detect Markers dialog to detect the targets on the Scale bars, and use them to automatically generate markers. Make sure the Reference Pane is visible and choose Tools > Markers > Detect Markers. Guidelines for Calibrated Scale Bar Placement and Processing , Version Cultural Heritage Imaging 2015, All Rights Reserved 5.
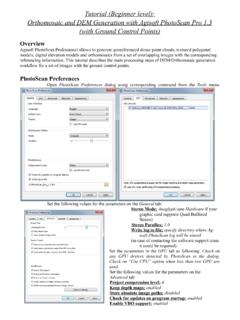
7 Figure 4: Detect markers for Scale bars. TIP: We suggest that you start with a tolerance of 20, and make it higher if not all targets are detected. This graphic also shows the different kinds of markers that may appear on Scale bars. The Scale bars from CHI include all three kinds of marker targets supported by PhotoScan, as shown in the figure. Marker targets can be circular coded, circular non-coded or non- coded cross. An advantage of coded targets is that they are always named consistently. Coded targets are named target xx, where xx is the number of the coded target, printed on the Scale bar. Non-coded targets are named sequentially in the order the software identifies them, and labeled point xx, but the numbering is not reproducible in different projects. TIP: If you are using both circular coded and circular non-coded targets, you should detect the coded markers (the circular 12-bit marker in this example) before you detect any non- coded circular markers.
8 This is because the center of the circular coded marker is a circle, and it will be detected as a non-coded circle if there is not already a marker present from detecting the coded markers. Then when coded markers are detected, you may have duplication of markers. The centers of coded and non-coded circular targets are placed with high precision because the center of the circle can be detected algorithmically. The centers of non-coded cross-type targets with Calibrated distances, as well as the corners of small scales made up of black and white squares are placed with high precision because the center point of the cross can be detected algorithmically by the software. Although you will rarely use these Scale markers for setting Scale in your project, you should retain any detected Scale markers. They mark additional known points that can aid the software in the photo alignment and camera calibration.
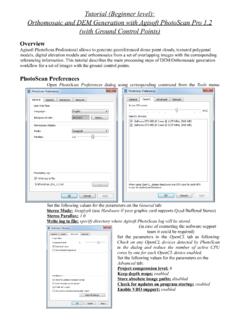
9 To see the markers that are generated in each image, click the Edit Markers icon in the top toolbar (the blue flag). Each marker is labeled as a target or point, with an index number. Guidelines for Calibrated Scale Bar Placement and Processing , Version Cultural Heritage Imaging 2015, All Rights Reserved 6. Figure 5: Detected coded and non-coded cross targets. Corners in the centimeter Scale are also detected. For more information on markers, see the Agisoft PhotoScan Pro User's Guide, Chapter 4, Referencing and Measurement. Examining and Editing Markers After you detect the markers, you can see information about each marker in the Markers area of the Reference Pane, as shown in Figure 6. Figure 6: The Markers area of the Reference Pane after markers have been detected. The Error (pix) value is the estimated error in units of pixels for that marker's Placement . You should check these values to evaluate the quality of the automatic marker detection.
10 Guidelines for Calibrated Scale Bar Placement and Processing , Version Cultural Heritage Imaging 2015, All Rights Reserved 7. The Projections value is the number of photos in which the marker was detected. We recommend a minimum of three projections for any marker that is used to set Scale for the project. Check the Error for Each Marker You can sort by error to find the most extreme ones in your project. You can review the markers on a photo, remove them or change their position. If you intend to use a marker to set Scale , we recommend that you remove projections on photos with the most error, or move projections until the marker error is below pixels. (See Creating Scale Bar Objects below for instructions on creating the Scale bars and setting their distance values). Beginning with PhotoScan version , it is possible to see information about all the images that have a projection for any given marker, and to see the error in pixels for each projection on each photo.