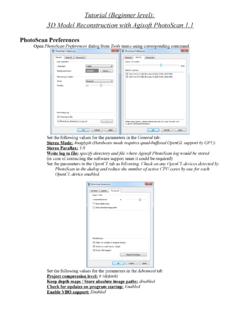
Transcription of Professional Edition, Version 1 - Agisoft PhotoScan
1 Agisoft PhotoScan User ManualProfessional edition , Version PhotoScan User Manual: Professional edition , Version date 2016 Copyright 2016 Agisoft LLCiiiTable of ContentsOverview .. vHow it works .. vAbout the manual .. v1. Installation .. 1 System requirements .. 1 OpenCL acceleration .. 1 Installation procedure .. 2 Restrictions of the Demo mode .. 22. Capturing photos .. 4 Equipment .. 4 Camera settings .. 4 Object/scene requirements .. 4 Image preprocessing .. 4 Capturing scenarios .. 5 Restrictions .. 63. General workflow .. 8 Preferences settings .. 8 Loading photos .. 8 Aligning photos .. 11 Building dense point cloud .. 14 Building mesh .. 15 Building model texture .. 17 Building tiled model .. 19 Building digital elevation model.
2 20 Building orthomosaic .. 21 Saving intermediate results .. 22 Exporting results .. 234. Referencing .. 35 Camera calibration .. 35 Setting coordinate system .. 37 Optimization .. 43 Working with coded and non-coded targets .. 465. Measurements .. 48 Performing measurements on model .. 48 Performing measurements on DEM .. 49 Vegetation indices calculation .. 516. Editing .. 53 Using masks .. 53 Editing point cloud .. 57 Classifying dense cloud points .. 59 Editing model geometry .. 61 Shapes .. 64 Orthomosaic seamlines editing .. 657. Automation .. 67 Using chunks .. 674D processing .. 71 Python scripting .. 738. Network processing .. 74 Overview .. 74 Cluster components .. 74 Cluster setup .. 75 Agisoft PhotoScan User ManualivCluster administration.
3 77A. Graphical user interface .. 78 Application window .. 78 Menu commands .. 82 Toolbar buttons .. 87 Hot keys .. 90B. Supported formats .. 92 Images .. 92 Camera calibration .. 92 Camera flight log .. 92 GCP locations .. 92 Interior and exterior camera orientation parameters .. 93 Tie points .. 93 Sparse/dense point cloud .. 93 Mesh model .. 94 Texture .. 94 Orthomosaic .. 94 Digital elevation model (DSM/DTM) .. 94 Tiled models .. 95 Shapes and contours .. 95C. Camera models .. 96 Frame cameras .. 96 Fisheye cameras .. 96 Spherical cameras (equirectangular projection) .. 97 Spherical cameras (cylindrical projection) .. 97vOverviewAgisoft PhotoScan is an advanced image-based 3D modeling solution aimed at creating professionalquality 3D content from still images.
4 Based on the latest multi-view 3D reconstruction technology, itoperates with arbitrary images and is efficient in both controlled and uncontrolled conditions. Photos canbe taken from any position, providing that the object to be reconstructed is visible on at least two image alignment and 3D model reconstruction are fully it worksGenerally the final goal of photographs processing with PhotoScan is to build a textured 3D model. Theprocedure of photographs processing and 3D model construction comprises four main first stage is camera alignment. At this stage PhotoScan searches for common points on photographsand matches them, as well as it finds the position of the camera for each picture and refines cameracalibration parameters. As a result a sparse point cloud and a set of camera positions are sparse point cloud represents the results of photo alignment and will not be directly used inthe further 3D model construction procedure (except for the sparse point cloud based reconstructionmethod).
5 However it can be exported for further usage in external programs. For instance, the sparsepoint cloud model can be used in a 3D editor as a the contrary, the set of camera positions is required for further 3D model reconstruction next stage is building dense point cloud. Based on the estimated camera positions and picturesthemselves a dense point cloud is built by PhotoScan . Dense point cloud may be edited and classifiedprior to export or proceeding to 3D mesh model third stage is building mesh. PhotoScan reconstructs a 3D polygonal mesh representing the objectsurface based on the dense or sparse point cloud according to the user's choice. Generally there are twoalgorithmic methods available in PhotoScan that can be applied to 3D mesh generation: Height Field- for planar type surfaces, Arbitrary - for any kind of mesh having been built, it may be necessary to edit it.
6 Some corrections, such as mesh decimation,removal of detached components, closing of holes in the mesh, smoothing, etc. can be performed byPhotoScan. For more complex editing you have to engage external 3D editor tools. PhotoScan allowsto export mesh, edit it by another software and import it geometry ( mesh) is reconstructed, it can be textured and/or used for orthomosaic texturing modes are available in PhotoScan , they are described in the corresponding section ofthis manual, as well as orthomosaic and DEM generation the manualBasically, the sequence of actions described above covers most of the data processing needs. All theseoperations are carried out automatically according to the parameters set by user. Instructions on how toget through these operations and descriptions of the parameters controlling each step are given in thecorresponding sections of the Chapter 3, General workflow chapter of the some cases, however, additional actions may be required to get the desired results.
7 In some capturingscenarios masking of certain regions of the photos may be required to exclude them from the of masks in PhotoScan processing workflow as well as editing options available are describedOverviewviin Chapter 6, Editing. Camera calibration issues are discussed in Chapter 4, Referencing, that alsodescribes functionality to optimize camera alignment results and provides guidance on model referenced model, be it a mesh or a DEM serves as a ground for measurements. Area, volume, profilemeasurement procedures are tackled in Chapter 5, Measurements, which also includes information onvegetation indices calculations. While Chapter 7, Automation describes opportunities to save up on manualintervention to the processing workflow, Chapter 8, Network processing presents guidelines on how toorganize distributed processing of the imagery data on several can take up quite a long time to reconstruct a 3D model.
8 PhotoScan allows to export obtained resultsand save intermediate data in a form of project files at any stage of the process. If you are not familiar withthe concept of projects, its brief description is given at the end of the Chapter 3, General the manual you can also find instructions on the PhotoScan installation procedure and basic rules fortaking "good" photographs, pictures that provide most necessary information for 3D the information refer to Chapter 1, Installation and Chapter 2, Capturing 1. InstallationSystem requirementsMinimal configuration Windows XP or later (32 or 64 bit), Mac OS X Snow Leopard or later, Debian/Ubuntu (64 bit) Intel Core 2 Duo processor or equivalent 2GB of RAMR ecommended configuration Windows XP or later (64 bit), Mac OS X Snow Leopard or later, Debian/Ubuntu (64 bit) Intel Core i7 processor 12GB of RAMThe number of photos that can be processed by PhotoScan depends on the available RAM andreconstruction parameters used.
9 Assuming that a single photo resolution is of the order of 10 MPix, 2 GBRAM is sufficient to make a model based on 20 to 30 photos. 12GB RAM will allow to process up to200-300 accelerationPhotoScan supports accelerated depth maps reconstruction due to the graphics hardware (GPU) 8xxx series and HD 5xxx series and is likely to be able to utilize processing power of any OpenCL enabled device during DensePoint Cloud generation stage, provided that OpenCL drivers for the device are properly installed. However,because of the large number of various combinations of video chips, driver versions and operating systems, Agisoft is unable to test and guarantee PhotoScan 's compatibility with every device and on every table below lists currently supported devices (on Windows platform only). We will pay particularattention to possible problems with PhotoScan running on these Supported Desktop GPUs on Windows platformNVIDIAAMDQ uadro M6000 Radeon R9 290xGeForce GTX TITANR adeon HD 7970 GeForce GTX 980 Radeon HD 6970 GeForce GTX 780 Radeon HD 6950 GeForce GTX 680 Radeon HD 6870 Installation2 NVIDIAAMDGeForce GTX 580 Radeon HD 5870 GeForce GTX 570 Radeon HD 5850 GeForce GTX 560 Radeon HD 5830 GeForce GTX 480 GeForce GTX 470 GeForce GTX 465 GeForce GTX 285 GeForce GTX 280 Although PhotoScan is supposed to be able to utilize other GPU models and being run under a differentoperating system, Agisoft does not guarantee that it will work OpenCL acceleration can be enabled using OpenCL tab in the Preferences dialog box.
10 For eachOpenCL device used, one physical CPU core should be disabled for optimal performance. Using OpenCL acceleration with mobile or integrated graphics video chips is not recommendedbecause of the low performance of such procedureInstalling PhotoScan on Microsoft WindowsTo install PhotoScan on Microsoft Windows simply run the downloaded msi file and follow PhotoScan on Mac OS XOpen the downloaded dmg image and drag PhotoScan application to the desired location on your PhotoScan on Debian/UbuntuUnpack the downloaded archive with a program distribution kit to the desired location on your hard PhotoScan by running script from the program of the Demo modeOnce PhotoScan is downloaded and installed on your computer you can run it either in the Demo modeor in the full function mode. On every start until you enter a serial number it will show a registrationbox offering two options: (1) use PhotoScan in the Demo mode or (2) enter a serial number to confirmthe purchase.