Transcription of INSTALLATION AND OPERATING INSTRUCTIONS …
1 Securitron Magnalock Corp. Tel ASSA ABLOY, the global leader 550 Vista Boulevard Fax in door opening solutions Sparks, NV 89434 INSTALLATION AND OPERATING INSTRUCTIONS . For Model GL1 Gate Locks 1. INTRODUCTION. Securitron's GL1 Gate Lock is an electromechanical lock designed for exterior (or interior) use in gated areas which require controlled access or egress. Each unit is comprised of a strong mounting chassis, access cover and an easy to install swivel type strike assembly that provides a very forgiving allowance for misalignment due to gate sag or tracking error (up to +/-1/2.)
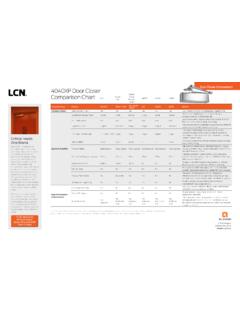
2 Vertically and horizontally from the centerline of the lock to the centerline of the strike). The unit operates at 12 Volts DC or 24 Volts DC and is fail safe / fail locked field-convertible. NOTE: See SECTION 5 for INSTRUCTIONS on the Fail Safe conversion. 2. SPECIFICATIONS. Physical: Electrical: Holding Force: 2,000 Lbs. [907 Kg] 12 Volts DC Current Requirement: Initial (Peak): (~1 sec.) 870 mA. Dimensions: Reduced: 290 mA. Inches: 2-3/4 L X 7-1/4 H X 3-1/4 D Power Consumption: Watts Millimeters: 70 L X 184 H X 83 D 24 Volts DC Current Requirement: Initial (Peak): (~1 sec.
3 720 mA. Reduced: 170 mA. Power Consumption: Watts 3. PRODUCT OVERVIEW. Upon unpacking this product, an inventory should be made to ensure that all the required components and hardware have been included. Along with these INSTRUCTIONS and the INSTALLATION template, the lock assembly should include the following items: Lock Cover Lock Chassis Strike Assembly Hardware Pack 4. RECOMMENDED TOOLS. Hammer Wrenches: 1/2 box-end, 1/4 & 7/8 open-end Center punch Pliers, Vise grip Drill Screwdriver, #2 Phillips Drill bits: 25/64 [10mm] and 1/2 Hex (Allen) wrench, 3/16.
4 [ ], (13/64 [ ] - Optional) (Tap, 1/4-20 UNC-2B - Optional). Copyright, 2008, all rights reserved PN# 500-22100. Page 1 Rev. C, 5/08. INSTALLATION INSTRUCTIONS . Pre- INSTALLATION Survey Due to the variety of mounting configurations available with this product, it is strongly recommended that an initial physical survey and assessment be made of the actual area to which the lock will be installed. A determination of the optimal method of mounting should be made prior to INSTALLATION with considerations made to the following: A. Physical strength of mounting areas: It is recommended that the structural integrity of mounting surfaces be strong enough to meet or exceed the holding force of the lock.
5 B. Protection of the lock from external attack: The lock and the wiring must be protected to a reasonable degree from potential damage due to intruders or vandals. C. Convenience and accessibility of area to be protected: The lock assembly should be installed in a location that will not hinder or create a potential safety hazard to authorized personnel routinely accessing the protected area. The mounting configurations primarily addressed in this manual will be for swinging and sliding gate applications. Fastening hardware required for mounting the lock and strike in either mount configuration has been included with the unit.
6 For added security (in conjunction with the fasteners, the lock and strike may be welded in place (see Figure 7, page 8), but care must be taken when welding to prevent damage to the electronic components of the lock. Because of the diversity in gate manufacturing/construction methods and INSTALLATION configurations, mounting surfaces for the lock and strike assembly will be left to the installer. Optimum mounting platforms may be achieved by welding adequate size metal plates, channels or tubing to the fence frame and the gate.)
7 Formed angle and brackets along with appropriately sized fasteners may also be utilized to mechanically secure mounting platforms for the lock and strike. For maximum security when using the provided blind nut inserts, it is best to mount the lock to steel tubing or channel in order to conceal and protect the backside of the nut from exposure to damage or vandalism. INSTALLATION WARNINGS: 1. The lock must be mounted in the upright position (with the latching mechanism at bottom). The latching mechanism will not function in the inverted or horizontal position.
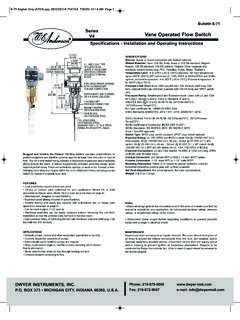
8 2. Make sure all welding is completed prior to making any electrical connections to the mounted lock. Welding in or around a lock assembly that is connected electrically can cause damage to the electronic components. 3. Not recommended for dual swing gates. The following illustrations show some basic mounting configurations on a chain-link style fence frame and gate: swinging Gate Mount Sliding Gate Mount PN# 500-22100. Page 2 Rev. C, 5/08. Typical Gate Lock Applications: swinging Gate The following Figures 1 through 4 demonstrate an example of a lock installed to a round tubular steel (chain-link) gate and frame in a swinging gate configuration.
9 The mounting brackets shown are only examples they are NOT included with the product: (Reference). Stationary Fence Frame (Existing/User Installed). Lock Chassis Secure to Mounting Surface using four (4) 1/4-20 UNC. Socket Head Cap Screws (Cover and PC Board Not Shown). (Reference). swinging (Hinged) Gate (Reference) Mounting Surface (Existing/User Installed) for Securing Lock Mounting Chassis Welded or Fastened to Fence Frame (User Fabricated/Installed). (Reference) Offset or "Z" Type Bracket Mounting Surface for Strike Assembly Securing Strike Assembly Secure to Mounting Surface Welded or Fastened to Gate using four (4) 1/4-20 UNC.
10 (User Fabricated/Installed) Socket Head Cap Screws Figure 1 Swing Gate Operation CL. (Ref.) Fence Frame Top View For Fastener Hardware Mounting: 3. Drill & Tap Mounting Surface for 1/4-20 UNC - OR- Drill 25/64". [10mm] Diameter Hole Thru &. Install 1/4-20 UNC Blind Nut (Deep). (Typical 4 Places). 4. 5..75. 5a 1..87 2. Bracketed [ ] dimensions are millimeters. Front View of Mounting Surface Figure 2 Lock INSTALLATION PN# 500-22100. Page 3 Rev. C, 5/08. C. L. (Ref.) Gate Top View 3..63. 16 6. 4. For Fastener Hardware Mounting: Drill & Tap Mounting Surface for 1/4-20 UNC - OR- Drill 25/64".