Transcription of Introduction to Word 2013 - Montclair State …
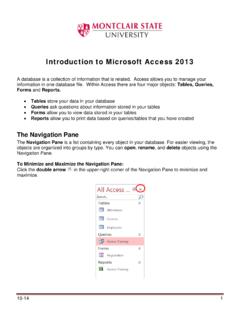
1 3 - 15 1 Introduction to Word 2013 Screen Elements 1. File Tab: The File tab will bring you into the Backstage View. The Backstage View is where you manage your files and the data about them creating, opening, printing, saving, inspecting for hidden metadata or personal information, and setting options. 2. Ribbon: An area across the top of the screen that makes almost all the capabilities of Word available in a single area. 3. Tabs: An area on the Ribbon that contains buttons that are organized in groups. The default tabs are Home, Insert, Design, Page Layout, References, Mailings, Review, View and EndNote X7.
2 4. Title Bar: A horizontal bar at the top of an active document. This bar displays the name of the document and application. At the right end of the Title Bar is the Minimize, Maximize and Close buttons. 1 2 3 4 5 6 7 8 9 10 2 5. Groups: A group of buttons on a tab that are exposed and easily accessible. 6. Dialog Box Launcher: A button in the corner of a group that launches a dialog box containing all the options within that group. 7. Status Bar: A horizontal bar at the bottom of an active window that gives details about the document. 8. View Toolbar: A toolbar that enables, adjusts, and displays different views of a document.
3 9. Zoom Button: A button that magnifies or reduces the contents in the document window. 10. Quick Access Toolbar: A customizable toolbar at the top of an active document. By default the Quick Access Toolbar displays the Save, Undo, and Repeat buttons and is used for easy access to frequently used commands. To customize this toolbar, click on the dropdown arrow and select the commands you want to add. Contextual Tabs are designed to appear on the Ribbon when certain objects or commands are selected. These tabs provide easy access to options specific to the selected object or command. For example, the commands for editing a picture will not be available until the picture is selected, at which time the Picture Tools tab will appear.
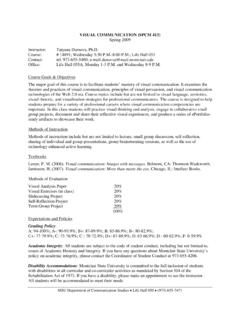
4 To Create a New Word Document: 1) Click the File tab 2) Click New 3) Click Blank Document 3 Navigating in a Document The following table lists ways to navigate in an active document using your keyboard to move the insertion point: To Display Different Views: 1) Click the View tab 2) Click on the desired view View Options: Read Mode: Displays as much of the content of the document as will fit in the screen Print Layout View: Shows a document as it appears on a printed page Web Layout View: Shows a document as it appears in a web browser Outline View: Shows the structure of a document, which consist of heading and body text Draft View: Displays the content of a document with a basic layout ~OR~ 3) Click a View button on the View Toolbar in the lower right corner of the Status Bar 4 Editing and Proofing Documents Selecting Text Select a word: Click and drag or double-click on the word Select a sentence: Click and drag or click in the sentence while holding down the CTRL key Select a paragraph: Click and drag or triple-click in the paragraph or double-click in the selection area to the left of the paragraph Select a block of text.
5 Click and drag or click to the left of the first word, hold down the SHIFT key, and then immediately click to the right of the last word Select a line: Click and drag or click in the selection to the left of the line Select an entire document: Triple-click in the selection area or hit the CTRL + A keys Undo an action: On the Quick Access Toolbar click the Undo key Deleting Text When deleting text in your document you can either use the Delete key or the Backspace key. The Delete key deletes text to the right of your cursor while the Backspace key deletes text to the left of your cursor. Cut, Copy and Paste Often times you will need to move text from one location in a document to another, or to a different application.
6 In this case you will perform a Cut and Paste. To reproduce a specific part of a document and place it elsewhere, you will perform a Copy and Paste. To Cut Text: 1) Select the text you want to move 2) Click on the Cut icon located on the Home tab in the Clipboard group To Copy Text: 1) Select the text you want to copy 2) Click on the Copy icon located on the Home tab in the Clipboard group To Paste Text: 1) Click in the area of the document where you want to paste your text 2) Click on the Paste icon located on the Home tab in the Clipboard group 5 Formatting a Document To Make Font Changes: 1) Select the desired text that you want to format 2) Choose commands from the Font group on the Home tab 3) For additional formatting options, click on the Dialog Box Launcher in the lower-right corner of the group to launch the Font dialog box You can also use the MiniToolbar.
7 The Mini Toolbar is activated when you select text to be formatted. This toolbar is miniature and semi-transparent to help you work with fonts, font styles, font sizing, alignment, text color, indent levels, and bullet features. Live Preview Using Live Preview temporarily applies formatting on selected text or objects whenever a formatting command is hovered. This allows you to quickly preview how the formatting options will look before they are made. 1) Select the desired text that you want to format 2) On the Home tab, in the Font group, do any of the following: a. Click the arrow next to the Font box and move the pointer over the fonts that you want to preview.
8 B. Click the arrow next to the Font Size box and move the pointer over the font sizes that you want to preview. 6 c. Click the arrow next to the Text Highlight Color button and move the pointer over the highlight or fill colors that you want to preview. d. Click the arrow next to the Font Color button and move the pointer over the font colors that you want to preview. When you finish previewing the formatting choices, do one of the following: To apply the previewed formatting, click the selected font name, size, or color in the list To cancel live previewing without applying any changes, press ESC Formatting a Paragraph A paragraph is a select group of text that can have its own formatting characteristics, such as alignment, spacing and styles.
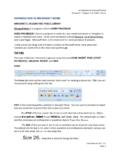
9 1) Select the desired paragraph(s) that you want to format 2) Choose commands from the Paragraph group on the Home tab 3) For additional formatting options, click on the Dialog Box Launcher in the lower-right corner of the group to launch the Paragraph dialog box 4) You can also use the MiniToolbar Previewing and Printing a Document 1) Click the File tab 2) Click Print This view includes print preview, print commands, as well as the print settings: 7 Saving and Closing a New Document To Save a New Document 1) On the Quick Access Toolbar, click the Save button ~OR~ 2) Click the File tab 3) Click Save As, the Save As dialog box will appear 4) In the File Name field, type the name of the document 5) Click Save To Close a Document 1) Click the File tab, and then click Close 2) If a Microsoft Office Word dialog box appears displaying a Do you want to message 3) Click Save to save, Don t Save to discard changes, or Cancel to close the dialog box