Transcription of Meet the Tiva C Series TM4C1294 - Texas …
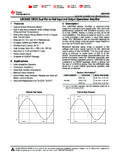
1 Meet the TivaTM C Series TM4C1294 . A closer look at your new LaunchPad Connected LaunchPad Featured microcontroller: Tiva C Series TM4C1294 . This LaunchPad is ideal Evaluation Kit Industrial applications, including remote monitoring, networked automation, embedded gateways, test & measurement and more Part Number: EK-TM4C1294XL Beginners & experienced developers with multiple points of entry into software development (Energia for beginners & industrial-grade tools like CCS, Keil, and IAR for more advanced designers). {. What comes in the box? This Quick TM4C1294 . Start Guide LaunchPad TM4C1294XL. { TM4C1294 NCPDTI Microcontroller - 32-bit ARM CortexTM-M4 120-MHz CPU. with floating point - 1 MB Flash / 256 kB RAM / 6 kB EEPROM.}}
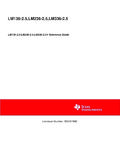
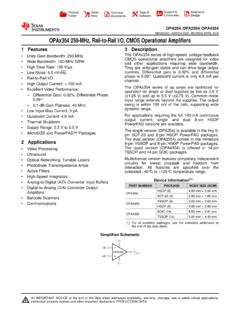
2 Micro-USB. Cable - 8-/16-/32-bit EPI. - 12-bit SAR ADC (2 MSPS), Comparators, Ethernet Timers and DMA. Cable - Advanced connectivity integration: - 2 CAN Modules - QSSI/UART/I2C. - Integrated Full- & Low-speed USB - 10/100 Ethernet MAC + PHY Software can be downloaded online @ BoosterPack Ecosystem Sensor Hub BoosterPack Fuel Tank BoosterPack EK-TM4C1294XL Overview InvenSense MPU-9150 9-axis Untether your LaunchPad projects! MEMS motion sensor 40-pin BoosterPack 40-pin BoosterPack Rechargeable battery connector can accept connector can accept - 3-axis gyroscope Power Select I C fuel gauge 2 both 20- & 40-pin both 20- & 40-pin - 3-axis accelerometer BoosterPacks Jumper (JP1) BoosterPacks - 3-axis compass LED charge-level indicator {.}
3 {. Bosch Sensortec BMP180 Provides 5V & sources pressure sensor Debug USB Port Sensirion SHT32 humidty & for power and Ethernet programming/. ambient temperature sensor Port debugging Intersil ISL29023 light & IR sensor TI TMP006 contactless temp sensor >> See them all @ Reset Switch Tiva TM4C- Wake Button 123GH6 PMI for Software Tools programming Energia Professional Software tools USB. Micro-A/ -B. Connector { & debugging External debug connection A simple open-source & LaunchPad is also supported by professional IDEs that community-driven code editor provide industrial-grade features and full debug based on the Wiring framework. capability. Set breakpoints, watch variables & more with { Breadboard Connected LaunchPad.}}}
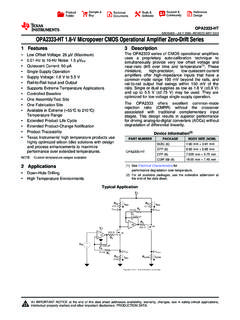
4 Connection Headers Robust collection of easy-to-use {. {. function calls. APIs, and examples to get you started quickly. Code Composer StudioTM IDE Third party IDE options {. User User Switch Switch 1 (PJ0) 2 (PJ1). User LEDs 1:4. 40-pin BoosterPack connector can accept 40-pin BoosterPack connector can accept (PN1, both 20- & 40-pin both 20- & 40-pin >> PN0, BoosterPacks BoosterPacks PF4, Tiva TM4C1294 NCPDTI. PF0) Microcontroller 2014 Texas Instruments Incorporated. The platform bar, Tiva, and Code Composer Studio are trademarks of Texas Instruments. All other trademarks are the property of their respective owners. >> Disclaimer: SPMZ858. Let's get started! The out-of-box demo: The EK-TM4C1294XL Connected LaunchPad features a TM4C1294 NCPDTI microcontroller device pre-programmed with an Internet of Things (IoT) quickstart application.}}}
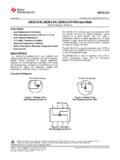
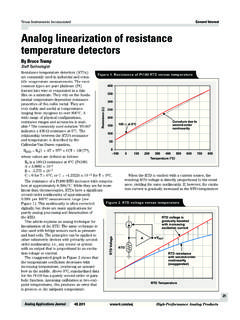
5 This application records various information about the Connected LaunchPad and periodically reports it to a cloud server managed by Exosite, a third party. 1. Register with Exosite Go to and create a Portal account. After activating your account, log in and click on the circled link under Getting Started Guide on the Home page to add your Tiva C Series Connected LaunchPad to your Exosite Portal. Setup Type: Click Select a supported device below . and select the EK-TM4C1294XL Connected LaunchPad . from the drop-down menu. Click continue. Device Setup: Enter the device MAC address, a device name, and a device location. Click continue. The device MAC address is on a sticker on the bottom of your board.
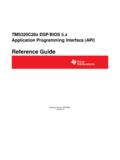
6 Confirm: Your Connected LaunchPad is now registered with Exosite! You can see your device on the Devices tab. 2. Connecting the Hardware Connect the included Ethernet cable from the Ethernet port of a router to the Ethernet port on the Connected LaunchPad. Verify that the Power Select Jumper (JP1) is in the ICDI position. Connect the included USB. cable from a Windows -enabled PC to the Debug USB port (top-right corner) on the Connected LaunchPad. Note: If the Found New Hardware dialog box appears, ignore it until it is time to install the drivers. 3. Demo Application Go to the Home tab on the far left of the TI Exosite webpage. Under Device List, click on your device to see the data dashboard.
7 Here you can find widgets that display data and interact with your Connected LaunchPad. For more details about this quickstart application, see the readme file located at the default file path C:/ qs_iot. Visit to watch the tutorial video. Troubleshooting Notes: If you have trouble connecting or firewall issues, go to If your device is behind a proxy, connect to the Virtual COM Port (see step 4 below) and type setproxy help' in the terminal window for configuration information. 4. Connecting to the Virtual COM Port The Debug USB Port provides debug and Virtual COM Port connectivity via the In-Circuit Debug Interface (ICDI). To use the Virtual COM port, install the Stellaris ICDI Drivers on your PC.
8 The drivers and driver installation instructions can be found at Once installed, you can view data from the quickstart application and troubleshoot using a terminal running at 115,200 baud, 8-N-1. Where do I go next? Software, Drivers, & Documentation Go to Here you will find links to the latest TivaWare software, driver installation instructions, TM4C microcontroller-compatible compiler and debuggers, LM Flash Programmer, the PinMux Utility, a complete list of compatible devices, additional documenation including data sheets and user guides, and everything else you need to get started! Project 0. When you are ready to take the next step, complete Project 0. For more information, go to and click on the Project 0 link for the EK-TM4C1294XL.
9 (!) indicates a GPIO pin that is interrupt capable. ** indicates functionality that may not be present on all LaunchPads. IMPORTANT NOTICE. Texas Instruments Incorporated and its subsidiaries (TI) reserve the right to make corrections, enhancements, improvements and other changes to its semiconductor products and services per JESD46, latest issue, and to discontinue any product or service per JESD48, latest issue. Buyers should obtain the latest relevant information before placing orders and should verify that such information is current and complete. All semiconductor products (also referred to herein as components ) are sold subject to TI's terms and conditions of sale supplied at the time of order acknowledgment.
10 TI warrants performance of its components to the specifications applicable at the time of sale, in accordance with the warranty in TI's terms and conditions of sale of semiconductor products. Testing and other quality control techniques are used to the extent TI deems necessary to support this warranty. Except where mandated by applicable law, testing of all parameters of each component is not necessarily performed. TI assumes no liability for applications assistance or the design of Buyers' products. Buyers are responsible for their products and applications using TI components. To minimize the risks associated with Buyers' products and applications, Buyers should provide adequate design and operating safeguards.