Transcription of NI-DAQmx for USB Devices Getting Started Guide - …
1 Getting Started GUIDENI-DAQ mx for USB DevicesThis Guide describes how to install and configure NI USB data acquisition (DAQ) Devices and how to verify that the Devices are working properly. Current versions of NI documents are available at For NI-DAQmx related documentation, go to and enter rddq8x. The NI-DAQmx readme, available on the NI-DAQmx installation disc, contains software version support must be an Administrator to install NI software and Devices on your and Mac OS drivers are available by entering rddqld at Step 1. Install the NI Application SoftwareInstall the NI application software such as NI LabVIEW.
2 Back up any applications before upgrading software or modifying the 2. Install NI-DAQmxInstall NI-DAQmx driver software before installing NI USB Devices so Windows can detect them. Insert the disc included with your device into your computer. If the NI-DAQmx installer does not open automatically, select Start Run. Enterx:\ , where x is the drive letter. Complete the instructions. Troubleshooting information is available at NI-DAQmx for USB Devices Getting Started 3. Unpack and Set Up the NI USB DeviceRemove the packaging and inspect the device.
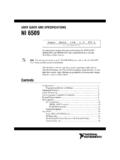
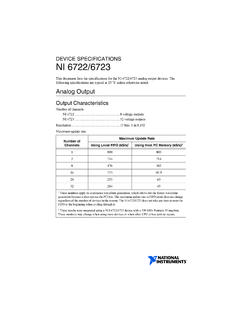
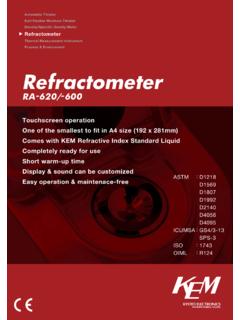
3 Contact NI if the device is damaged. Do not install a damaged NI USB device is static sensitive. Always properly ground yourself and the equipment when handling or connecting the signal label, strain relief, panel mounting, and safety and compliance information, refer to the NI USB device documentation available at To install the NI USB device, plug the USB cable into the PC and device, and follow the Terminal Block (interchangeable before signal connection)2 Signal Labels3 USB-600x/621x/6501 Device4 USB-9000 Series Device5 USB-443x Device34215 National Instruments Corporation3NI-DAQmx for USB Devices Getting Started GuideFirmware Update After installing the NI USB device or upgrading NI-DAQmx , complete any Windows Hardware Wizard prompts to update the firmware on your Series Users When first connecting the device to your computer, the Found New Hardware Wizard cycles through approximately three installations before the device is ready for use.
4 Windows Device RecognitionWindows versions earlier than Vista recognize newly installed Devices when the computer restarts. Vista installs device software Device MonitorAfter Windows detects newly installed Devices , NI Device Monitor runs automatically at startup. NI Device Monitor is on when the icon, shown at left, is visible in your Windows taskbar. To turn the NI Device Monitor on, unplug your device, restart NI Device Monitor by selecting Start All Programs National Instruments NI-DAQ NI Device Monitor, and replug in your NI Device Monitor prompts you to select from the following options.
5 These options may vary, depending on the Devices and software installed on your system. Begin a Measurement with This Device Using NI LabVIEW SignalExpress Opens an NI-DAQmx step that uses the channels from your device in LabVIEW SignalExpress. Begin an Application with This Device Launches LabVIEW. Choose this option if you have already configured your device in MAX. Run Test Panels Launches MAX test panels for your for USB Devices Getting Started Configure and Test This Device Opens MAX. Take No Action Recognizes your device but does not launch an following features are available by right-clicking the NI Device Monitor icon: Run at Startup Runs NI Device Monitor at system startup (default).
6 Clear All Device Associations Select to clear all actions set by the Always Take This Action checkbox in the device auto-launch dialog box. Close Turns off NI Device Monitor. Step 4. Confirm NI USB Device RecognitionTo confirm NI USB device recognition, complete the following steps:1. Launch Expand Devices and Interfaces to confirm MAX detects your NI USB device. If your NI USB device is not listed, press <F5> to refresh MAX. If the device is still not recognized, go to National Instruments Corporation5NI-DAQmx for USB Devices Getting Started Guide3.
7 Right-click the NI USB device name and select Self-Test. When the self-test completes, a successful verification message appears. If an error occurs, refer to 5. Attach Sensors and Signal LinesAll NI USB Devices have a PDF user manual that contains pinouts. Go to and search for your device. The following table lists pinout information about sensors, go to For information about IEEE TEDS smart sensors, go to using LabVIEW SignalExpress, go to Step 7. Using Your NI USB Device in an to Access PinoutMAXR ight-click the device name under NI-DAQmx Devices , and select Device the device name under NI-DAQmx Devices , and select Help Online Device Documentation.
8 A browser window opens to with the results of a search for relevant device AssistantSelect the task or virtual channel, and click the Connection Diagram tab. Select each virtual channel in the HelpSelect Start All Programs National Instruments NI-DAQmx NI-DAQmx to the device for USB Devices Getting Started 6. Run Test PanelsUse the MAX test panel as follows:1. In MAX, expand Devices and Interfaces NI-DAQmx Right-click the device, and select Test Panels to open a test Click Start to test device functions, or Help for operating instructions.
9 To troubleshoot errors, refer to the NI-DAQmx Help, or go to 7. Using Your NI USB Device in an ApplicationUse the DAQ Assistant to configure virtual and measurement channels. After installing NI-DAQmx refer to the Start All Programs National Instruments NI-DAQ for LabVIEW SignalExpress and for the NI-DAQmx readme for operating system and NI application version support. National Instruments Corporation7NI-DAQmx for USB Devices Getting Started GuideThe following table lists DAQ Assistant tutorial locations in NI applications:Programming ExamplesNI-DAQmx includes example programs to help you get Started developing an application.
10 Modify example code and save it in an application, or use examples to develop a new application, or add example code to an existing locate NI software examples, go to and enter the info code daqmxexp. For additional examples, refer to run examples without the NI USB device installed, use an NI-DAQmx simulated device. For more information, select Help Help Topics NI-DAQmx MAX Help for NI-DAQmx and search for simulated Devices . NI ApplicationTutorial LocationLabVIEWGo to Help Search the LabVIEW Help. Next, go to Getting Started with LabVIEW Getting Started with DAQ Taking an NI-DAQmx Measurement in LabVIEW.