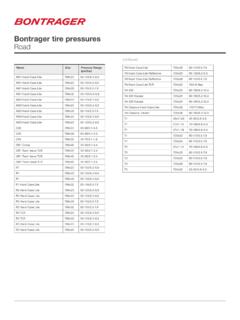
Transcription of NODE 1.1 & NODE 2
1 ENGLISHNODE & NODE This ManualThis is the complete manual for your NODE computer. It explains how to install your NODE computer and complete the setup (programming). It includes riding safety. It also shows how to access the features of your NODE computer and to view and record your ride data. If you need additional information, visit your Bontrager dealer or visit us online at 1 BASIC INFORMATIOND isplay (screen) .. 2 Function 3 Buttons .. 4 Memory .. 5 INSTALLATIONP rocess Overview.
2 6 Attaching the Computer .. 7 Setup (Initial Programming) .. 8 Basic Setup .. 9 STARTING A RIDEMain Ride Functions .. 14 Secondary display .. 15 RECAP (Review Trip Data)Switch to RECAP 23 See Recap (Trip data) .. 24 MANAGE (Optional Programming)Switch to Manage 25 Bike Selection .. 26 Wheel 27 Altitude .. 30 Cadence .. 31 Power .. 32 Heart Rate and Calories .. 34 Temperature .. 40 Dual 45 Distance .. 49 BATTERY INFORMATION .. 51 TROUBLESHOOTING .. 52 Screen TermsThe following abbreviations appear on the screen of the Node LTAltitudeAVGA verageBIKEB icycles, including bike1 and bike 2 CADC adenceCALC alorieCLOCKC lockCURC urrent, or nowDISTD istanceFFemaleGRADEG radeHRHeart RateKGKilogramLBPoundMMaleMAXM aximumMINM inimumODOO dometerOFFOffONOnPWRP owerTEMPT emperatureTIMETime1 When riding your bicycle, do not stare at the computer for a long time (Figure 1).
3 If you do not watch the road, you could hit an obstacle, which might cause you to lose control and fall. Figure 1. Do Not Stare at Computer for Long Periods of Time. SAFETY22 BASIC INFORMATIONThis section describes the NODE display, the terms used in this manual, and the working modes. This is background information to help you understand the other sections of the manual. However, you will not see any of the screen elements until you have installed the (screen) There are four regions of data on the NODE screen.
4 Computer statusThe uppermost section of the NODE screen shows the status of connected sensors, mode, bike selection, and battery and Ride ClockThe second section of the NODE screen shows the time of day (either 12-hour or 24-hour) and the Ride Clock, which shows the time the computer has been running on the current NODE always shows Speed as the biggest numbers in the middle of the display. Recap ModeRide ClockClockBike Selection Bike 1 Bike 2 BatteryMode IndicatorsSpeed (Primary Display)Mode (Secondary Display)Speed Function Selection Current Average MaximumActive sensor Indicators Speed Cadence Power Heart Rate33 Secondary displayThe lower part of the display shows the secondary functions.
5 When set to Dual View, your computer shows two secondary functions at the same time. See the section Setting the Dual View in the Manage listThe NODE and NODE have different function menus. NODE NODE ViewXXCadenceXXHeart rateXXPowerXXGradeXAltitudeXTemperatureX You can switch most of the sensors to Off or On. If a sensor is switched to Off, its function does not appear when you browse ModeRide ClockClockBike Selection Bike 1 Bike 2 BatteryMode IndicatorsSpeed (Primary Display)Mode (Secondary Display)Speed Function Selection Current Average MaximumActive sensor Indicators Speed Cadence Power Heart Rate44 ButtonsThe NODE has four buttons (Figure 7).
6 The actions for buttons are described in the table below. For simplicity, these are the abbreviations of button names: T is TopB is Bottoms1 is Side 1s2 is Side 2 BrowsePress and repeat to switch through a list of values or screen a button continuously for about three a button once, NODE has a Trip memory and a Total (accumulated) data CadenceAVGand MAX Distance Heart Rate AVG, MIN, and MAX; plus Zones 1 through 5 Power AVG, MIN, and MAX Speed AVG and MAX Altitude (ALT), +, , and Grade (%) AVG and MAXE rasing trip data: Trip RestartThe Trip data can be erased (set to 0) before each ride (Figure 8): hold s1 for three seconds.
7 Resetting the Trip memory does not affect the Total memory. Accumulated data (Total memory) Total distance Total altitude gainErasing total memory: ResetYou can set all values in the memory to 0 (zero) and erase all settings. See page 7. Names of 8. Erase Trip Data.(3 seconds)s155 ModesThe NODE computer has five modes:SetupThis mode allows you to program the computer, setting your preferences for language, distance units, time, and the Ride mode (Figure 9) when riding.
8 It shows displays of the information gathered by the computer. This information can be the current data: your current speed, the current temperature, or data from other functions. For some functions the NODE can display your average, total, or minimum/maximum data. You can learn more about each of these functions in the section that covers you have finished a ride or just want to see your data, you can view the computed data in the Recap mode (Figure 10).Manage This mode allows you to revise the Setup or perform advanced (Standby)If the sensors do not send a signal to the NODE for 20 minutes, the computer goes into Standby to conserve battery power.
9 In Standby, the screen will display two dashes ( ). After an additional 10 minutes, the NODE switches to Off. NOTE: To extend battery life during long periods of non-use, remove the computer from its computer base. This deactivates the Auto Start are two methods for waking the computer: Press any button Autostart: spin the wheel to make the wheel sensor send a signalFigure 9. Ride 10. Recap your Node up and running is easy and takes only about 10 minutes. Process OverviewIt will help you through the process if you take the time to completely read the installation section before you start.
10 For example, you cannot complete the setup process (#3 below) if the sensor cannot read the magnet in the wheel (#1).Here are the steps in the process (explained more fully in the following pages):1. Install the speed sensor and wheel magnet (see the instructions packaged with the sensor ). Install optional accessory Attach the computer to the handlebar or Setup your preferences for time, miles, etc. 4. Pair the computer (make the computer recognize and remember the radio signal from the sensor ).