Transcription of ONE-ON-ONE COMPUTER HELP COMPUTER CLASSES …
1 ONE-ON-ONE COMPUTER HELPCOMPUTER CLASSESTECHTUTORTECHTUTORTECHTUTORONE-ON -ONE COMPUTER HELPCOMPUTER CLASSESTECHTUTORONE-ON-ONE TECHTUTORONE-ON-ONE COMPUTER HELPCOMPUTER CLASSESONE-ON-ONE COMPUTER HELPCOMPUTER CLASSESCOMPUTER HELPM icrosoft excel 2016 Level 1 ManualRev excel 2016 LEVEL 1 microsoft excel 2016 Level 1 1 | microsoft excel 2016 Level 1 Welcome to microsoft excel 2016 - Level 1. In this class you will learn the basics of excel , and work on a small project using commands and calculations. You will connect to online tutorials and courses to reinforce and advance your learning. As you re going through the class, think about how you could use excel at home or work.
2 Contents!What is microsoft excel ? .. 1! microsoft excel 2016 Interface .. 2!The Welcome Page .. 2!The Ribbon .. 2!Quick Access Toolbar .. 3!File Tab .. 3!Exercise My Pet Store Earnings .. 4!Entering Data into Cells .. 4!Basic Formatting - Labels .. 4!Basic Formatting - Values .. 5!Calculating with Formulas .. 6!Copy a Formula with Autofill .. 7!Quick Addition with AutoSum .. 8!Save Your Work .. 8!Exercise Welcome to excel .. 9! ONE-ON-ONE help , CLASSES , and Online Courses .. 9! What is microsoft excel ? excel is a spreadsheet program that allows you to store, organize, and manipulate data. Data can be text, numbers, and formulas. The data is entered into cells which are organized into columns and rows.
3 Many people use excel to keep a budget, use charts and graphs to show data, track sales for a business, and much more. Open excel 2016 on your COMPUTER . Locate the excel icon on the COMPUTER desktop (see Figure 1), place the pointer arrow on it, and double-click the left mouse button. Figure 1 - microsoft excel icon 2 | microsoft excel 2016 Level 1 microsoft excel 2016 Interface The excel interface is where you see and use the tools in excel on the screen. This includes the way the tools are organized and presented to you, the software user. You will learn about The Welcome Page, The Ribbon, Quick Access Toolbar, and File Tab. The Welcome Page When you first open excel 2016, you will see the Welcome Page (see Figure 2).
4 Take a moment to browse the many templates available for specific uses. Notice the Search Box near the top-center where you can search for templates for other uses. Figure 2 - excel Welcome Page (zoomed in to upper left side) Try it! Open a new Blank workbook from Welcome Page. Simply click the template with that name. You will be working in this blank workbook during the class exercise. TIP: if you have a microsoft account (like outlook, hotmail, or Office 365) you can log in near the upper right corner of the Welcome Page where it reads, Sign in to get the most out of Office . Doing this allows you to save your work to OneDrive , and then accessing it from any other COMPUTER with Internet connection.
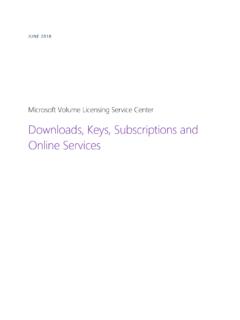
5 For example, you start a document in the library, save it to your microsoft account, and retrieve at home or work later. This is known as saving to the cloud, or more formally cloud computing . The Ribbon The Ribbon is a toolbox at the top of the screen. It s organized into three main parts (see Figure 3): !!Tabs Tabs represent a general activity area. For example, the Home has the tools most often used, and the Insert tab has the tools to put objects into the work area. !!Groups Groups show related tools together more specifically, like Font or Alignment . !!Commands A command is one of the actual tools , which can be a button, expandable menu, or a box for entering information.
6 3 | microsoft excel 2016 Level 1 Try it! Click the various tabs and observe how the Groups and Commands change. Let the mouse arrow rest over a command (icon) and the name and description of that command will appear. TIP: If you have a question about excel , type it into the box labeled Tell me what you want to Quick Access Toolbar The Quick Access Toolbar is above the Tabs and has the commands used most often (see Figure 4). Try it! Click into any of the blank rectangles (cells) in the large white grid area (worksheet). Type your name, then click the Undo button. The Undo command takes back any changes made in the document. Use it when you want to go back a few steps.
7 On that note, it is important to save early and save often. (see Saving Your Work on page 9.) File Tab The File Tab is where you can create a New document, Open an existing one, Save changes, Save As a different file with a different name, Print the current workbook, and many other options. Try it! Click the File Tab and observe the options described. This area is called the backstage view . Click the back arrow at the top to return to the main excel work area. Figure 3 - Parts of the Ribbon Tabs Groups Commands Quick Access Toolbar Undo Figure 4 - Quick Access Toolbar & Undo button (zoomed in) 4 | microsoft excel 2016 Level 1 Exercise My Pet Store Earnings Let s get to work in excel !
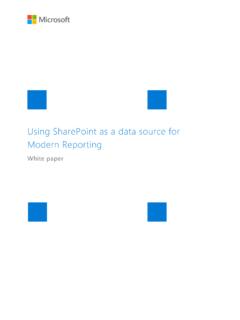
8 In this exercise, you will operate a pet store for a month and keep track of your sales for that month. First you will learn how to enter information into a cell. Entering Data into Cells Most of the work in excel takes place in the rectangular boxes called cells . Cells make up the large white grid called the worksheet . Each cell has a cell address made up of a letter for the column, and a number for the row (see Figure 5). Try it! Follow these steps to recreate Figure 5: 1.!Click into cell A1 2.!Type My Pet Store Earnings 3.!Press Enter on the keyboard 4.!Type Type of Pet in cell A2 5.!Continue entering the list of pets shown in Figure 5 Let s continue creating this table by adding column labels: 1.
9 !Click into cell B2 2.!Type Number Sold 3.!Press the Tab on the keyboard 4.!Type Price in cell C2 5.!Press Tab 6.!Type Total per type The worksheet should look like Figure 6. Basic Formatting - Labels The words you type into a cell are called labels . excel has many formatting tools to make labels look better and easier to read. For example, the label Number Sold is too long to fit into a cell B2. Try it! Select cell range A1:E1 (click and drag from cell A1 to E1). Click the Merge and Center command in the Alignment Group of the Home Tab. Now add a little style: click the Good command in the Styles Group of the Home Tab. Your worksheet should look like Figure 7.
10 Figure 5 - Worksheet area, columns, rows, and data in cells Figure 6 - Worksheet with column labels 5 | microsoft excel 2016 Level 1 Try it! Place the mouse pointer on the thin line between column letters B and C . Double click, and the columns will automatically adjust to fit the text in column B . Make the text in every column easy to read. Your worksheet should look like Figure 7. You may also click and drag to adjust the width of the column. Basic Formatting - Values The numbers you type into a cell are called values . Working with values in excel will begin to show you the power of the software. Try it! Type the values you see in columns B and C in Figure 8.