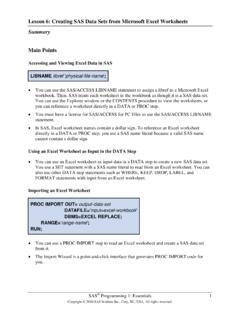
Transcription of Introduction to MS EXCEL 2007
1 Introduction to MS EXCEL 2007. Data entry & formatting Using formulas & functions Presenting data with charts Database features in EXCEL 2009 Centre for Educational Technology, University of Cape Town Introduction to MS EXCEL 2007 2. Table of Contents Getting started with EXCEL .. 4. What is EXCEL ? .. 4. The EXCEL 2007 window .. 4. Starting EXCEL .. 5. Closing EXCEL .. 6. Navigating within a worksheet .. 6. Selecting cells .. 7. Selecting rows or columns .. 7. Entering data .. 8. First you need a workbook .. 8. Overview of data 8. Data entry cell by cell .. 9. Deleting data .. 9. Moving 9. Copying data .. 9. Using Autofill.
2 10. Saving a 10. Editing 11. Editing cell contents .. 11. Inserting or deleting cells .. 11. Inserting or deleting rows .. 12. Inserting or deleting columns .. 12. Inserting or deleting a worksheet .. 12. Moving or copying a worksheet .. 13. Renaming a worksheet .. 13. Formatting data .. 14. Cell formatting .. 14. Formatting rows and columns .. 14. Hiding rows and columns .. 15. Keeping row and column headings in 16. Creating a 17. How formulas are evaluated .. 18. Relative cell 18. Absolute cell 18. Functions .. 21. Using AutoSum .. 21. Basic functions .. 21. The IF() 23. Nested functions .. 23. 24. Print preview .. 24.
3 Preparing to 24. Printing a 25. 26. Creating a 26. Modifying a 27. Inserting graphics in a worksheet .. 27. Data manipulation .. 28. 28. Filter .. 28. Subtotals .. 29. 2009 Centre for Educational Technology, University of Cape Town Introduction to MS EXCEL 2007 3. MS EXCEL Task Sheet .. 31. 2009 Centre for Educational Technology, University of Cape Town Introduction to MS EXCEL 2007 4. Getting started with EXCEL EXCEL and Word have a lot in common, since they both belong to the MS Office suite of programs. This means that if you are familiar with Word, then you already know how to use several EXCEL features! In the Word section of this manual, you'll be able to find more information and guidance on Using the mouse and keyboard Starting the program The Office button and ribbon Character formatting Opening, saving and printing files Accessing Help What is EXCEL ?
4 EXCEL is all about numbers! There's almost no limit to what you can do with numbers in EXCEL , including sorting, advanced calculations, and graphing. In addition, EXCEL 's formatting options mean that whatever you do with your numbers, the result will always look professional! Data files created with EXCEL are called workbooks (in the same way as Word files are called documents). But where Word starts up with a single blank page, EXCEL files by default contain three blank worksheets. This gives you the flexibility to store related data in different locations within the same file. More worksheets can be added, and others deleted, as required.
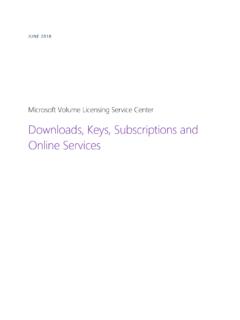
5 You'll often hear EXCEL files referred to as spreadsheets. This is a generic term, which sometimes means a workbook (file) and sometimes means a worksheet (a page within the file). For the sake of clarity, I'll be using the terms workbook and worksheet in this manual. The EXCEL 2007 window As in Word 2007, the old menu system has been replaced by the Ribbon and the Office button. The title bar displays the name of your current workbook. Tabs at the bottom of the screen identify the different worksheets available to you I'll show you a little later how to give them meaningful names. 2009 Centre for Educational Technology, University of Cape Town Introduction to MS EXCEL 2007 5.
6 Notice how the working area of the screen is divided into rows (1, 2, 3, 4, ..) and columns (A, B, C, D, ). Together these provide an address, such a C10 or G21, that uniquely identifies each cell in the worksheet. A range of cells extends in a rectangle from one cell to another, and is referred to by using the first and last cell addresses separated by a colon. For example, the group of cells from A3 to G4 would be written as A3:G4. In the example above, the current or active cell is B7. It is surrounded by a heavy black border, and its address is displayed in the name box above column A. Its row and column numbers are also highlighted.
7 On the right of the name box is the formula bar. This displays the value stored in the active cell, and is also the place where you would enter a new data value or formula into that cell. Starting EXCEL If you have an icon on the desktop for EXCEL , then all you have to do is double-click it to open EXCEL . Alternatively, click the Start button and then select All Programs, Microsoft Office, Microsoft EXCEL . When you open EXCEL from a desktop icon or from the Start menu, a new empty workbook (consisting of three worksheets) will be displayed on your screen. 2009 Centre for Educational Technology, University of Cape Town Introduction to MS EXCEL 2007 6.
8 If you double-click on an existing EXCEL file from inside the Windows Explorer window, then EXCEL will open and display the selected file on your screen. Closing EXCEL Close EXCEL by clicking the X on the far right of the title bar. Navigating within a worksheet Using the mouse: Use the vertical and horizontal scroll bars if you want to move to an area of the screen that is not currently visible. To move to a different worksheet, just click on the tab below the worksheet. Using the keyboard: Use the arrow keys, or [PAGE UP] and [PAGE DOWN], to move to a different area of the screen. [CTRL] + [HOME} will take you to cell A1.]
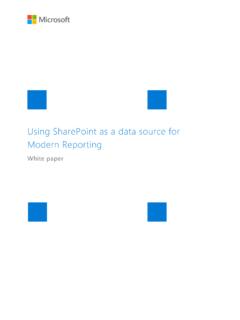
9 [CTRL] + [PAGE DOWN] will take you to the next worksheet, or use [CTRL] +. [PAGE UP] for the preceding worksheet. You can jump quickly to a specific cell by pressing [F5] and typing in the cell address. You can also type the cell address in the name box above column A, and press [ENTER]. 2009 Centre for Educational Technology, University of Cape Town Introduction to MS EXCEL 2007 7. Selecting cells Using the mouse: Click on a cell to select it. You can select a range of adjacent cells by clicking on the first one, and then dragging the mouse over the others. You can select a set of non-adjacent cells by clicking on the first one, and then holding down the [CTRL] key as you click on the others.
10 Using the keyboard: Use the arrow keys to move to the desired cell, which is automatically selected. To select multiple cells, hold down the [SHIFT] key while the first cell is active, and then use the arrow keys to select the rest of the range. Selecting rows or columns To select all the cells in a particular row, just click on the row number (1, 2, 3, etc) at the left edge of the worksheet. Hold down the mouse button and drag across row numbers to select multiple adjacent rows. Hold down [CTRL] if you want to select a set of non-adjacent rows. Similarly, to select all the cells in column, you should click on the column heading (A, B, C, etc) at the top edge of the worksheet.