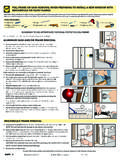
Transcription of PREPARING FOR INSTALLATION
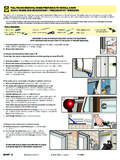
1 BFRPF 3 2018 Pella CorporationRevised 04/16/2018 YOU WILL NEED TO SUPPLY:TOOLS REQUIRED: Moisture Resistant shims/spacers Fasteners (see block frame anchor instructions and tables at the end of this booklet) Closed cell foam backer rod/sealant backer Pella SmartFlash foil backed butyl window and door flashing tape or equivalent Low expansion, low pressure polyurethane insulating window and door foam sealant DO NOT use high pressure or latex foams. Pella Window and Door INSTALLATION Sealant or equivalent high quality, multi-purpose sealant Tape measure Level Square Hammer Scissors or utility knife Small flat blade screwdriver Sealant Gun Screw Gun with a Phillips Driver bit 1/8" Allen wrenchSEALANTSEALANTTWO OR MORE PEOPLE WILL BE REQUIRED FOR THE WINDOW WINDOWS IN UPRIGHT POSITION, OUT OF DIRECT Remove plastic wrap and cardboard packaging from the window. Do not cut checkrail bands (if present) or remove plastic or foam shipping spacers located between the window sash and frame.
2 DO NOT open the window until it is securely Inspect the product for any damage such as cracks, dents or scratches. DO NOT install damaged Remove screens and hardware (if necessary). Label them and set aside in a protected with Half Screens: From the exterior, pull one side of the screen near the shipping clips until the clips disengage from the frame. Rotate the shipping clips toward the exterior of the screen until they snap free from the screens of some vinyl windows can be removed from the INSTALLATION , remove dirt and debris from all surfaces of the Read the entire instruction before PUSH DISCARD PUSH Shipping Clip Pull screen nearshipping clipPREPARING FOR BLOCK FRAME OR RENOVATION / PRECISION FIT WINDOW INSTALLATIONOTHER CONSTRUCTION MATERIALS MAY BE REQUIRED. READ AND UNDERSTAND THE INSTRUCTIONS AND INSPECT THE WALL CONDITIONS BEFORE YOU FOR INSTALLATIONT hese instructions were developed and tested for use with wall systems designed to manage water.
3 These instructions are not to be used with any other construction methods or window frame types. INSTALLATION instructions for use with other construction methods or frame types may be obtained from Pella Corporation, your local Pella retailer or Building designs, construction methods, building materials, and site conditions unique to your project may require an INSTALLATION method different from these instructions and/or additional care. Determining the appropriate INSTALLATION method is the responsibility of you, your architect, or construction read the Limited Warranty before purchasing or installing Pella products. By installing this product, you are acknowledging that this Limited Warranty is part of the terms of the sale. Failure to comply with all Pella INSTALLATION and maintenance instructions may void your Pella product warranty. See written Limited Warranty for details, including exceptions and limitations at , or contact Pella Customer Service at 6 2018 Pella CorporationRevised 04/16/2018 CAUTION: Many windows in older homes are painted with lead-based paint.
4 Removal of old windows may disturb this paint. Proper precautions must be taken to minimize exposure to dust and debris. Consult state or local authorities for more TO USE APPROPRIATE PERSONAL PROTECTIVE Measure the width and height of the pocket opening. The new window must be 1/2 to 3/4 smaller than this Unlock the window. If the sashes are painted shut, use a high-speed oscillating tool or a utility knife to cut the joint between the sashes and frame stops until the sashes are 1 DRILL 1/4IN WEEP HOLEDRILL 1/4IN WEEP HOLEDRILL 1/4IN WEEP HOLEDRILL 1/4IN WEEP HOLEDRILL 1/4IN WEEP HOLEDRILL 1/4IN WEEP HOLE1 REMOVE THE EXISTING SASHES2 PREPARE THE OPENING3 PREPARE THE WINDOWC. Remove the exterior stops at the head and jambs using a chisel, reciprocating saw, roto-tool or equivalent. Cut them flush with the side of the Carefully remove the upper sash and dispose of it StopWedgeFor older existing windows with weight pocket and pulley balances, cut the cords, letting the weights fall and remove the windows with vinyl or aluminum jamb liners, tilt or twist the sash and release it from the balance Remove the head and jamb parting stops (if applicable) by pulling or prying them out of the frame.
5 F. Carefully remove the lower sash. G. Remove any remaining jamb liner material (if applicable). Caution: Some balances are Insulate the weight chamber (if desired).Jamb LinerA. Inspect the existing window frame. Repair or replace any deteriorated Clean the opening of any dirt, debris or excess old paintNote: if using aluminum coil exterior trim, apply it Apply flashing tape to the sill. Cut one piece of tape the same length as the sill. Extend the tape up the vertical leg of the stool. Work the tape into the corner and press firmly to adhere the tape. Lap the tape over any coil trim at the Apply sealant over any gaps in the corners of the existing Check the sill for level or for Install and level sill shims only if necessary to correct for bowing of the sill. Place 1" wide x 1/4" to 3/8" thick shims 1/2" from each side. Place additional shims under each mullion and sliding window interlocker. For vinyl windows, add shims so maximum spacing is 18".
6 G. Attach shims to prevent movement after they are level. Note: Improper placement of shims may result in bowing the bottom of the next page for Sill Adapter illustrations. A. Drill pilot holes (if necessary) in the new window frame. See anchoring instructions at the end of this Dry fit the window in the opening. C. Measure the distance from the bottom of the window to the existing sill. Remove the window from the Trim the sill adapter to the correct height (if applicable). Use a sharp utility knife to score the sill adapter along the groove. Bend and break off the excess sill adapter material. E. Install the sill adapter. Cut it to length and notch it (if necessary).F. Dry fit the window a second time to ensure a proper fit. Remove the window from the SillMeasurethisdistance(SILL CUTAWAY VIEW)G. Create " weep holes (Vinyl products only). Drill or notch a weep hole 1" from each end of the sill adapter. Interiorsash stopExteriorblind stopPartingstopBottomsashStoolSillApronT op sashBottomsash weightTop balancecordBalancecord pulleysTop sashweightBottombalancecordsEXTERIOR Interior sash stop Parting stop Exterior blind stop Measure to this surfacePOCKET REPLACEMENT FROM THE EXTERIOR FOR BLOCK FRAME WINDOWS installing new block frame windows in existing wood double-hung or single-hung windowsPR_BFEBFRPF 7 2018 Pella CorporationRevised 04/16/20183 PREPARE THE WINDOW (continued)4 SET AND FASTEN THE WINDOWP ella 350 SeriesArchitect Series / 850, Designer Series / 750 and Pella 450 SeriesPella Impervia A.
7 Apply a 3/8" bead of sealant where the existing stool meets the existing window sill. Additionally, place sealant at the ends of the flashing tape, making sure to connect with the stool Apply a 3/8" bead of sealant at the exterior surface of the interior head and jamb stops. Connect this bead of sealant to the sealant line on the Insert the window in the opening. Check to make sure the window rests against the interior stops and is making contact with the Place shims and begin driving screws at each predrilled hole in the window frame. Add additional shims at the ends of meeting rails and as necessary to ensure even reveal between the frame and to the anchoring instructions at the end of this booklet. Ensure the window frame remains fully embedded in : Keep shims 1/2" from the exterior surface of the window to allow for backer rod and Cut the checkrail band at each jamb and remove. Tilt the sashes to remove checkrail clips.
8 (If applicable) Pella 450 Series only: Push the remaining tails of the band into the jambliner Check for plumb, level, square and window operation. Make any necessary adjustments to shims and finish installing frame Adjust the screw jacks (if applicable) with a screwdriver. Turn clockwise to move the frame toward the sash. Tilt the lower sash inward to locate the jamb jacks in the interior balance channel near the Install interior sealant from the exterior. Refer to the interior sealant instructions at the end of this Install exterior sealant. Refer to the exterior sealant instructions at the end of this booklet. J. Install exterior frame expanders at this time (if necessary).POCKET REPLACEMENT FROM THE EXTERIOR FOR BLOCK FRAME WINDOWS installing new block frame windows in existing wood double-hung or single-hung windows 1 Casements and Fixed Windows:1/4 Head expanderTop window frame(Side View)Encompass by Pella / ThermaStar by Pella /Pella 250 SeriesPR_BFEBFRPF 16 2018 Pella CorporationRevised 04/16/2018 EEEEVERYSESEVERYM2M1SM1M2 EEEVERYSM1M2M2M1 EESSEVERYM1M2M2M1 SSEVERYEEESEVERYSEVERYESM1M2M2M1 SEVERYEEEEPLACE FRAME SCREWS OR CLIPS AT THE LOCATIONS INDICATEDP roductEdge Spacing (E)Max.
9 Intermediate Spacing (S)First Mullion Anchor (M1)Second Mullion Anchor (M2)FastenerSpecial NotesWood **Casement / Awning6"16"3"*6"#8x3" Finish ScrewDouble- or Single- Hung6"16"3"*6"#8x3" Finish ScrewFixed Frame6"16"3"*6"#8x3" Finish ScrewMonumental DH > 54" x 96"6" (head)16" (head)3" *6" *#8 x 3" ScrewRemove sashes and jamb liners. Drive 1 screw though each jamb liner support clip (top, bottom, checkrail and center of each sash). Drive 2 additional screws through the frame (or secure clips) 3" above and below the checkrail on each jamb. Drive additional screws through the frame (or secure clips) centered between each jamb liner support SERIES (850), DESIGNER SERIES (750) AND PELLA 450 SERIES WINDOW ANCHOR SPACING INSTRUCTIONS1/8" Pilot Hole LocationsHeadJambSillCasement/AwningDesi gner/450 Series Double-HungArchitect Series Double-HungMonumental-HungDo not install fasteners through operator cutout. Pry HereSill anchors not required.
10 Designer Series 450 Series Note: Standard performance only. Additional anchoring may be required for performance upgrade, impact resistant products or to comply with local building code from end#6 x 5/8 corrosionresistant screwsLipMonumental Hung jamb liner support clipPry off Monumental Double-Hung jamb liner#6 x 1-1/2" screwClad Frame Head/Jamb/SillPR_BFEBFRPF 17 2018 Pella CorporationRevised 04/16/2018 PELLA IMPERVIA WINDOW ANCHOR SPACING INSTRUCTIONSP roductEdge Spacing (E)Max. Intermediate Spacing (S)First Mullion Anchor (M1)Second Mullion Anchor (M2)FastenerSpecial NotesWood**Casement / Awning6"*16"*None6"#8x2" Pan Head (Provided)Head and Sill anchors not required when frame width is less than 42" Single-Hung / Sliding Window6"*16"*None6"#8x2-1/2" Pan Head (Provided)Do not use Frame screws through the sillDouble-Hung6"*(head)16"*(head)None6" #8x2-1/2" Pan Head (Provided)Sill frame screw anchors are not requiredFixed Frame6"*16"*None6"#8x2-1/2" Pan Head (Provided)* Use Factory Drilled INSTALLATION holes if present.