Transcription of Printing a Mounting Template - Garmin
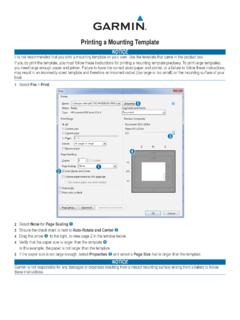
1 Printing a Mounting TemplateNoticeThese instructions for Printing a Mounting Template must be followed precisely. Failure to do so may result in incorrect dimensions on the Template and an incorrect cutout (too large or too small) on the Mounting surface of your print the attached Mounting Template , check the dimensions of the Template and select the appropriate size of paper. Both the length and width measurements are indicated on the paper size must be larger than the dimensions of the Template . Select the paper size using the Properties button in the Adobe Acrobat print dialog Auto-Rotate and Center to ensure the Template prints in the correct : When Printing the flush mount Template , set Page Scaling in the Adobe Acrobat print dialog box to Scaling: Select None:Auto-Rotate and Center: Select with a check mark for correct orientationProperties: Select the paper size (example): Use appropriate size Printing and before cutting the Mounting surface, measure the printed Template to ensure both the length and the width printed at the correct size and to ensure that the dimensions of the printed Template match the actual size of your mount.
2 Garmin is not responsible for any damages or expenses resulting from a miscut Mounting surface arising from a failure to follow these " (190 mm) "(150 mm)GPSMAP 2006/2006C/2106/2206/3006C/3206 TRIM Template ALONG THIS LINE TO AID FITTING CUT Mounting SURFACE ALONG INSIDE OF THIS OUTLINEGPSMAP 2x06/2x10/3x06/3x10 FLUSH MOUNT TEMPLATESD rill a 3/8" (6 mm) hole. Begin cutting very careful when cutting this hole, because there is only a small amount of clearance between the unit and the Mounting hole. To flush mount the GPSMAP 2006/2006C/2106/2206/3006C/3206:1. Trim the flush mount Template and tape it in the preferred Using the center punch, indent the center of each Mounting hole Using an 1/8" (3 mm) drill bit, drill the four Mounting holes. (Drilling the Mounting holes before cutting the hole for the unit allows for an easier installation.)
3 4. Using a 3/8" (6 mm) drill bit, drill a hole to begin cutting the Mounting Using the jig saw, cut the Mounting surface along the inside of the dashed line indicated on the Template . Be very careful when cutting this hole, because there is only a small amount of clearance between the case molding and the Mounting Install the four Mounting studs into unit by screwing the shorter, threaded section into the back of the unit. Use a .05" Allen wrench to tighten the Mounting studs until the stop contacts the case. Be careful not to overtighten, because this may damage the Mounting stud! The studs have a reusable thread-locking patch pre-applied from the Place the unit into the cut out of the Mounting Place washers over the Mounting studs, then thread on one hex nut per Mounting stud. Tighten all four until the unit is snug against the Mounting surface.
4 Install and tighten the second hex nut on all four Mounting studs to lock the first one in International 1200 E. 151st Street, Olathe, KS 66062 190-00243-00 Rev. F April 2006 Printed in " (230 mm) "(208 mm)GPSMAP 2010/2010C/2110/2210/3010C/3210 CUT Mounting SURFACE ALONG INSIDE OF THIS OUTLINED rill a 3/8" (6 mm) hole. Begin cutting Template ALONG THIS LINE TO AID FITTING Be very careful when cutting this hole, because there is only a small amount of clearance between the unit and the Mounting flush mount the GPSMAP 2010/2010C/2110/2210/3010C/3210:1. Trim the flush mount Template and tape in the preferred Using the center punch, indent the center of each Mounting hole Using an 1/8" (3 mm) drill bit, drill the four Mounting holes. (Drilling the Mounting holes before cutting the hole for the unit allows for an easier installation.)
5 4. Using a 3/8" (6 mm) drill bit, drill a hole to begin cutting the Mounting Using the jig saw, cut the Mounting surface along the inside of the dashed line indicated on the Template . Be very careful when cutting this hole, because there is only a small amount of clearance between the case molding and the Mounting Install the four Mounting studs into unit by screwing the shorter, threaded section into the back of the unit. Use a .05" Allen wrench to tighten the Mounting studs until the stop contacts the case. Be careful not to overtighten, because this may damage the Mounting stud! The studs have a reusable thread-locking patch pre-applied from the Place the unit into the cut out of the Mounting Place washers over the Mounting studs, and then thread on one hex nut per Mounting stud. Tighten all four until the unit is snug against the Mounting surface.
6 Install and tighten the second hex nut on all four Mounting studs to lock the first one in place.