Transcription of Quick Installation Guide
1 7106506449 English Fran ais AC750 WiFi Range ExtenderRE200 Quick Installation GuideSpecifications are subject to change without notice. TP-LINK is a registered trademark of TP-LINK TECHNOLOGIES CO., LTD. Other brands and product names are trademarks or registered trademarks of their respective part of the specifications may be reproduced in any form or by any means or used to make any derivative such as translation, transformation, or adaptation without permission from TP-LINK TECHNOLOGIES CO., LTD. Copyright 2016 TP-LINK TECHNOLOGIES CO., LTD. All rights TP-LINK TECHNOLOGIES CO.
2 , ..1 Fran ais ..9 English1 LEDs5G and (Power)Red: The extender is connected to the wireless network of the router, but is too away from : The extender is connected to the wireless network of the router and is in a good : The extender isn't connected to the : The exxtender is : The extender is off. (Wireless Signal) (RE)On: The wireless function is : The wireless function is : WPS connection is established. Blinking: WPS connection is in : No active connection .RESET: Press this button to reset the extender to its factory port: Connect your Ethernet-enabled device to this port to enjoy the Internet.
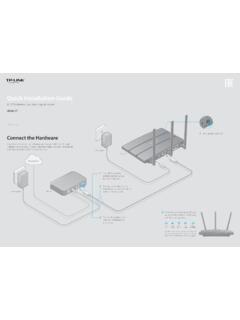
3 (Ethernet)On: A device is connected the Ethernet port, but there is no : A device is connected to the Ethernet port, and is : No device is connected to the Ethernet easy setup options:ONE: Using a Web BrowserTWO: Using WPS(Wi-Fi Protected Setup)ResetEthernet portEnglish2 Option1: Using a Web Browser Power on ConnectUnplug the Ethernet cable from your computer (if any). Click the Wireless Network Connection icon on your taskbar and connect to the extender 's network :Password:OKCancel ConfigureGo to Quick Setup Wizard to configure your are availableNot connectedWireless Network ConnectionConnect automaticallyConnectTP-LINK_Extender_XXG Hz Launch a web browser and type i n the address bar.
4 Use admin (all lowercase) for both Username and Password to log the extender into a power outlet near your router, and wait until the Wireless LED is lit and solid On the Start screen, click click Next to set up the Range extender or click Exit to go to the Device Management Router/AP WiFi Network Name(SSID):ExitNextWi-Fi Network :Wi-Fi Network Name_5 GHz:Connection Status:N/AN/ADisconnectedWireless SettingsReview SettingsStartB. Select your router s wireless network name (SSID) and click Next. If the SSID is hidden, select the Set SSID and MAC manually option.
5 Signal MAC Channel Security00-0A-EB-74-06-06 1 WPA-PSK0C-72-2C-B3-A5-2C 1 WPA-PSKA vailable Wireless Networks ( ): 24 Choose SSID TP-LINK_XXXBackRescanNext Wireless SettingsReview SettingsStart Set SSID and MAC ManuallyC. Enter the router s Wi-Fi password and either choose Copy from Main Router or Customize to create a new network name for the extender . Click Secure(WPA-PSK/WPA2-PSK) SettingsReview SettingsStartMain Router/AP Network ( )Main Router/AP WiFi Network Name(SSID):Main Router/AP MAC Address(BSSID):WiFi Security Option:Fill in the WiFi Password of your Main Router/AP:Range extender Network (XXGHz)Range extender WiFi Network Name(SSID):Copy from Main Router/AP Select your router s 5 GHz wireless network.
6 Click Next and repeat step C. Click Next to Secure(WPA-PSK/WPA2-PSK)123456789 BackNextTP-LINK_5 GHz_XXX_EXTW ireless SettingsReview SettingsStartMain Router/AP Network (5 GHz)Main Router/AP WiFi Network Name(SSID):Main Router/AP MAC Address(BSSID):WiFi Security Option:Fill in the WiFi Password of your Main Router/AP:Range extender Network (XXGHz)Range extender WiFi Network Name(SSID):Copy from Main Router/AP TP-LINK_5 GHz_XXXC ustomizeE. Verify your Wireless Settings and click Finish. Both and 5G LEDs should turn on and stay solid Setting Main Router/AP WiFi Network Name ( ):Main Router/AP WiFi Network Name (5 GHz):Range extender WiFi Network Name ( ):WiFi Security Option:WiFi Password:Range extender WiFi Network Name (5 GHz):WiFi Security Option.
7 WiFi Secure (WPA/WPA2-PSK)123456789TP-LINK_5 GHz_XXX_EXTMost Secure (WPA/WPA2-PSK)123456789 Wireless SettingsReview SettingsStartBackFinishExport Settings RelocatePlug in the extender about halfway between your router and the Wi-Fi English5dead for the extender to reconnect and the LED should turn green. If not, relocate it closer to the router to achieve better signal extender PlacementRouterClientsExtended NetworkHost Network Both extended networks share the same Wi-Fi passwords as those of your host networks, but may have different wireless network names if you have customized them during the minimize wireless interference, place your extender in an open space area, away from other bluetooth devices or radioactive devices such as cordless phones, microwaves, !
8 Keep away fromOption2: Using WPS(Wi-Fi Protected Setup)Important:In order to use this option, your router must support WPS. Power on Plug the extender into a power outlet near your router, and wait until the Wireless LED is lit and solid green. ConnectA. Press the WPS button on your Press the WPS button on the extender . Once the connection is established, the RE, and 5G LEDs will turn solid green. RelocateRefer to Step 5 of Option 1 to relocate your !Ideal extender PlacementRouterClientsExtended NetworkHost NetworkThe extended networks share the same wireless network names (SSIDs) and wireless passwords as those of the host.
9 For more information about using WPS on your router, please refer to the router manufacturer's user either the or 5G LED is not on, repeat step A and B to connect the other the RE LED does not switch from blinking to a solid green, please refer to Option AdapterThe extender can be used as a wireless adapter to connect any Ethernet-enabled device, such as a Blu-ray player, game console, DVR, or smart TV, to your wireless network. First, connect the extender to your Wi-Fi network following the instructions in Option 1 or Option 2, and then connect your Ethernet-enabled device to the extender via an Ethernet TVGame ConsoleDesktopWireless ConnectionLaptopSmartphoneTablet Troubleshooting and Support1.
10 My router has no WPS button, how do I connect the extender ? your router does not support WPS, please use Option 1 to setup the extender using a web Why does the RE LED not change from blinking to solid green after completing Option 1? You may have entered the wireless password of your router incorrectly during the configuration. Please login to the extender s web management page, and double-check your router s wireless password. If the RE LED still keeps blinking, please reset the extender and go through the configuration again. 3. What should I do when the RE LED is on, but only one band is connected?