Transcription of Quick Start Guide - Sophos
1 Quick Start GuideXGS 116(w)/126(w)/136(w)1 Quick Start Guide XGS 116(w)/126(w)/136(w)For more information about your appliance, scan the QR code or visit you begin, please confirm that you have a working Internet connection and make sure you have the account information available that was provided by your Before DeployingCongratulations on the purchase of your Sophos XGS appliance. This Quick Start Guide describes in short steps how to connect your appliance and explains how to open the web-based Admin Console from your administration PC. The Admin Console allows you to configure every aspect of the ) What is included in the boxMicro USB cableRJ45 Ethernet cable Power cableThis Quick Start Guide and Safety InstructionsXGS 116(w)/126(w)/136(w)3 antennas (XGS 126w/136w model, 2 on XGS 116w model)Power AdapterENGLISH2b) Appliance images.
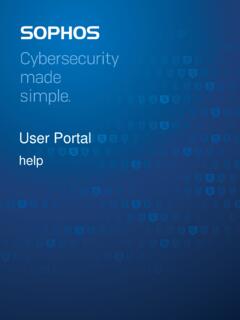
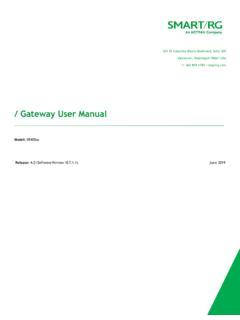
2 Front and backQuick Start Guide XGS 116(w)/126(w)/136(w)XGS 116(w)Status LEDs (w-model has additional WiFi LED)1 x USB x COM Micro USBXGS 126(w)/136(w)Status LEDs (w-model has additional WiFi LED)1 x USB x COM Micro USB2 x external antenna (XGS 116w only)6 x GbE copper portF1 1 x SFP fiber port1 x COM (RJ45)1 x USB supplyConnector for optional 2nd redundant power supplyOptional module expansion bay3 x external antenna (XGS 126w/136w only)10 x GbE copper portF1 F2 2 x SFP fiber ports1 x COM (RJ45)1 x USB supplyOptional module expansion bay1 x GbE PoE port1 x GbE copper port2 x GbE PoE port (136(w)) 2 x GbE PoE port (126(w))Connector for optional 2nd redundant power supplyENGLISH3 InterfacesLAN PortsTypeSpeedComment1 8RJ4510/100/1000 MbpsPort 8 on XGS 116(w) can be used to power a connected device ( access point, IP camera, or IP Phone) via PoE with upto 30W (PoE ).
3 9 10(XGS 126(w)/136(w) only)RJ45100/1000 Mbps11 12(XGS 126(w)/136(w) only)RJ45 XGS 126(w): 100/1000 MbpsXGS 136(w): 100/1000/2500 MbpsBoth ports can be used to power a connected device ( access point, IP camera, or IP Phone) via PoE with upto 30W (PoE ) GbpsSFP transceivers are sold (XGS 126(w)/136(w) only)SFP1 GbpsSFP transceivers are sold PortsTypeCommentCOMM icro USB [front]RJ45 [back]You can connect a serial console to the Micro USB or RJ45 COM port to access the CLI. Only one port can be used at any time. If both ports are connected, then the Micro USB port will take precedence. The required connection settings are: Bits per second: 38,400 Data bits: 8 Parity: N (none) Stop bits: 1 USBUSB [Type A] [front]USB (Type A) [back]You can connect a USB and/or compatible device to these ports ( USB thumb drive, UPS, 3G/4G dongles).
4 ResetButtonPress and hold for >10 seconds to reset the unit to factory default settings. All configuration, reports and patterns will be BayComment3G/4G ModuleCan be used for Sophos XGS 3G/4G Module, which is optionally available from your Sophos ModuleCan be used for Sophos XGS WiFi Module, which is optionally available from your Sophos Start Guide XGS 116(w)/126(w)/136(w)ENGLISH42. Mount and Connect the ApplianceMount the antennas (for wireless models only)Connect the provided antennas to the connectors on the back of your appliance and align them in a vertical the ports to the internal and external networks1. Connect the port 1/LAN via a switch to the internal network.
5 For this purpose, use the RJ45 Ethernet cable provided. Note that your Administration PC must also be connected to this Connect Port 2/WAN to the external network. The connection to the WAN depends on the type of Internet appliances are shipped with the following default settings:Ethernet PortIP AddressZone1 Console UsernameAdmin Console PasswordCLI Console PasswordadminadminadminDefault GatewayDNSDHCP ServiceDHCPDHCPE nabledMount the appliance to the rackIf you want to mount the device within a rack please use the optionally available rackmount kit for this Start Guide XGS 116(w)/126(w)/136(w)ENGLISH53. Power Up the ApplianceConnect the power cable and turn on the applianceConnect the appliance to the power supply using the power cable(s).
6 Turn the appliance on. The power switch is on the back of the appliance near the power connection. During boot up the Status LED on the front will blink green. Once the device has booted completely the Status LED will turn to solid Connect Your Administration PCAdministration PC connection properties:Use the settings below to configure your (PC/laptop) network interface: IP address: Netmask: Enter Default Gateway: Enter the IP address of the appliance s internal network card (Port1/LAN): DNS Server: Enable this option and enter the IP address of the internal network card (Port1/LAN): your PC/laptop to Port 1/LAN of the appliance: Start the browser and enter the IP address of the appliance s LAN port that your PC is connected to: :4444 Login with the default details below:Username.
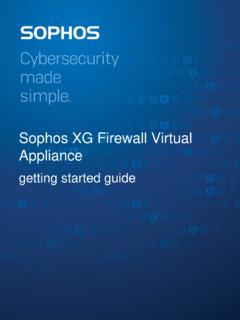
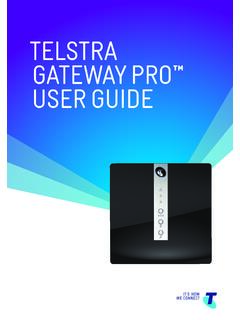
7 AdminPassword: , DSL modemInternal network admin client PCXGS Appliance2/WANS witch1/LANQ uick Start Guide XGS 116(w)/126(w)/136(w)ENGLISH65. Set Up the Appliancea) Start network configurationSelect Click to begin on the Welcome screen to Start your basic appliance configuration. Change the interface IP addresses, default gateway, DNS settings and date/time zone to match your local network ) Register the applianceIf you have not previously registered your appliance on MySophos, you will see the registration screen Register Your Firewall. The appliance requires Internet connectivity for it to be registered with MySophos. If you want to register later, click the check box I do not want to register now and proceed with section c).
8 If you have a serial number provided on your License Schedule please enter it into the first field and click I have an existing serial number, otherwise click I don t have a serial number ( Start a Trial). If you are upgrading from an existing UTM/SG appliance and want to migrate your existing UTM license to your new firewall, click the respective button on the screen and browse for your UTM license to upload it to your clicking Continue , you will be redirected to the MySophos portal. If you already have a MySophos account, enter your login credentials under Log in to MySophos . If you are a new user, sign up for a MySophos account by entering the details under Register for MySophos.
9 Click Continue to complete the registration process. Please wait while the process completes it will take a few seconds. After successful registration, you will see a screen with the message, Your device is now registered . Please note that you should proceed with the next step, Synchronize License only after the appliance is successfully ) Synchronize licenseClick Initiate License Synchronization to get the license information from Sophos onto the appliance. After synchronization, you will see a screen with the message, Synchronization with server was successful. Quick Start Guide XGS 116(w)/126(w)/136(w)ENGLISH76. Connecting PoE Powered DevicesPorts 8 (on XGS 116(w) and 11/12 (on XGS 126(w)/136(w) are able to provide power over Ethernet (PoE) to a connected PoE device which conforms to the standards (max.))
10 Or (max. 30W). Each port can provide up to 30 watts max. Please note: If a high performance expansion module is used in a XGS 126(w) or XGS 136(w) module slot then the max. power of one PoE port will be limited to visit or contact your local Sophos reseller for more information about high performance expansion Appliance LED codesLEDs on each RJ45 Ethernet ConnectorACT/LNK (Left LED)GreenSolid1. The Ethernet port has established Good connection between the Ethernet port and adapter is sending or receiving network 1. The adapter and switch are not receiving No connection between both ends of Network drivers have not been loaded or do not function (Right LED)AmberOn If Ethernet port is operating at 1000 If Ethernet port is operating at 100 Ethernet port is operating at 10 Start Guide XGS 116(w)/126(w)/136(w)ENGLISH8 LEDs on each SFP ConnectorACT/LNKG reenSolid1.