Transcription of ReadyNAS Ultra, Ultra Plus, and Pro Series …
1 350 East Plumeria DriveSan Jose, CA 95134 USAJuly 2011202-10846-03 ReadyNAS Ultra , Ultra plus , NVX, and Pro SeriesHardware ManualModels: Ultra 2 Ultra 4 Ultra 6 Ultra 2 plus Ultra 4 plus Ultra 6 PlusNVX Pioneer NVX (Business Edition) Pro 2 Pro 4 Pro 6 Pro Pioneer Pro (Business Edition)2 ReadyNAS Desktop Storage Systems 2011 NETGEAR, Inc. All rights part of this publication may be reproduced, transmitted, transcribed, stored in a retrieval system, or translated into any language in any form or by any means without the written permission of NETGEAR, SupportThank you for choosing NETGEAR. To register your product, get the latest product updates, or get support online, visit us at Phone (US & Canada only): 1-888-NETGEARP hone (Other Countries): See support information , the NETGEAR logo, and Connect with Innovation are trademarks and/or registered trademarks of NETGEAR, Inc. and/or its subsidiaries in the United States and/or other countries. Information is subject to change without notice.
2 2011 NETGEAR, Inc. All rights of ConditionsTo improve internal design, operational function, and/or reliability, NETGEAR reserves the right to make changes to the products described in this document without notice. NETGEAR does not assume any liability that may occur due to the use, or application of, the product(s) or circuit layout(s) described of ContentsChapter 1 Getting StartedAdditional Documentation.. 6 Choosing a Setup Location .. 6 System Requirements .. 7 Diskless Units .. 7 Chapter 2 ReadyNAS Ultra 2, Ultra 2 plus , Pro 2 Front and Side Panels .. 10 Drive Bay .. 11 Rear Panel .. 12 Status Information .. 13 System Shutdown.. 13 Boot Menu .. 14 Chapter 3 ReadyNAS Ultra 4, Ultra 4 plus , Pro 4, NVX Pioneer, NVX (Business Edition)Front and Side Panels .. 17 Drive Bay .. 18 Rear Panel .. 19 Status Information .. 20 System Shutdown.. 21 Boot Menu .. 21 Chapter 4 ReadyNAS Ultra 6, Ultra 6 plus , Pro 6, Pro Pioneer, Pro (Business Edition)Front and Side Panels.
3 24 Drive Bay .. 25 Rear Panel .. 26 Status Information .. 27 System Shutdown.. 28 Boot Menu .. 28 Chapter 5 DisksPreviously Formatted Disks .. 31 Adding a Disk .. 32 Failed Disk Notification .. 33 Replacing a Disk.. 334 ReadyNAS Desktop Storage SystemsAppendix A Defaults and Technical SpecificationsTwo-Bay Systems .. 36 Four-Bay Systems .. 38 Six-Bay Systems .. 40 Safety Warnings .. 42 Electrical Safety Precautions .. 42 General Safety Precautions .. 43 Electrostatic Discharge (ESD) Precautions .. 43 Appendix B Compliance NotificationIndex511. Getting StartedCongratulations on your purchase of a NETGEAR ReadyNAS storage system. This ReadyNAS Ultra , Ultra plus , NVX, and Pro Series hardware manual describes the physical features of these storage chapter contains the following sections: Additional Documentation Choosing a Setup Location System Requirements Diskless Units 6 ReadyNAS Desktop Storage Systems Additional DocumentationFor detailed information about configuring, managing, and using your storage system, see the appropriate software manual for your unit, as listed in the following ManualUltra Series : Ultra 2, Ultra 4, Ultra 6 ReadyNAS for Home RAID iator Software ManualUltra plus Series : Ultra 2 plus , Ultra 4 plus , Ultra 6 PlusNVX PioneerPro PioneerNVX (Business Edition) ReadyNAS for Business RAID iator Software ManualPro 2 Pro 4 Pro 6 Pro (Business Edition)Both documents are available at maintains a community website that supports ReadyNAS products.
4 Visit for reviews, tutorials, a comparison chart, software updates, documentation, an active user forum, and much a Setup LocationYour ReadyNAS desktop unit is suitable for use in a home or small office environment where it can be freestanding. The small, compact size makes it suitable for sitting on a desk or on a closet a location for your unit that meets these criteria: Cables can be connected easily. Water or moisture cannot enter the case. Airflow around the unit and through the vents in the side of the case is not restricted. The air is as free of dust as possible. Temperature operating limits are not likely to be exceeded. If you are using an uninterruptable power supply (UPS) for protection, the power cable can be securely and safely connected to the ReadyNAS Desktop Storage SystemsSystem RequirementsYour ReadyNAS desktop unit requires the following: Ethernet connection Microsoft Windows 7, Vista, XP, 2000, Mac OS, UNIX, or Linux operating system Microsoft Internet Explorer +, Apple Safari, +, Mozilla Firefox +, or Opera + browser Hard disk drive or drives from the NETGEAR hardware Compatibility List; see Diskless UnitsIf you purchased a ReadyNAS storage system without a pre-installed hard disk drive or drives, you must follow this procedure before you use your unit.
5 The following procedure is illustrated with a 2-bay ReadyNAS storage system, but the same steps apply to 4-bay and 6-bay models. To prepare a diskless unit for first use:1. Obtain at least one hard disk drive that appears on the NETGEAR hardware Compatibility you are using a previously formatted disk, see the precautions listed in Previously Formatted Disks on page 27. 2. With the unit turned off, insert a disk into a drive bay, as the disk tray release latch. The tray handle pops out. 8 ReadyNAS Desktop Storage Systems b. Pull out the disk tray, place the new disk on the tray, and assemble the disk and tray with the screws that came with your unit. c. Make sure that the hard disk connectors face the interior of the disk bay. d. Slide the disk tray back into the unit and press the handle to secure the Turn the unit on and perform a factory See Boot Menu on page : Note: This process erases all data and formats the disk as X-RAID2TM. If you are using a previously formatted disk that contains data you want to preserve, you must move the data to an external drive before using the previously formatted disk in your ReadyNAS factory reboot process can take up to 30 minutes while your unit tests and formats the disk, installs the operating system, and creates a volume.
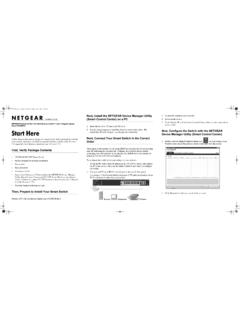
6 This process can take up to 30 minutes; you can follow the progress in RAIDar. For more information about RAIDar, see the software manual for your unit, which is available at If you are installing multiple disks at the same time, they must synchronize. This might take several hours, depending on the disk size. You can continue to use your ReadyNAS , although access is slower until the volume synchronization ReadyNAS Ultra 2, Ultra 2 plus , Pro 2 This chapter provides an overview of the physical features of the ReadyNAS Ultra 2, Ultra 2 plus , and Pro 2 and includes the following sections: Front and Side Panels Drive Bay Rear Panel Status Information System Shutdown Boot Menu 10 ReadyNAS Desktop Storage Systems Front and Side PanelsThis section describes the front and side panels of ReadyNAS Ultra 2, Ultra 2 plus , and Pro 2 units. Your unit s color might vary from the color shown in this 1. ReadyNAS Ultra 2, Ultra 2 plus , and Pro 2 front and side panels1.
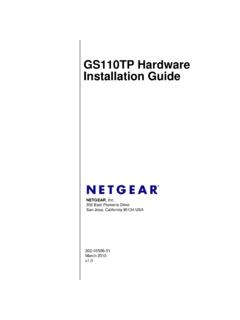
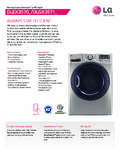
7 Exhaust vents2. Power button and LED3. Disk activity LED4. Disk 1 and disk 2 LEDs5. USB port6. Backup button7. USB and backup status LED8. Drive bay door11 ReadyNAS Desktop Storage SystemsDrive BayThis section describes the drive bay of ReadyNAS Ultra 2, Ultra 2 plus , and Pro 2 2. ReadyNAS Ultra 2, Ultra 2 plus , and Pro 2 drive bay1. Drive bay door2. Disk bays3. Recessed disk tray locking mechanism4. Disk release latch5. Disk tray latch handle6. Disk tray12 ReadyNAS Desktop Storage Systems Rear PanelThis section describes the rear panel of ReadyNAS Ultra 2, Ultra 2 plus , and Pro 2 / 5 6 / 78 Figure 3. ReadyNAS Ultra 2, Ultra 2 plus , and Pro 2 rear panel1. Exhaust fan2. Kensington lock 3. Reset button4. LAN2 gigabit Ethernet port with LED status indicators5. USB port6. LAN1 gigabit Ethernet port with LED status indicators7. USB port8. Power cable socket13 ReadyNAS Desktop Storage SystemsStatus InformationYou can obtain information about the status of your unit by reviewing the indicators listed in the following button and LEDP ress this button to turn on the ReadyNAS .
8 The LED has these states: Blinking. Booting Blue. Powered on Off. Powered offDisk LEDs (1, 2)Each disk bay has an LED associated with it on the front panel of the unit. The disk LEDs have these states: On. Power is on and the disk is operating normally. Blinking. The disk was removed, failed, or is resynchronizing. Off. The disk bay is activity LEDThe disk activity LED has these states: Blinking green. A disk is active. Off. No disks are panel Ethernet portsTwo LED status indicators are built into these ports. One LED indicates port activity. The other LED indicates connection speed as follows: Green. The port is operating at 1,000 Mbps. Amber. The port is operating at 100 Mbps. Off. The port is operating at 10 ShutdownYou can shut down your unit in these ways: Using the Power button: Preferred shutdown. Press the Power button twice initiate a graceful shutdown. Forced shutdown. If the unit is hung, press the Power button and hold for 5 seconds to force shutdown.
9 Using FrontView. For information about using FrontView to shut down your storage system, see the software manual for your unit, which is available at Desktop Storage Systems Boot MenuUse the boot menu to restart or troubleshoot your ReadyNAS unit. Your unit has the following boot modes: Normal. Initiates a normal boot process, just like booting using the Power button. Factory default. Initiates a short disk test that takes approximately 5 minutes, then begins a 10-minute time-out period waiting for RAIDar. During the 10-minute time-out period, the system can be powered off safely without causing any data loss. After 10 minutes, or if you select the factory default option with RAIDar during the time-out period, the factory default process begins. WARNING!The factory default reboot process resets the unit to factory settings, erases all data, resets all defaults, and reformats the disk to X-RAID2. OS reinstall. Reinstalls the firmware from the internal flash to the disks.
10 Use the OS reinstall boot mode when the system crashes and corrupts some configuration files. OS reinstall boot mode also resets some settings on your unit, such as Internet protocol settings and the administrator password, to defaults. Tech support. Boots into a low-level diagnostic mode. Use the tech support boot mode only when instructed to do so by a NETGEAR Technical Support representative. Skip volume check. After a system crash, the system tries to scan and fix the volume using a file system check. If several problems are found on a disk, this process can stall, causing the system not to boot. Use this option to skip the scan and let the system boot. WARNING!Use the skip volume check boot mode only when instructed to do so by a NETGEAR Technical Support representative, otherwise data loss might occur. Memory test. Performs a memory test. The pass or fail result is reported using the unit s LEDs. Contact a NETGEAR technical support representative to interpret memory test results.