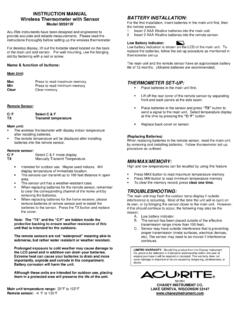
Transcription of SAVE THIS MANUAL FOR FUTURE REFERENCE.
1 Ill Instruction MANUAL weather Station model 02099 / 4409999 CONTENTS Unpacking Instructions .. 2 Package Contents .. 2 Product Registration .. 2 Features and Benefits: Sensor .. 2 Features and Benefits: Display .. 3 Setup .. 5 Sensor Setup .. 5 Display Setup .. 6 Set the Time, Date and 7 Backlight 7 Placement Guidelines .. 8 Using the weather 9 Programmable Troubleshooting ..11 Care and Maintenance ..12 Calibration ..12 FCC Information ..13 Customer Support ..13 Questions? Contact Customer Support at (877) 221-1252 or SAVE THIS MANUAL FOR FUTURE REFERENCE. LI Congratulations on your new AcuRite product. To ensure the best possible product performance, please read this MANUAL in its entirety and retain it for FUTURE reference. Unpacking Instructions Remove the protective film that is applied to the LCD screen prior to using this product.
2 Locate the tab and peel off to remove. Package Contents1. Display with Tabletop Stand 2. Outdoor Sensor 3. Power Adapter 4. 2 AA Batteries 5. Instruction MANUAL Features and Benefits 1 OUTDOOR SENSOR 1. Integrated Hanger 2 For easy placement. 2. Wireless Signal Indicator Flashes when data is being sent to the display. 3. Battery Compartment 3 4. A-B-C Switch ID code that must match display s A-B-C 4 switch to ensure units synchronize. 5. Battery Compartment Cover 5 2 /\. 0 V Features and Benefits 1 2 3 4 5 6 DISPLAY FRONT 1. Current Outdoor Temperature Arrow icon indicates direction temperature is trending. 2. Current Outdoor Humidity Arrow icon indicates direction humidity is trending. 3. Sensor Low Battery Indicator 4. Heat Index Displays heat index calculation when temperature is 27 C (80 F) or higher. 5. Dew Point Displays dew point calculation when temperature is 26 C (79 F) or lower.
3 6. Icon Indicates display is in auto-dimming brightness mode (see page 7). 7. Clock 8. Button For viewing high and low records. 9. Display Low Battery Indicator 10. and Buttons For setup preferences. 11. Button For setup preferences. 2021 19 78910 11 10 12 18 17 16 15 14 13 12. Button For alarm setup. 13. Date 14. Moon Phase 15. Humidity Level Indicator Indicates a high, low or ideal humidity comfort level. 16. Barometric Pressure Arrow icon indicates the direction pressure is trending. 17. Current Indoor Humidity Arrow icon indicates direction humidity is trending. 18. Current Indoor Temperature Arrow icon indicates direction temperature is trending. 19. 12 to 24 Hour weather forecaster Self-Calibrating Forecasting pulls data from the outdoor sensor to generate your personal forecast. 20. Icon Disappears after weather forecast self-calibration is complete (see page 9). 21. Sensor Signal Strength 3 Features and Benefits 1 2 3 48 67 5 DISPLAY BACK 1.
4 Backlight Button 5. Plug-in for Power Adapter For momentary backlight and dimmer settings. 6. Power Adapter 2. Integrated Hang Holes 7. Battery Compartment Cover For easy wall mounting. 8. RESET Button 3. Backup Battery Compartment Full reset to factory defaults. 4. A-B-C Switch ID code that must match sensor s A-B-C switch to ensure units synchronize. 4 SETUP Sensor Setup 1 Set the A-B-C Switch The A-B-C switch is located inside the battery compartment. It can be set to A, B or C. However, you must select the same letter choices for both the sensor and the display in order for the units to synchronize. 2 Install or Replace Batteries AcuRite recommends high quality alkaline batteries in the outdoor sensor for the best product performance. Heavy duty or rechargeable batteries are not recommended. 1. Slide off the battery compartment cover. Take note of the A-B-C switch setting inside the battery compartment for display setup.
5 2. Insert 2 x AA batteries into the battery compartment, as shown. Follow the polarity (+/-) diagram in the battery compartment. 3. Replace the battery cover. 2 Install Batteries 2 AA batteries A B C 1 A-B-C Switch Set to match display 5 Display Setup 1 Set the A-B-C Switch Locate the A-B-C switch inside the battery compartment. Set the A-B-C switch to A, B or C. You must select the same letter choices for both the display and the sensor in order for the units to synchronize. 2 Install or Replace Backup Batteries (optional) 1. Remove the battery compartment cover. 1 A-B-C Switch Set to match sensor 2. Insert 3 x AAA alkaline batteries into the battery compartment, as shown. Follow the polarity (+/ ) diagram in the battery compartment. 3. Replace the battery cover. 3 Plug in Power Adapter For the best performance, plug in the power adapter as the main power source for this product.
6 2 Install Batteries 3 AAA Batteries (optional) IMPORTANT: Batteries are a backup power source to preserve records in the event of a power outage. Power adapter is recommended as the primary power source to enjoy the full functionality of this product. 3 Plug inPower Adapter A B C PLEASE DISPOSE OF OLD OR DEFECTIVE BATTERIES IN AN ENVIRONMENTALLY SAFE WAY AND IN ACCORDANCE WITH YOUR LOCAL LAWS AND REGULATIONS. BATTERY SAFETY: Clean the battery contacts and also those of the device prior to battery installation. Remove batteries from equipment that will not be used for an extended period of time. Follow the polarity (+/-) diagram in the battery compartment. Promptly remove dead batteries from the device. Dispose of used batteries properly. Only batteries of the same or equivalent type as recommended are to be used. DO NOT incinerate used batteries. DO NOT dispose of batteries in fre, as batteries may explode or leak.
7 DO NOT mix old and new batteries or types of batteries (alkaline/standard). DO NOT use rechargeable batteries. DO NOT recharge non-rechargeable batteries. DO NOT short-circuit the supply terminals. 6 /\. V 0 Set the Time, Date and Units Press and release the button, located on the front of the display, to enter SET MODE. Once in set mode, the preference you are currently setting will blink on the display. To adjust the currently selected (flashing) item, press and release the or buttons (press and HOLD to fast adjust). To save your adjustments, press and release the button again to adjust the next preference. The preference set order is as follows: Auto DST (Daylight Saving Time ON of OFF)* CLOCK HOUR CLOCK MINUTE CALENDAR MONTH CALENDAR DATE CALENDAR YEAR TEMPERATURE UNITS ( C or F) PRESSURE UNITS (hPa or inHg) *If you live in an area that observes DST, DST should be set to ON, even if it is not currently Daylight Saving Time.
8 You will automatically exit SET MODE if no buttons are pressed for 10 seconds. Enter setup mode at any time by pressing the button. Display Backlight Settings This weather station s colour display features three different lighting settings: High (100%) brightness, Medium (60%) brightness and Low (15%) brightness. Using battery power alone, the backlight is available momentarily for 10 seconds by pressing the Backlight button. When display is powered with the power adapter, backlight remains on at 100% brightness. Press Backlight button once to dim to 60% brightness; press again to dim to 15%, press a 3rd time to enter AUTO DIM mode. NOTE: Pressing and holding the button for 5 seconds will disable the backlight. Once any button is pressed, the backlight will return to your selected setting. AUTO DIM MODE: Automatically adjusts display brightness based on time of day and year. MARCH 11- NOVEMBER 4 6:00 - 9:00 = 100% brightness 9:01 - 5:59 15% brightness NOVEMBER 5 - MARCH 10 7:30 - 7:00 100% brightness 7:01 - 7:29 = 15% brightness 7 1111 \ I / --o.
9 - -; I \ ' ~ f------i -) ) } ) [ 3feet) I Placement for Maximum Accuracy AcuRite sensors are sensitive to surrounding environmental conditions. Proper placement of both the display and outdoor sensor are critical to the accuracy and performance of this product. Display Placement Place the display in a dry area free of dirt and dust. Display stands upright for tabletop use and is wall-mountable. Outdoor Sensor Placement Sensor must be placed outside to observe outdoor conditions. Sensor is water resistant and is designed for general outdoor use, however, to extend its life place the sensor in an area protected from direct weather elements. Hang the sensor using the integrated hang hole or hanger, or by using string (not included) to hang it from a suitable location, like a well covered tree branch. The best location is 1 to 2 metres (4 to 8 feet) above the ground with permanent shade and plenty of fresh air to circulate around the sensor.]
10 Important Placement Guidelines To ensure accurate temperature measurement, place units out of direct sunlight and away from any heat sources or vents. Display and outdoor sensor must be within 100 m (330 ft) of each other. To maximize wireless range, place units away from large metallic items, thick walls, metal surfaces, or other objects that may limit wireless communication. To prevent wireless interference, place both units at least 90 cm (3 ft) away from electronic devices (TV, computer, microwave, radio, etc.). 90 cm (100 metres maximum) (330 feet) Setup is Complete The sensor will now synchronize with the display. It may take a few minutes for synchronization to complete. Please refer to the troubleshooting section of this MANUAL if anything appears to be functioning improperly. 8 ~ ~ .. IC X lt X X OPERATION Using the weather Station Learning Mode Self-Calibrating Forecasting uses a unique algorithm to analyze changes in pressure over a time period (called Learning Mode) to determine your altitude.