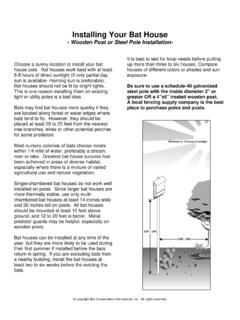
Transcription of Single-chamber Bat House (wall mounted)
1 Materials (makes one House )1 4sheet (2' x 4') 1 2" AC, BC or T1-11 (outdoor grade) plywoodOne piece 1" x 2" (3 4" x 11 2" finished) x 8' pine (furring strip)20 to 30 exterior-grade screws, 1" One pint dark, water-based stain, exterior gradeOne pint water-based primer, exterior gradeOne quart flat, water-based paint or stain, exterior gradeOne tube paintable latex caulk1" x 4" x 28" board for roof (optional, but highly re c o m m e n d e d )Black asphalt shingles or galva n i zed metal (optional)6 to10 roofing nails, 7 8" (if using shingles or metal ro o f i n g )Recommended toolsTable saw or handsawCaulking gunVariable-speed re versing drillPa i n t b ru s h e sS c rewd r i ver bit for drillHammer (optional)Tape measure or yard s t i c kTin snips (optional)Co n s t ru c t i o n1.
2 Me a s u re and cut plywood into three pieces:2 61 2" x 24" 161 2" x 24" 5" x 24"2. Roughen inside of backboard and landing area by cuttingh o r i zontal gro oves with sharp object or saw. Space gro oves 1 4"to 1 2" apart, cutting 1 3 2" to 1 1 6" Apply two coats of dark, water-based stain to interior surf a c e s .Do not use paint, as it will fill gro ove s .4. Cut furring strip into one 24" and two 201 2" Attach furring strips to back, caulking first. St a rt with 24"piece at top. Roost chamber spacing is 3 4" .6. Attach front to furring strips, top piece first (caulk first).L e a ve 1 2" vent space between top and bottom front Caulk all outside joints to further seal roost Attach a 1" x 4" x 28" board to the top as a roof (optional,but highly re c o m m e n d e d ).
3 9. Apply three coats of paint or stain to the exterior (use primerfor first coat).10. Cover roof with shingles or galva n i zed metal (optional).11. Mount on building (south or east sides usually best).Optional modifications to the Single-chamber bat house1. Wider bat houses can be built for larger colonies. Be sure toadjust dimensions for back and front pieces and ceiling 3 4" support spacer may be needed in the center of the ro o s t-ing chamber for bat houses over 24" wide to pre vent To make a taller version for additional temperature dive r s i t y,use these modifications: From a 2' x 8' piece of plywood, cutt h ree pieces: 51" x 24", 33" x 24" and 12" x 24".
4 Cut two 8'furring strips into one 24" and two 44" pieces. Fo l l ow assem-bly pro c e d u re above .3. Two bat houses can be placed back-to-back, mounted betwe e ntwo poles, to create a three- chamber nursery House . Be f o rea s s e m b l y, cut a horizontal 3 4" slot in the back of each houseabout 9" from the bottom edge of the back piece to permitm ovement of bats between houses. Two pieces of wood, 1" x4" x 41 4", screwed horizontally to each side, will join the twob oxes. Leave a 3 4" space between the two houses, and ro u g h e nthe wood surfaces or cover the back of each with plastic mesh(see item 5 below).
5 Do not cover the rear exit slots with 1" x 4" x 34" ve rtical piece, attached to each side over theh o r i zontal pieces, blocks light but allows bats and air to galva n i zed metal ro o f, covering both houses, protects thecenter roosting area from rain. Eaves should be about 3" insouthern areas and about 11 2" in the nort h .4. Ventilation may not be necessary in cold climates. In this case,the front should be a single piece 23" long. Smaller bat houseslike this one will be less successful in cool climates. Howe ve r,those mounted on buildings maintain thermal stability betterand are more likely to attract Durable plastic mesh can be substituted to provide footholdsfor bats.
6 Attach one 20" x 241 2" piece to backboard after stain-ing interior, but prior to assembly. Single-chamber Bat House (wall mounted) 1/2" v e n tlanding areaMore bat- House plans and additional information can befound in BCI sBat House Builder s Handbook,available at copyright Bat Conservation International, rights reserved.