Transcription of SolidWorks 2014 - SDC Publications
1 SolidWorks 2014 Tutorial with Video InstructionSolidWorks 2014 Tutorial with Video Instruction A Step-by-Step Project Based Approach Utilizing 3D Solid Modeling SDCPUBLICATIONS Textbooks. Lower DiscIncludes Supplemental Files and Video InstructionVideosContains all new training videos for SolidWorks 2014 David C. Planchard, CSWP, SolidWorks Accredited EducatorVisit the following websites to learn more about this book: Powered by TCPDF ( ) PAGE 1 - 1 Chapter 1 LINKAGE Assembly Below are the desired outcomes and usage competencies based on the completion of Chapter 1.
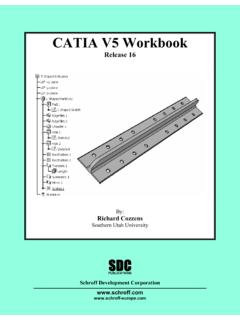
2 Desired Outcomes: Usage Competencies: Create three parts: o AXLE o SHAFT-COLLAR o FLATBAR Understand the SolidWorks default User Interface. Establish a SolidWorks session. Create 2D sketch profiles on the correct Sketch plane. Apply the following 3D features: Extruded Boss/Base, Extruded Cut and Linear Pattern. Create an assembly: o LINKAGE assembly Understand the Assembly toolbar. Insert components into an assembly. Apply the following Standard mates: Concentric, Coincident and Parallel. LINKAGE Assembly Courtesy of SMC Corporation of America LINKAGE Assembly SolidWorks 2014 Tutorial PAGE 1 - 2 Notes: SolidWorks 2014 Tutorial LINKAGE Assembly PAGE 1 - 3 Chapter 1 - LINKAGE Assembly Chapter Objective SolidWorks is a design software application used to model and create 2D and 3D sketches, 3D parts, 3D assemblies and 2D drawings.
3 The chapter objective is to provide a comprehensive understanding of the SolidWorks default User Interface and CommandManager: Menu bar toolbar, Menu bar menu, Drop-down menu, Context toolbar / menus, Fly-out FeatureManager, System feedback, Confirmation Corner, Heads-up View toolbar and an understanding of Document Properties. Obtain the working familiarity of the following SolidWorks sketch and feature tools: Line, Circle, Centerpoint Straight Slot, Smart Dimension, Extruded Boss/Base, Extruded Cut and Linear Pattern. Create three individual parts: AXLE, SHAFT-COLLAR and FLATBAR.
4 Create the assembly, LINKAGE using the three created parts and the downloaded subassembly - AirCylinder. On the completion of this chapter, you will be able to: Start a SolidWorks session and navigate through the SolidWorks (UI) and CommandManager. Set units and dimensioning standards for a SolidWorks document. Generate a 2D sketch and identify the correct Sketch plane. Add and modify sketch dimensions. Create a 3D model. Understand and apply the following SolidWorks features: o Extruded Boss/Base, Extruded Cut and Linear Pattern Insert the following Geometric relations: Vertical, Horizontal, Coincident, MidPoint, Parallel and Equal.
5 Download an assembly into SolidWorks and create an assembly. Understand the Assembly toolbar. Apply the following Standard mates: Coincident, Concentric and Parallel. Apply the Quick Mate method. LINKAGE Assembly SolidWorks 2014 Tutorial PAGE 1 - 4 Chapter Overview SolidWorks is a 3D solid modeling CAD software package used to produce and model parts, assemblies, and drawings. SolidWorks provides design software to create 3D models and 2D drawings. Create three parts in this chapter: AXLE SHAFT-COLLAR FLATBAR Create the LINKAGE assembly. Download the AirCylinder assembly from the Pneumatic Components folder.
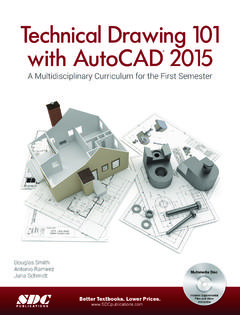
6 Combine the created parts with the AirCylinder sub-assembly to create the LINKAGE assembly. Illustrations in the book display the default SolidWorks user interface for 2014 SP0. Every license of SolidWorks contains a copy of SolidWorks SustainabilityXpress. SustainabilityXpress calculates environmental impact on a model in four key areas: Carbon Footprint, Energy Consumption, Air Acidification and Water Eutrophication. Material and Manufacturing process region, Transportation usage region, Duration of usage, End of life, and more are used as input variables. AXLE SHAFT-COLLAR FLATBAR AirCylinder assembly LINKAGE assembly SolidWorks 2014 Tutorial LINKAGE Assembly PAGE 1 - 5 AXLE Part The AXLE is a cylindrical rod.
7 The AXLE supports the two FLATBAR parts. Tangent edges and origins are displayed for educational purposes in this book. The AXLE rotates about its axis. The dimensions for the AXLE are determined from other components in the LINKAGE assembly. Start a new SolidWorks session. Create the AXLE part. Apply the feature to create the part. Features are the building blocks that add or remove material. Utilize the Extruded Boss/Base tool from the Features toolbar to create a Boss-Exturde1 feature. The Extruded Boss/Base feature adds material. The Base feature (Boss-Extrude1) is the first feature of the part.
8 The Base feature is the foundation of the part. Keep the Base feature simple! The Base feature geometry for the AXLE is a simple extrusion. How do you create a solid Extruded Boss/Base feature for the AXLE? Select the Front Plane as the Sketch plane. Sketch a circular 2D profile on the Front Plane, centered at the Origin as illustrated. Apply the Extruded Boss/Base Feature. Extend the profile perpendicular ( ) to the Front Plane. Utilize symmetry. Extrude the sketch with the Mid Plane End Condition in Direction 1. The Extruded Boss/Base feature is centered on both sides of the Front Plane.
9 Start a SolidWorks session. The SolidWorks application is located in the Programs folder. AXLE FLATBAR Origin Origin AXLE LINKAGE Assembly SolidWorks 2014 Tutorial PAGE 1 - 6 SolidWorks displays the Tip of the Day box. Read the Tip of the Day to obtain additional knowledge on SolidWorks . Create a new part. Select File, New from the Menu bar toolbar or click New from the Menu bar menu. There are two options for new documents: Novice and Advanced. Select the Advanced option. Select the default Part document. Activity: Start a SolidWorks Session Start a SolidWorks 2014 session.
10 1) Click Start from the Windows Taskbar. 2) Click All Programs . 3) Click the SolidWorks 2014 folder. 4) Click the SolidWorks 2014 application. The SolidWorks program window opens. Note: Do not open a document at this time. 5) If you do not see the below screen, click the SolidWorks Resources tab on the right side of the Graphics window location in the Task Pane as illustrated. 6) Hover the mouse pointer over the SolidWorks icon as illustrated. 7) Pin the Menu Bar toolbar. View your options. If available, double-click the SolidWorks icon on the Windows Desktop to start a SolidWorks session.