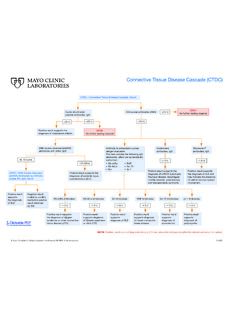
Transcription of Specimen Collection and Preparation Guide
1 Specimen Collection and Preparation Guide Specimen Collection and Preparation Guide 10/14/2019 Page 2 of 19 Contents Blood Specimens .. 4 Step 1: Determine the Specimen Requirements .. 4 Step 2: Collect the Specimen .. 4 Step 3: If Appropriate, Pour the Specimen into an Aliquot Tube or Bottle .. 4 Step 4: Label the Specimen .. 5 Step 5: Package the Specimen in a Biohazard Bag .. 5 Step 6: Package Batch Sheets and Forms .. 6 Urine Specimens .. 6 Step 1: Determine the Specimen Requirements .. 6 Step 2: Give Urine Collection Instructions to the Patient (24-hour Collections) .. 6 Step 3: Pour the Specimen into an Aliquot Tube or Bottle .. 7 Step 4: Label the Specimen .. 7 Step 5: Package the Specimen in a Biohazard Bag .. 8 Step 6: Package Batch Sheets and Forms .. 8 Stool Specimens .. 9 Step 1: Determine the Specimen Requirements.
2 9 Step 2: Provide Acceptable Containers .. 9 Step 3: Give Stool Collection Instructions to the Patient .. 10 Step 4: After Collection , Complete the Label .. 10 Step 5: Label the Specimen .. 10 Step 6: Package the Specimen in a Biohazard Bag .. 11 Step 7: Package Batch Sheets and Forms .. 12 Microbiology Specimens .. 12 Step 1: Determine the Specimen Requirements .. 12 Step 2: Label the Specimen .. 12 Step 3: Package the Specimen in a Biohazard Bag .. 13 Step 4: Package Batch Sheets and Forms .. 14 Microbiology Organisms .. 14 Specimen Collection and Preparation Guide 10/14/2019 Page 3 of 19 Step 1: Verify the Specimen is a Microbiological Actively Growing, Pure Culture .. 14 Step 2: Label the Specimen .. 15 Step 3: Place the Culture in a Secondary Leak-Proof Container .. 15 Step 4: Package the Specimen in a Biohazard Bag.
3 15 Step 5: Package Batch Sheets and Forms .. 16 Step 6: Place a Blue "C" Culture Label on the Bag .. 17 Special Collections .. 17 Step 1: Determine the Specimen Requirements .. 17 Step 2: Collect the Specimen .. 17 Step 3: Label the Specimen .. 17 Step 4: Package the Specimen in a Biohazard Bag .. 18 Step 5: Package Batch Sheets and Forms .. 19 Contact Information .. 19 Specimen Collection and Preparation Guide 10/14/2019 Page 4 of 19 Blood Specimens Step 1: Determine the Specimen Requirements In the Test Catalog, use the Specimen and Overview tabs of each test to identify: Patient Preparation requirements Specimen requirements Specimen container requirements Specimen stability (temperature) requirements Collection instructions Required forms or special instructions Step 2: Collect the Specimen Most laboratory tests are performed on anticoagulated plasma, serum, or whole blood.
4 Follow the instructions in the test to collect the Specimen , paying special attention to container/tube, volume, and stability (temperature) requirements. Step 3: If Appropriate, Pour the Specimen into an Aliquot Tube or Bottle Check the Specimen requirements in the Test Catalog to see if your Specimen requires any of the following: Aliquotting: Most specimens require aliquotting in an appropriate container to maintain Specimen integrity. If you are not aliquotting, wrap the Specimen in a bubble bag (T055) to protect from breakage. Light protection: Some specimens require light protection to ensure Specimen integrity. Check the list of Light Protection Tests before packaging your Specimen . Mayo Medical Laboratories supplies the following tubes, which have met DOT and IATA leak-proof requirements.* T465 Clear Aliquot Tube Standard polypropylene tube for serum and plasma specimens.
5 Preferred tube for most specimens. T192 Amber Aliquot Tube Amber-colored polypropylene tube to prevent analyte degradation from exposure to light. T485 Sterile Aliquot Tube Sterile tube for use when maintaining sterility is critical. *The primary receptacle must be leak-proof and must not contain more than 1 liter (shipping requirement). It must be capable of withstanding, without leakage, an internal pressure of 95 kPa in the range of -40 C to 55 C. Specimen Collection and Preparation Guide 10/14/2019 Page 5 of 19 Step 4: Label the Specimen Specimens must have two person-specific identifiers on the patient label. Person-specific identifiers include: Accession number Patient's first and last name Unique identifying number (for example, medical record number) Date of birth Mislabeled Specimens Specimens are considered mislabeled when there is a mismatch between the person-specific identifiers on the Specimen and the information accompanying the Specimen .
6 This information might include a computer system, requisition form, or additional paperwork. In addition, if a handwritten name and a label are on the container, the information must match exactly. For example, "Rebecca" does not match "Becky." When insufficient or inconsistent identification is submitted, a new Specimen may be required. Step 5: Package the Specimen in a Biohazard Bag T229 Refrigerate Specimen Bag - pink T027 Ambient Specimen Bag - white T121 Frozen Specimen Bag - yellow T043 Biohazard Bag - 12x15 Use if your container is too large for color-coded bags. Mark it Frozen, Refrigerate, or Room Temp (Ambient). If you are not using a bag supplied by Mayo Medical Laboratories: The bag must be leak-proof. There must be absorbent material between the primary receptacle (tube/container) and the secondary packaging (bag) that is able to absorb the entire contents of the bag.
7 Place the tube or container in a Mayo Medical Laboratories color-coded (temperature-specific) shipping bag. Electronic Clients: Clients who submit electronic orders will have a batch order. Place all specimens for the temperature-specific batch number into one bag. If all the specimens do not fit, use a larger biohazard bag (T043) and indicate the shipping temperature. Do not place multiple batches into one bag. Specimen Collection and Preparation Guide 10/14/2019 Page 6 of 19 Wrap any breakable tubes individually in bubble wrap (T055). Step 6: Package Batch Sheets and Forms Folded batch sheet with bar code and delivery address visible Manual Clients Clients who do not order electronically must include a completed Test Request form with each patient Specimen . Our Customized Test Request Form generator provides the Test Request form and all other required forms for the specified test.
8 Complete and print all forms included; then fold and insert the forms into the outside pocket of the biohazard bag. If there is no pocket, place the forms inside the bag with the Specimen . Urine Specimens Step 1: Determine the Specimen Requirements In the Test Catalog, use the Specimen and Overview tabs of each test to identify: Patient Preparation requirements Specimen requirements Specimen container requirements Specimen stability (temperature) requirements Collection instructions Required forms or special instructions Whether a preservative must be added at the start of the Collection . See the Urine Preservatives Chart for conditions and concentrations of urine preservatives. Step 2: Give Urine Collection Instructions to the Patient (24-hour Collections) If a 24-hour Collection is required, print the 24-Hour Urine Collection Instructions for the patient.
9 When you give the instructions and 24-hour Collection container to the patient, review: Collection duration Electronic Clients Clients who submit electronic orders will have a batch sheet. The bottom of the batch sheet lists the number of pages (for example, 1 of 3). fold the batch sheets into fourths and place them in the outside pocket of the bag. If there is no pocket, place them inside the bag with the specimens. Include all pages in the corresponding bag. The delivery address and bar code, if applicable, must be visible. Do Not combine multiple batches into one bag. Specimen Collection and Preparation Guide 10/14/2019 Page 7 of 19 Diet requirements Potentially hazardous preservatives in Collection container Storage of the Specimen until it is returned Step 3: Pour the Specimen into an Aliquot Tube or Bottle Mix well before aliquotting.
10 Send urine aliquots in the following leak-proof containers only. Other containers could leak and compromise the Specimen . Some specimens require light protection to ensure Specimen integrity. Check the list of Light Protection Tests before packaging your Specimen , and use amber containers to prevent analyte degradation due to exposure to light (for 24-hour collections). T068 Urine Tube, 13 mL Standard aliquot tube for random Collection . T313 Urine Container, 60 mL Standard aliquot container for 24-hour Collection . T596 Urine Container, Amber, 60 mL Aliquot tube for 24-hour collections when testing for light-sensitive analytes. Step 4: Label the Specimen Specimens must have two person-specific identifiers on the patient label. Person-specific identifiers include: Accession number Patient's first and last name Unique identifying number (for example, medical record number) Date of birth Mislabeled Specimens Specimens are considered mislabeled when there is a mismatch between the person-specific identifiers on the Specimen and the information accompanying the Specimen .