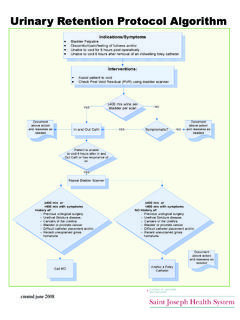
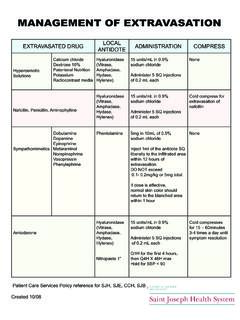
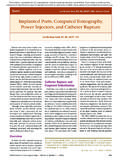
Transcription of Tips on Accessing, Assessing and Maintaining …
1 Tips on accessing , Assessing and MaintainingImplanted Ports with Non-Coring Huber Safety NeedleReference 6 ONC ext 4660 Check with Patient to see if they have any information on their Port: a Bard Port (round) or a Power Port (triangular).Order from: Central Distribution (1940 SJH, 5304 SJE req specific needle) or Par Excellence: Mini Loc Huber Regular or double Port-a-Caths Power Loc Huber Needle for PowerPorts Must be used if needed for CT ScansMiniloc and PowerLoc Huber needle lengths: inch, 1 inch and 1 inch1 inch is most commonly used length inch for a patient with a very thin walled chest 1 inch is for patient with large chest wall where the port sits deep in the chest. USE SMALLEST NEEDLE POSSIBLE THAT CAN DELIVER PRESCRIBED THERAPY YET TOUCHES THE BOTTOM OF THE PORTP repare Huber needle by attaching a CLC2000 to tubing and flush tubing and needle with an at-tached prefilled NS Syringe keeping needle Chloraprep and don sterile glovesPalpate port site and locate septum PowerPorts are triangular with three palpable bumps on each corner, Regular ports are round and may be a double port.
2 Cleanse the site with Chlora Prep for 30 seconds using a back and forth port by palpation and immobilization with your nondominant the huber needle: Grasp colored wings of the miniloc or Power Loc needle and needle with syringe with syringe attached, perpendicular to the septum and push firmly through the skin until needle contacts back of for Blood return confirms placement then Flush with 10ml syringe then clamp. Attach a CLC 2000 or IV applied blue side up with Bioclusive dsg applied (2X2 gauze if bleeding), label with date and initials. PowerPort: apply purple label to Power Loc tubing. Document: Nurse s Notes/MARC hange needle, biopatch and CLC2000 q7days or earlier if wet or loose. New port dsg are to be changed in 24h if gauze used. If allergic to biopatch and only sorbaview or tegaderm is used change Accessed port lines q8hrs with 10ml Blood, Blood Draws, and TPN use 20ml each shift ensure that CLC2000 is on the end of Huber and not on accessing , Assessing and MaintainingImplanted Ports with Non-Coring Huber Safety Needlepage 1page 2 Deaccessing the Portacath Needle(MiniLoc Huber Needle)Flush port with 10 ml of NS then 500 units Heparin (5ml of 100units/ml).
3 Take off syringe, close clamp. Flush 2nd port if presentClean hands and don glovesRemove old dressingDon Sterile Gloves Stabilize the port by securely holding the finger tabs down and firmly pull the wings up until you hear or feel the click and visualize an orange dot. Dispose in a sharps pressure if site bleeds Apply 2x2 or bandaidDocument in NN and Note Heparin flush on MAR Checklist for Identifying and accessing the PowerPort implanted Port for Contrast Injection1. Confirm the presence of a Power Port DeviceCheck Patient s Chart for Device Identification Sticker new placement Palpate the Port of Triangular ShapePalpate Port for Three Palpation PointsAsk the Patient for PowerPort device ID or other Identifying Items 2. Access the port, confirm blood return and flushAccess with Power Loc* Huber Needle in Accordance with Policy with purple labelCheck for Patency by confirming blood returnFlush Port with 10ml sterile normal saline in Accordance with Policy3.
4 Do not power inject for a CT scan unless a Power Port device has been verified by at least two of four requirements from Step the sticker enclosed with the Power Loc Package for CT to see Routine Maintenance of Deaccessed PortacathFlush device with 500 units (5ml of 100 units/ml) q4weeksFlushing Central Lines, PICCS, PortacathsPICCS, Power PICCS, deep lines, accessed ports that do not have fluid continuously infusing are to be flushed q8hrs with 5-10ml of NSAll Central line lumens will have CLC2000 Positive pressure adapters attached to them CLC2000 can remain on for 7days document changesEnsure these are not indentedTips on accessing , Assessing and MaintainingImplanted Ports with Non-Coring Huber Safety NeedleTips on accessing , Assessing and MaintainingImplanted Ports with Non-Coring Huber Safety Needlepage 3page 4 Created 0807