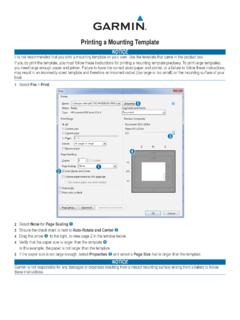
Transcription of Transom Mount Intelliducer Installation …
1 Transom Mount Intelliducer Installation InstructionsTo obtain the best possible performance, install your Transom Mount Intelliducer according to the following instructions . If you experience difficulty during the Installation , contact Garmin Product Support, or seek the advice of a professional Transom Mount Intelliducer provides depth information either to a NMEA 0183-compatible device, or to your existing NMEA 2000 network, depending on the model. For more information about NMEA 2000, visit : See the Important Safety and Product Information guide in the product box for product warnings and other important RegistrationHelp us better support you by completing our online registration today!
2 Connect to our Web site at Keep the original sales receipt, or a photocopy, in a safe future reference, write the serial number assigned to your Intelliducer in the space provided. The serial number is located on a sticker around the number Contact GarminContact Garmin if you have any questions while installing or using your Intelliducer . In the USA contact Garmin Product Support by phone: (913) 397-8200 or (800) 800-1020, or go to Europe, contact Garmin (Europe) Ltd. at +44 (0) (outside the UK) or 0808 2380000 (within the UK).Packing List and Tools NeededBefore installing your Intelliducer , confirm that your package includes the following items.
3 If any parts are missing, contact your Garmin dealer Package Transom Mount Intelliducer (not pictured)A 5 mm flat washers (2)B 5 30 mm screws (2)C 10-32 lock nut (1)D 4 12 mm screw (4)E 10-32 in. screw (1)F 1/4 in. cable clamps (2)G Plastic spacer (1)H 1/4 in. rubber washer (1)I Cable tie, in. (4)J Cable entry cover (1)K NMEA 2000 T-connector (1) (NMEA 2000 Intelliducer only)FHCDKIJGEABT ools Needed Drill and drill bits 3/8 in. ( mm) wrench or socket Masking tape Number 2 Phillips screwdriver Marine sealantMarch 2008 190-00889-01 Rev. B Printed in Taiwan Transom Mount Intelliducer Installation InstructionsInstall the IntelliducerTo install the Transom Mount Intelliducer :1.
4 Assemble the Mount the Connect the Intelliducer your existing NMEA 2000 network. OR Connect the Intelliducer to power and a NMEA 0183-compatible Update your Garmin chartplotter (if applicable).Step 1: Assemble the IntelliducerTo assemble the Intelliducer :1. Insert the rubber washer and the plastic spacer into the Intelliducer at the same time. DO NOT lubricate the rubber Route the NMEA 2000 or power/data cable toward the back of the Intelliducer . Slide the Intelliducer into the Intelliducer Place the 5 mm flat washer on the 10-32 in. screw, and insert the screw through the Intelliducer Mount , the spacer, and the rubber Place the remaining 5 mm flat washer on the exposed end of the 10-32 in.
5 Screw. Install the 10-32 locknut finger tight. Retighten the Intelliducer after Installation on the 2: Mount the IntelliducerWhen selecting a Transom - Mount location, consider the following for optimal performance:For your sonar to operate properly, the Intelliducer must be located in calm the Intelliducer as close to the center of the boat as NOT Mount the Intelliducer in locations where it might be jarred when launching, hauling, or NOT Mount the Intelliducer in the path of the propeller on single-drive boats. The Intelliducer can cause cavitation that can degrade the performance of the boat and damage the propeller. On twin-drive boats, Mount the Intelliducer between the drives, if possible.
6 NOTE: DO NOT Mount the Intelliducer behind strakes, struts, fittings, water intake or discharge ports, or anything that creates air bubbles or causes the water to become turbulent. The Intelliducer must be in clean (non-turbulent) water for optimal performance. Back of the IntelliducerBack of the Intelliducer Transom Mount Intelliducer Installation InstructionsTo Mount the Intelliducer on a Transom :1. Position the Intelliducer Mount at the selected Transom location. Make sure the Intelliducer is parallel with the water line. Mark the center locations of each hole on the Intelliducer marine sealant to all screw threads to prevent water from seeping into the the Intelliducer cable cover far above the should extend 1/8 in.
7 ( . mm) below a fiberglass hull or 3/8 in. ( mm) below an aluminum that the Intelliducer is below water level when the boat is on plane at high not Mount the Intelliducer directly in the path of the propeller. The Intelliducer can cause cavitation that may degrade the boat performance and damage the the Intelliducer parallel with the Drill 5/32 in. (4 mm) pilot holes approximately 1 in. (25 mm) deep at the marked locations. To avoid drilling the holes too deep, wrap a piece of tape around the bit at 1 in. (25 mm) from the point of the bit. 3. Apply marine sealant to the 5 30 mm screws. Attach the Intelliducer assembly to the Transom using the 5 30 mm screws.
8 Adjust the Intelliducer assembly to extend beyond the bottom of the Transom approximately 1/8 in. ( mm) on fiberglass hulls or 3/8 in. ( mm) on aluminum hulls. Adjust the Intelliducer assembly to be aligned parallel with the Tighten the 10-32 locking nut until it touches the mounting bracket, and then tighten 1/4 turn more. (Do not overtighten.)5. Place the first cable clamp on the Intelliducer cable, approximately one third of the distance between the Intelliducer and the top of the Transom . 6. Mark the location. Drill a 1/8 in. ( mm) pilot hole approximately 3/8 in. ( mm) Attach the cable clamp using one of the 4 12 mm screws. Coat the screw with marine sealant before Installation .
9 Repeat steps 5 and 6 using the other cable clamp. 8. Route the NMEA 2000 cable to the backbone of your existing NMEA 2000 network. OR Route the power/data cable to power and a NMEA 0183-compliant device. CAuTION: Avoid routing the cable close to electrical wires or other sources of electrical interference. Transom Mount Intelliducer Installation InstructionsStep 3 (NMEA 2000): Connect the Intelliducer to a NMEA 2000 NetworkThe Intelliducer is packaged with a NMEA 2000 T-connector. The Intelliducer has a built-in NMEA 2000 drop cable. Use these two components to connect the Intelliducer to your existing NMEA 2000 network. If you do not have an existing NMEA 2000 network, you will need to install a NMEA 2000 network on your boat.
10 For more information on NMEA 2000, visit connect the Transom Mount Intelliducer to your existing NMEA 2000 network:1. Determine an appropriate location to connect the Intelliducer to your existing NMEA 2000 Disconnect one side of a NMEA 2000 T-connector, or disconnect a terminator from the backbone nearest to the location where you want to connect the Intelliducer . If you need to extend the NMEA 2000 backbone, connect an appropriate NMEA 2000 backbone extension cable (not included) to the T-connector or terminator you Connect the included T-connector for the Intelliducer in the NMEA 2000 backbone. 4. Route the built-in drop cable on the Intelliducer to the bottom of the T-connector you added to your NMEA 2000 network.