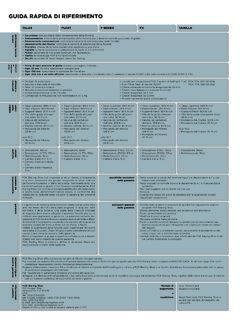
Transcription of TUNING GUIDE - Fox Factory
1 SHOCKFLOAT32 Sag settingTo achieve the best performance from your FOX suspension, adjust the air pressure to attain your proper sag setting. Sag is the amount your suspension compresses under your weight and riding gear. Sag range should be set to 25 30% of total shock travel. Watch the sag setup video at Turn the 3-position lever to the OPEN mode. 2. Start by setting the shock air pressure (psi) to match your weight in pounds. With the air pump attached to the shock valve, slowly cycle your shock through 25% of its travel 10 times as you reach your desired pressure.
2 This will equalize the positive and negative air chambers and will change the pressure on the pump gauge. Do not exceed maximum air pressure: Non-EVOL air shocks have a maximum pressure of air shocks have a maximum pressure of Remove the pump. 4. Sit still on the bike in your normal riding position, using a wall or a tree for Pull the sag indicator o-ring up against the rubber air sleeve Carefully dismount the bike without Measure the distance between the sag indicator o-ring and the rubber air sleeve seal. Compare your measurement to the Suggested Sag Measurements Add or remove air pressure until you reach your desired sag RANGE25-30%TOTAL SHOCK TRAVELOPENMEDIUMFIRMThe recommended settings in this TUNING GUIDE are designed to be a starting point, in order to get you out on your first ride in as few steps as possible.
3 Consult your bike manufacturer s instructions for setup Sag MeasurementsTravel25% sag (Firm)30% sag (Plush)38 mm ( in)10 mm ( in)11 mm ( in)44 mm ( in)11 mm ( in)13 mm ( in)51 mm (2 in)13 mm ( in)15 mm ( in)57 mm ( in)14 mm ( in)17 mm ( in)63 mm ( in)16 mm ( in)19 mm (.75 in)RUBBER AIR SLEEVE SEALINDICATOR O-RINGAs you ride and get used to your new shock, adjust your settings as needed. Detailed information and videos can be found in the online owner s shock has a 4 digit ID code on the shock body. Use this number on the Help page at to find out more information about your shock, including shock AIR SLEEVE EVOL comes Factory installed on FLOAT X2, and is available as an option for FLOAT DPS and FLOAT AIR PRESSUREE qualize the positive and negative air chambers by slowly compressing the shock through 25% of its travel 10-20 times after every 50 psi addition.
4 Failure to equalize the chambers can result in greater pressure in the positive air chamber than the negative chamber. If the shock feels very stiff and is in the topout position, compress the shock until you hear or feel air transfer. Hold the shock in this compressed position for a few AIR PRESSURE Release air slowly so the air from the negative chamber can also be released through the Schrader valve. Releasing the air pressure too quickly can cause the negative chamber to have more pressure than the positive chamber. If the shock is compressed into its travel and does not fully extend, add air pressure until the shock extends, then slowly compress the shock through 25% of its travel 10-20 ADJUST ments3-POSITION LEVEROPENMEDIUMFIRMOpen mode adjust is useful to control shock performance during rider weight shifts, G-outs, and slow mode adjust provides 3 additional fine TUNING adjustments for the OPEN mode.
5 Lift the open mode adjuster, rotate it to the 1, 2, or 3 position, and press it in to lock the position. It is recommended to make these adjustments with the 3-position lever in the Medium or Firm mode. Setting 1 will have a more plush feel and setting 3 will have a firmer 3-position lever is useful to make on-the-fly adjustments to control shock performance under significant changes in terrain, and is intended to be adjusted throughout the the OPEN mode during rough descending, the MEDIUM mode for undulating terrain, and the FIRM mode for smooth climbing.
6 *OPEN MODE ADJUST123 Air Pressure (psi)Recommended Rebound Setting<100 Open (counter-clockwise)100-12011120-14010140 -1609160-1808180-2007200-2206220-2405240 -2604260-2803280-300 Closed (clockwise)rebound ADJUST mentThe rebound adjustment is dependent on the air pressure setting. For example, higher air pressures require slower rebound settings. Use your air pressure to find your rebound setting. Turn your rebound knob to the closed position (full clockwise) until it stops. Then back it out (counter-clockwise) to the number of clicks shown in the table controls the rate of speed at which the shock extends after compressing.
7 Set the open mode adjust to setting with the 3-position lever in the OPEN mode. LEAST AMOUNT OF REBOUND DAMPING, SHOCK REBOUNDS FASTESTMOST AMOUNT OF REBOUND DAMPING, SHOCK REBOUNDS SLOWESTCLOSED(CLOCKWISE)OPEN(COUNTER-CLO CKWISE)11109876543* Factory Series and Performance Elite Series shocks onlyFLOAT76 Additional TUNING optionsVolume SpacersChanging volume spacers in the shock is an internal adjustment that allows you to change the amount of mid stroke and bottom out resistance. If you have set your sag correctly and are using full travel (bottoming out) too easily, then you could install a larger spacer to increase bottom out you have set your sag correctly and are not using full travel, then you could install a smaller spacer to decrease bottom out procedure and TUNING options are available online at: ADDITIONAL INFORMATION AND VIDEOS.
8 TRAVELSHOCK FORCEFULL COMPRESSIONFULL EXTENSIONLARGE SPACER(LEAST AIR VOLUME)MEDIUM SPACER(LESS AIR VOLUME)NO SPACER(MOST AIR VOLUME)typical air spring curves605-00-164 REV A