Transcription of User Manual - D-Link
1 DCS-8525 LHUser ManualFull HD Pan & Tilt Wi-Fi CameraHardware: A1 Manual Version: DCS-8525LH User ManualD- link reserves the right to revise this publication and to make changes in the content hereof without obligation to notify any person or organization of such revisions or changes. Information in this document may become obsolete as our services and websites develop and change. Please refer to the website for the most current OverviewTrademarksD- link and the D-Link logo are trademarks or registered trademarks of D-Link Corporation or its subsidiaries in the United States or other countries. All other company or product names mentioned herein are trademarks or registered trademarks of their respective 2020 by D-Link Corporation, rights reserved. This publication may not be reproduced, in whole or in part, without prior expressed written permission from D-Link Corporation, 20, 2020 Initial 15, 2020 Spec updateiiD- link DCS-8525LH User ManualTable of ContentsTable of ContentsProduct Overview.
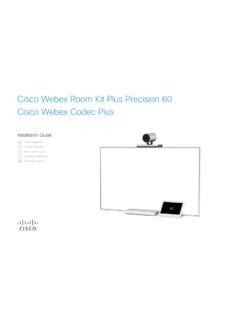
2 1 Package Contents ..1 Introduction ..2 System Requirements ..2 Hardware Overview ..3 Front .. Behavior ..5 Installation ..6 Safety ..6 Before you Begin ..6 Wireless Installation Considerations ..7mydlink App Camera Setup ..8 Mounting the the mydlink App ..12 Controlling Your Device ..12 Camera Options ..13 Device ..15 Troubleshooting ..17 Technical Specifications ..18 Regulatory Information ..201D- link DCS-8525LH User ManualSection 1 - Product OverviewProduct OverviewPackage ContentsIf any of the above items are missing, please contact your : Using a power supply with a different voltage rating than the one included with your product will cause damage and void the warranty for this || Full HD Pan & Tilt Wi-Fi Camera Ethernet CableQuick Installation GuideMounting KitPower Adapter2D- link DCS-8525LH User ManualSection 1 - Product OverviewIntroductionThe DCS-8525LH Full HD Pan & Tilt Wi-Fi Camera provides a range of features to help you effectively monitor large areas of your home or small office at all hours of the day.
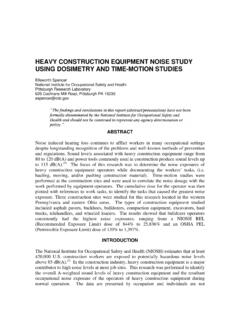
3 The pan/tilt function allows the camera to patrol a wide area, while the built-in IR LEDs provide around the clock surveillance regardless of the lighting conditions. Extra details are captured in 1080p high-definition, 2 megapixal resolution and compression saves space without sacrificing performance. Wireless connectivity means there is no need for additional RequirementsNetwork Requirements wireless network An Internet connection A router connected to your broadband modemmydlink App Requirements iPhone, iPad, Android smartphone or tablet (please refer to the mobile app's store page to check whether your device is compatible) Email account (for mydlink service registration)3D- link DCS-8525LH User ManualSection 1 - Product OverviewHardware OverviewFront2461 Light SensorThe IR-Cut removable sensor monitors lighting conditions and switches between color and infrared LensRecords video of the surrounding LEDsIR LEDs encircle the camera lens.
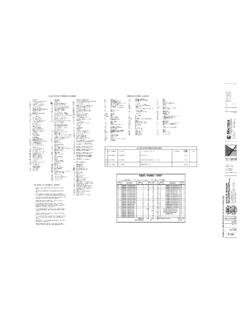
4 4 MicrophonePicks up sound near your camera. 5 link LEDC onnected to an access LEDC onnected to a power source. See LED Behavior on page 5 for more DCS-8525LH User ManualSection 1 - Product OverviewBack31microSD Card SlotWhere a microSD card can be PortRJ-45 connector for Power PortAttach your microUSB power adapter to this port to supply power to the ButtonHold the recessed button down for at least 10 seconds to reset the camera to factory default audio playback for the two-way audio DCS-8525LH User ManualSection 1 - Product OverviewLED BehaviorPower LEDP ower LEDP owering onUpgrading firmware - do not power offReady for set upConnected to Wi-FiLink LEDC onnected to Wi-FiLive streaming data being transferredLink LED6D- link DCS-8525LH User ManualSection 2 - InstallationPlease read all of the safety and operating instructions before using device: Do not open the device or attempt to repair it. Do not submerge the device in liquid or attempt to clean it with liquids or solvents.
5 To clean the device, disconnect it from the power outlet and use a damp towel to gently wipe it you BeginPlan the location of your camera: Verify that your camera is electrically rated to operate with the power available in your location. Connect the camera's power adapter into an electrical outlet that is not controlled by a wall switch. This will help avoid accidentally turning off power to the device. Be sure to plug the device into a properly grounded electrical outlet in order to help prevent against electrical shock. Make sure that the device is firmly DCS-8525LH User ManualSection 2 - InstallationWireless Installation ConsiderationsThe DCS-8525LH Full HD Pan & Tilt Wi-Fi Camera lets you view video footage from virtually anywhere within the operating range of your wireless network. Keep in mind that the number, thickness and location of walls, ceilings, or other objects that the wireless signals must pass through may limit the range.
6 Typical ranges vary depending on the types of materials and background RF (radio frequency) noise in your home or business. The key to maximizing wireless range is to follow these basic guidelines:1. Keep the number of walls and ceilings between the camera and wireless access point to a minimum - each wall or ceiling can reduce your camera s range from 1 to 30 meters (3 to 90 feet). Position your devices so that the number of walls or ceilings is Be aware of the direct line between network devices. A wall that is meters ( feet) thick, at a 45-degree angle appears to be almost 1 meter (3 feet) thick. At a 2-degree angle it looks over 14 meters (42 feet) thick! Position devices so that the signal will travel straight through a wall or ceiling (instead of at an angle) for better Building materials make a difference. A solid metal door or aluminum studs may have a negative effect on range. Try to position access points, wireless routers, and cameras so that the signal passes through drywall or open doorways.
7 Materials and objects such as glass, steel, metal, walls with insulation, water (fish tanks), mirrors, file cabinets, brick, and concrete will degrade your wireless Keep your product away at least 1 to 2 meters (3 to 6 feet) from electrical devices or appliances that generate RF DCS-8525LH User ManualSection 2 - Installationmydlink App Camera SetupLaunch the mydlink app and create a new account or sign in to your existing : If you are asked about allowing the app to access your location or to send notifications, select Allow. Make sure location services and Bluetooth are turned on in your phone s the mydlink app from the App Store (iOS) or Google Play (Android) by scanning the QR : Ensure that your device is wirelessly connected to the network that the DCS-8525LH will be DCS-8525LH User ManualSection 2 - InstallationAfter logging in, tap the Menu button in the top-left Add a Device. Follow the onscreen instructions to complete the device DCS-8525LH User ManualSection 2 - InstallationPlace the mounting bracket where you want to position the camera and use a pencil to mark the the Camera1/Depending on the material of the wall or ceiling , use proper tools todrill holes 25 mm deep with a 6 mm drill bit where you marked.
8 Forplaster, drywall, or concrete walls, insert the plastic anchors tosupport the power and Ethernet cables can be concealed behind the mounting bracket. Run the cables through the back of the mounting bracket, securing them with the built-in guides. Be sure to leave enough cable length protruding from the top to allow connection to the camera. 3/11D- link DCS-8525LH User ManualSection 2 - InstallationFasten the mounting bracket to the wall using the screws the supplied thumbscrew, fasten the camera to the mounting bracket. Connect the power and Ethernet cables to the camera. 5/Adjust the angle of the arm on the mounting bracket as required. Tighten the thumbscrew to lock the arm in DCS-8525LH User ManualSection 3 - mydlinkUsing the mydlink AppControlling Your DeviceAfter setting up your DCS-8525LH Full HD Pan & Tilt Wi-Fi Camera with a mydlink account in the mydlink app, you will be able to remotely access your camera through the app. After signing into your mydlink account, you will see a screen similar to the one on the you have previously checked the Add to shortcut option while installing the camera, you will see a quick link to your camera directly on the home screen.
9 Tap the shortcut link to your camera on the home screen and by default you will see a live video feed of your camera on the top half of the access the settings for your DCS-8525LH Full HD Pan & Tilt Wi-Fi Camera, tap > Devices > Camera > navigate to your camera on the carousel > .Note: Screenshots are representative only. The mydlink app is constantly being updated and so may appear DCS-8525LH User ManualSection 3 - mydlinkCamera OptionsOn the bottom half of the app you will see control options for your this button to take a snapshot of the video ToggleTap this icon to review various live video options such as microphone and video this button to enable video stream to toggle the Options to disable audio. Tap to enable audio. 14D- link DCS-8525LH User ManualSection 3 - mydlinkCamera PresetsSave and quickly access up to 5 different camera views. The button is your Home Point. To set other viewpoints, tap the button, then tap the live view screen and use the arrows to set your view preset.
10 Long press on the button to save a snapshot of that ResolutionTap 720p to use 720p resolution video. Tap 1080p to use 1080p resolution to TalkHold down the to send your voice to the camera's built-in DCS-8525LH User ManualSection 3 - mydlinkDeviceTo access the device page, either: From the home page, tap > Devices > Camera > navigate to your camera on the carousel > or In the camera control page, tap the device page contains several options for you to configure your DCS-8525LH User ManualSection 3 - mydlink1 Device PhotoTap to add a customized photo of this NameTap to change the device s LocationTap to change or add a new location for this to change the wireless network this device will use to connect to the Internet. Note: The network must be the same as all your other mydlink devices that you wish to use the same account ContactTap here to add, remove, or edit designated contacts that appear in the rich MicrophoneTap to enable or disable picking up sound near your camera in live view and SettingTap to further configure sensitivity and the active area of motion VisionTap to change night vision detection to On, Off or flicker in the video.