Transcription of Wi-Fi Smart Switch
1 Installation guide Wi-Fi Smart Switch table of contents before you what you need ..4 regulatory 24 27. installation and setup .. 6 19 getting to know your 2. before you start Review this guide in its entirety before beginning device installation. Consult an electrician with any questions or if you are unsure of your abilities. DWarning: Incorrect installation could Do not use with loads exceeding the result in death, serious injury, and/or device load rating (see page 22). damage to your home or devices. Connect the Smart Switch to a 120 VAC, 60 Hz power source ONLY.
2 DCaution: To reduce the risk of injury and/or overheating and damage to other Always use copper wire to install the equipment: Smart Switch and follow all applicable local and national electrical codes. For dry, indoor use only. Install in a non-metallic electrical box Do not use to power medical equipment. to protect wireless signal strength. Not suitable as a disconnecting means. Visit the Legrand website at for installation videos or to learn more about your Smart device. 3. what you need REQUIRED: Phillips-head screwdriver Flat blade screwdriver YOU MAY ALSO NEED: Voltage tester, pliers, wire cutter, wire stripper, electrical tape, flashlight, wiring leads (included), and wire nuts (included).
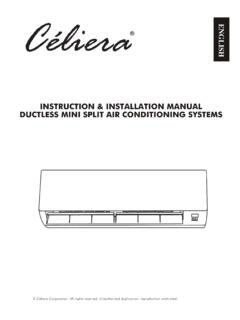
3 4. 5. installation & setup step one | turn off the power for your device at the circuit breaker Flip the existing light Switch multiple times to confirm the power is off. NOTE: If there are multiple devices next to your existing light Switch , make sure power is off at the circuit breaker for all of those devices. 6. ON ON ON ON ON. OFF OFF OFF OFF OFF. 7. installation & setup step two | remove the existing device Check for the following wires: 1 HOT or LINE: Receives power from the circuit box. Referred to as hot for the purposes of this guide. Do not touch or let hot wires contact other wires.
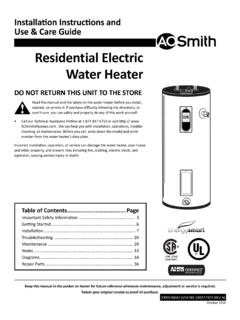
4 2 LOAD: Directs power to your light(s). 3 NEUTRAL: Creates a path to return current to the power source when the device is off. Required for your Switch installation. 4 GROUND: Provides a safe path for electricity in the event of a short circuit. 5 TRAVELER: If more than one Switch controls the light, an additional wire will be in the box that travels to the other Switch . NOTE: Refer to the faqs on page 23 if you are unsure of your wiring. 8. Load OFF. ON. OFF. ON. OFF. ON. Supply Hot . VO. TE LTAG. ST. ER E. 9. installation & setup step three | wire the Smart Switch Use the wire nuts provided to secure the wires together.
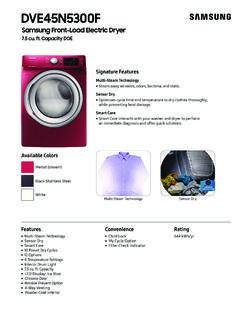
5 1 Connect the WHITE neutral wire on the Switch to the neutral wires in the box, using the red wire nut. 2 Connect the LOAD wire on the Switch to the load wire in the box. 3 Connect the HOT wire on the Switch to the hot wire(s) in the box. 4 Connect the GREEN ground wire on the Switch to the ground wire(s) in the box. 5 If the light is controlled with only one Switch , use a wire nut to cap the YELLOW. traveler wire on the device. If more than one Switch controls the light, connect the YELLOW traveler wire on the device to the wire going to the other Switch . NOTE: This product will work with existing three-way switches.
6 The Switch can be installed in either location. 10. HOT. 1-POLE. Ground 3-WAY. WHITE. ON ON ON. OFF OFF OFF. Hot . Load Supply 11. installation & setup step four | secure the Smart Switch 1 Gently fold the wires into the electrical box. Be careful not to pinch a wire or loosen any wire nuts. 2 Use the device screws to secure the Smart Switch to the electrical box. Do not fully tighten the screws. 12. 13. installation & setup step five | test the Smart Switch NOTE: See page 20 for feature details. 1 Turn the power back on at the circuit breaker. 2 Press the paddle Switch to turn your light on and off.
7 TROUBLESHOOTING TIP: If the device is not powering, reference the faqs on page 23 to determine if you have reversed the hot and load wiring. 14. ON ON ON ON ON. OFF OFF OFF OFF OFF. 15. installation & setup step six | attach the screwless wall plate 1 Noting which side faces out, align the sub-plate over the device screws. Use the sub-plate screws (provided) to secure the sub-plate to the Smart Switch . 2 Tighten the device screws to secure the Smart Switch to the electrical box. 3 Angle the end of the screwless wall plate over the top edge of the sub plate. Push the screwless wall plate down and in until it snaps into place over the sub-plate.
8 NOTE: To remove the wall plate, place the tip of a flat blade screwdriver into the slot under the wall plate and twist gently. 16. THIS SIDE OUT. 1. MOUNT OVER DEVICE. 2. THIS SIDE OUT. MOUNT OVER DEVICE. THIS SIDE OUT. 3. MOUNT OVER DEVICE. 17. 18. installation & setup step seven | set up your system 1 Download and launch the Smart Lights app by Legrand. The app is available on the App Store or on Google Play. 2 Connect your Smart Switch to your home network by following the step by step instructions in the app. 3 Use the app to control your Smart Switch . Google Play and the Google Play logo are trademarks of Google LLC.
9 App Store is a service mark of Apple Inc., registered in the and other countries. 19. getting to know your Switch Item Name Description Press the top of the paddle to turn the light on and the bottom to turn the light off. 1 Paddle Switch To return the Switch to factory default, press and hold both ends of the paddle for 30 seconds. Indicates the current state of the device. Refer to 2 LED Locator Light LED Locator Light Explanations for detail. 20. LED LOCATOR LIGHT EXPLANATIONS. 2. LED State of Explanation Color Light Solid Factory default; ready to Amber connect to your network 1 Blinking Device is attempting to Amber connect to the network Solid Device is connected to your White network and is switched off 21.
10 Specifications Load Rating Resistive 120 VAC, 60 Hz,15 A. Incandescent/halogen 1800 W. Ballast 15 A standard/electronic Motor 1/2 HP. Legrand reserves the right to change specifications without notice. 22. faqs Q: Which wire is the hot wire versus the load wire? A: To determine this safely, begin by confirming that power is off to the device location at the circuit breaker. Cap all of the exposed wires in the electrical box, then turn the power back on at the device location. Find your non contact voltage tester. Place your voltage tester next to each of the wires.