Transcription of Wireless Keypad Instructions STEP 1) …
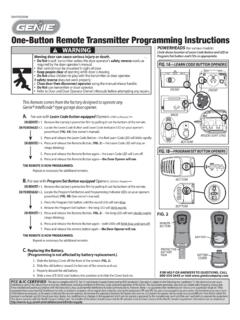
1 Keypad InstructionsIt is recommended to complete programming before mounting keypadKeypadUp/Down Key(enter)Program KeyLEDLED O LED OnLED FlashingKeypad O Keypad OnKeypad FlashingKeypad LED sSuccessful EntriesFailed EntriesSAVE THESE Instructions FOR FUTURE USEWARNING!MOVING DOOR CAN CAUSE SERIOUS INJURY OR DEATH. DO NOT install transmitter ( Keypad ) unless the door operator s safety device works as required by the door operator s manual. Wall Console must be mounted in sight of door, at least 5 feet above floor and clear of moving door parts. Keep people clear of opening while door is moving. DO NOT allow children to play with the transmitter or door safety reverse does not work properly: Close door then disconnect opener using the manual release handle. DO NOT use transmitter or door operator. Refer to Door and Door Opener Owner s Manuals before attempting any !D M NAGEMENT PORTE PEUT CAUSER DES BLESSURES GRAVES OU LA MORT.
2 NE PAS installer le transmetteur (clavier) moins que le dispositif de s curit de l op rateur de porte ne fonctionne comme l exige le manuel d utilisation de la porte. Console murale doit tre mont en vue de la porte d au moins 5 pieds au-dessus-de-chauss e et claire des pi ces mobiles de la porte. Garder les personnes clair de l ouverture lorsque la porte est en mouvement. Ne pas laisser les enfants jouer le premier match distance ou la la s curit inverse ne fonctionne pas correctement: Fermer la porte, puis d branchez moteur l aide de la poign e de d verrouillage manuel. Ne pas utiliser d ouverture distance ou la porte. Reportez-vous la porte et ouvre-porte de propri taires manuels avant de tenter toute r LED will flash each time a key is pressed and entry is LED and PROGRAM key will flash slowly and number pad back light will remain on for 15 seconds indicating a successful program or valid PIN has been LED, PROGRAM key and number pad back light will flash rapidly indicating a problem with programming or an invalid PIN entry.
3 Wait 15 seconds until back lighting shuts off and enter a valid PIN or reset Keypad to Part Statement: Changes or modifications not expressly approved by the party responsible for compliance could void the user s authority to operate the equipment. FCC / IC Statement: This device complies with FCC Part 15 and Industry Canada licence-exempt RSS standard(s). Operation is subject to the following two conditions: (1) this device may not cause harmful interference, and (2) this device must accept any interference received, including interference that may cause undesired operation of the device. Le pr sent appareil est conforme aux CNR d Industrie Canada applicables aux appareils radio exempts de licence. L exploitation est autoris e aux deux conditions suivantes : (1) l appareil ne doit pas produire de brouillage, et (2) l utilisateur de l appareil doit accepter tout brouillage radio lectrique subi, m me si le brouillage est susceptible d en compromettre le Door Operation:1.
4 Ensure number pad back lighting is Enter PIN Press the UP/DOWN Opener will Operation:1. Ensure number pad back lighting is Enter PIN Press the UP/DOWN Press number key corresponding with desired door (1, 2, or 3).5. Desired opener will an Existing PIN:1. Enter current PIN2. Press PROGRAM key Enter new Press PROGRAM key once. Original PIN will no longer operate Keypad or opener. ADDITIONAL (OPTIONAL) PROGRAMMING:Setting a Temporary PIN:A temporary PIN allows temporary access to the garage by, normally unauthorized, personnel such as repairmen or Enter current Press PROGRAM key 3 Enter a temporary PIN (3 to 8 digits)4. Press PROGRAM key once. The Temporary PIN will operate garage door opener until the original PIN is used. Use of the original PIN will delete temporary PIN. For questions, comments or troubleshooting, contact The Genie Company at:1 Door Drive, Mount Hope Ohio, 44660or call 1-800-354-3643 or visit our website at: MUST be mounted within sight of the garage door(s) at least 5 feet above floor and clear of any moving door parts.
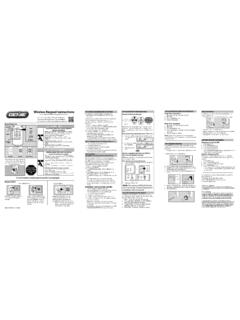
5 Programming will not be lost during battery Remove battery cover and Drill a 3/32 pilot hole for the top mounting Install included screw into pilot hole, leaving 1/8 gap between the screw head and Hook the slotted mount on back of Keypad over the "Screw head gap5. Mark and drill a 3/32 pilot hole for the bottom screw and secure Keypad to the wall. (Do not over-tighten).6. Reinstall the Keypad back-lighting fails to operate, Batteries may require replacement. Programming will not be lost during battery Remove battery cover and Replace batteries with same type alkaline (AAA) and check for proper direction of (+) and (-) batteries are NOT 3) OPERATING THE Keypad WITH THE OPENER(S)STEP 4) MOUNTING THE Keypad * RESETTING THE Keypad (FACTORY DEFAULT):If the Keypad has already been programmed or at any time the programming should be erased and started from the factory default, follow these Ensure that number pad back lighting is Press and hold the PROGRAM and UP/DOWN Keys together for approximately 5 The LED will flash twice and all lights will go out indicating the Keypad has been Start at STEP 1 to program a new PIN the Keypad for the first time* with a Personal Identification Number (PIN).
6 This PIN must be 3 to 8 Ensure number pad back lighting is Press 3-5-7 in sequence. 3. Press PROGRAM key. LED will blink once per Enter a PIN number (3-8 digits). 5. Press PROGRAM key. LED will blink twice and shut off. The Keypad is now programmed with a PIN number and ready to program to the garage door opener(s). See STEP 2A to program 1 Opener. See STEP 2B PROGRAMMING FOR MULTIPLE OPENERS if using Keypad to operate up to 3 doors. If LED did not blink twice and shut off, please see RESETTING THE Keypad (FACTORY DEFAULT ) 1) PROGRAMMING A PIN NUMBER1. Place garage door opener into PROGRAMMING MODE as illustrated in the column to the Ensure number pad back lighting is Enter the PIN number on Press the UP/DOWN key 3 to 4 times slowly until garage door opener operates. This completes the programming of a single door. See STEP 3 SINGLE DOOR OPERATION for further 2A) PROGRAMMING THE Keypad TO 1 OPENER-OR-Program the Keypad with a Personal Identification Number (PIN) as described in step 1.
7 Then follow these additional Ensure number pad back lighting is Enter PIN as programmed in STEP 1. 3. Press PROGRAM key twice. LED will blink once per Enter total number of openers that Keypad will be operating. (2 or 3).5. Press PROGRAM key once. LED will blink twice and shut off. NOTE: Only one PIN number can be used. The Keypad is now programmed with a PIN number and set up for multi opener operation. Keypad is now ready to program to multiple garage door openers. If LED did not blink twice and shut off, please see RESETTING THE Keypad (FACTORY DEFAULT ) 2B) PROGRAMMING THE Keypad FOR MULTIPLE OPENERS (UP TO 3)1. Place desired garage door opener (1, 2, or 3) into PROGRAMMING Ensure number pad back lighting is Enter the PIN number on Press the UP/DOWN key Press the number of the desired door (1, 2 or 3).6. Press the UP/DOWN key 3-4 times slowly until garage door opener operates.
8 Repeat steps 1 through 6 to program second and third openers. This completes programming of multiple doors. See STEP 3 MULTI-DOOR OPERATION for further THE Keypad TO MULTIPLE OPENERS (UP TO 3)For use with Intellicode garage door openersKeypad OverviewActivate Keypad by opening battery compartment and pull protective tab. Reinstall compartment door to begin : Keypad will remain active for 15 seconds after a successful entry is made. During this 15 seconds ANY key will operate the Production Openers1. Press and hold the program button until the round LED turns blue, then +PROGRAMSET+2. The round LED will go out and the long LED will begin flashing Return to STEP 2A or 1 TYPE 2 TYPE 3 There are 3 types of programming button pads. Type 1 is shown in these steps. All buttons perform the same function and programming is the same for all types shown operator into programming mode: TYPE 1-2-3 Openers manufactured between 1995 to 2011 and all external receiversRADIOSIGNALLEARNCODECODELEARNSE TSETOPENFORCECLOSECODELEARNLIMITMANUALor RADIOSIGNALLEARNCODERADIOSIGNALLEARNCODE 1.
9 Press & release Learn Code button once. The red LED will begin to operator into programming mode:NOTE: Learn Code Buttons are normally located under lens covers on earlier OPENER INTO PROGRAMMING MODE:NOTE: The openers LEARN LED will time out in 30 seconds. Programming must be completed within 30 +PROGRAMSET+2. Return to STEP 2A or BATTERIESScan this code with a QR code reader app on a smart device to view a video of these Instructions . Or visit del Teclado Inal mbricoPara su conveniencia, es mas f cil realizar la programaci n antes de montar el tecladoTeclado LED sEntradas ExitosasEntradas FallidasGUARDE ESTAS INSTRUCCIONES PARA USO EN EL FUTURO ADVERTENCIA!!LA PUERTA EN MOVIMIENTO PUEDE OCASIONAR LESIONES GRAVES O LA MUERTE. NO instale el transmisor (teclado) a menos que el dispositivo de seguridad del operador de la puerta funcione como es requerido por el manual del operador de la puerta.
10 La Consola de Pared debe ser montada a la vista de la puerta, por lo menos 5 pies arriba del piso y alejada de las partes en movimiento de la puerta. Evite que las personas se acerquen mientras la puerta est en movimiento. NO permita que los ni os jueguen con el transmisor o el operador de la puerta. Si la funci n inversa de seguridad no funciona correctamente: Cierre la puerta y despu s desconecte el abridor utilizando la manija de liberaci n manual. NO utilice el transmisor o el operador de la puerta. Consulte los Manuales del Propietario de la Puerta y del Abridor de la Puerta antes de intentar cualquier reparaci luz LED del teclado parpadear cada vez que una tecla sea oprimida y la entrada sea luz LED del teclado y la tecla de PROGRAMACI N parpadear n lentamente y la luz posterior del teclado num rico permanecer encendida durante 15 segundo indicando una programaci n exitosa o que ha sido introducido un n mero PIN v luz LED del teclado, la tecla de PROGRAMACI N y la luz posterior del teclado num rico parpadear n r pidamente indicando un problema con la programaci n o una entrada de un n mero PIN inv lida.