Transcription of www.BobsPlans
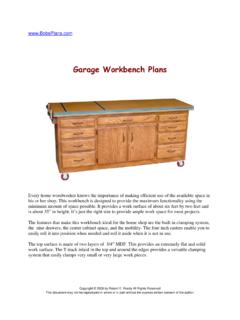
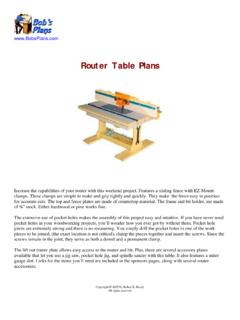
1 Foot Home BarHome Bar PlansEntertain your friends in style with this beautiful oak bar. The top is 6 ft. long and 24 deep. The overallheight about 42 . The classic design features solid oak armrest molding, solid brass foot rail, aconvenient work shelf in the rear, three drawers, and two sliding wine racks. The cabinet is made of oak veneered plywood. The trim and drawer fronts, from solid extensive use of pocket holes makes the assembly of this project easy and intuitive. If you havenever used pocket holes in your woodworking projects, you ll wonder how you ever got by withoutthem. Pocket hole joints are extremely strong and there is no measuring. You simply drill the pocketholes in one of the work pieces to be joined, (the exact location is not critical), clamp the pieces togetherand insert the screws. Since the screws remain in the joint, they serve as both a dowel and a 2005 by Robert E.
2 ReedyAll rights reservedClick any of these items for links to home bar accessories and supplies you may Ft Brass Foot Rail KitClick here for pricesBrass RailingClick here pricesArm Rest MoldingClick here pricesHome Bar Accessories & SuppliesDrink DispenserClick here for pricesBar Tending ToolsClick here pricesDrink Mixing BooksClick here pricesTable of ContentsPart 1 - DimensionsMaterials List Cabinet .. 1 Front Panel .. 2 Side Panel & Vertical Divider .. 3 Kick Panel, Shelf, & Cleats .. 4 Front Trim .. 5 Side Trim .. 6 Rear Trim .. 7 Rear Trim Arrangement .. 8 Materials List Brass Foot Rail .. 9 Materials List Top & Arm Rest Dimensions .. 10 Bar Top ..11 Bar Top Rear & Soffit ..13 Materials List Drawers & Wine Racks ..14 Drawer Box Sides, Fronts, & Backs ..15 Drawer Fronts & Bottoms ..16 Wine Racks ..17 Table of ContentsPart 2 - Assembly InstructionsAttach Drawer Slides.
3 18 Attach Wine Rack Slides - Assemble Bottom .. 19 Attach Vertical Dividers & Kick Panel .. 20 Attach Side Panels and Work Shelf ..21 Assemble Front & Side Panels ..22 Attach Front and Side Trim .. 23 Install Upper Horizontal Trim .. 24 Arrangement of Rear Trim .. 25 Install Brackets & Measure Side Rail Length .. 26 Measure Front Rail Length - Assemble Rails .. 27 Assemble Armrest Molding .. 28 Drill Pocket Holes in the Top .. 29 Attach Rear Trim to the Top .. 30 Attach Risers to the Top .. 31 Attach Top to Molding & End Soffit .. 32 Attach Center Soffit .. 33 Assemble Drawers .. 34 Assemble Wine Racks .. 35 Cutout Suggestions (1) ..36 Cutout Suggestions (2) ..37 Cutout Suggestions (3) ..38 Classic Home BarMaterials You Will Need Two SheetsOak Veneer Plywood -See Cutout Suggestions (1) One Sheet Oak Veneer Plywood -See Cutout Suggestions (1) One Sheet Oak Veneer Plywood -See Cutout Suggestions (2) One fourth Sheet Hardboard -See Cutout Suggestions (2) Four5 by 8 by Oak Boards One6 by 8 by Oak Board 22 foot length of Oak Armrest Molding 16 foot length of Oak Arm Rest Molding16 foot length of Polished Brass Foot Rail (2 diameter)22 foot length of Polished Brass Foot Rail (2 diameter)5 Polished Brass Floor Brackets (2 diameter)2 Polished Brass Elbows (2 diameter)2 Polished Brass End Caps (2 diameter)5 Sets of 14 Drawer Slides 3 Drawer HandlesLarge Box1 Pocket Hole ScrewsAbout 501 Flathead Wood Screws1# Box1 Finishing Nails1# Box1 Finishing Nails7 Small Angle BracketsNote.
4 Be sure all the brass items are 2 diameter and polished HereYou'll need to purchase one 8' length and one 2' length of arm rest molding. You can cut the 6' length & the second 2' length from the 8' piece. Click HereYou'll need one 8' length and one 2' length of polished brass foot rail (2 diameter). You can cut the 6' length & the second 2' length from the 8' piece. Click HereYou'll need two polished brass 90 degree elbows (2 diameter).Click HereYou'll need two polished brass end caps (2 diameter).Click HereYou'll need five polished brass floor brackets (2 diameter).Cabinet Materials ListPage 1 Please Note! The dimensions given are based on using 3/4" thick plywood. However, much of theplywood on the market today is actually a metric size and is slightly less than 3/4" thick. This will notaffect most of the dimensions, however, you will need to adjust the dimensions of the rear trimaccordingly if your plywood is less than 3/4" Name26 1/2" X 41 1/8"3/4" Oak PlywoodLeft and Right Front Panels141" X 41 1/8"3/4" Oak PlywoodCenter Front Panel214" X 41 1/8"3/4" Oak PlywoodCabinet Sides214" X 23 1/2"3/4" Oak PlywoodVertical Dividers214" X 52 1/2"3/4" Oak PlywoodTop Work Shelf and Bottom15" X 52 1/2"3/4" Oak PlywoodKick Panel116" X 14"3/4" Oak PlywoodSmall Shelf1514 X 2 3/4" Oak PlywoodCleats219" X 2"3/4" Oak PlywoodFront Cleats22" X 55 1/2"3/4" Solid OakTop and Bottom Trim (Front)22 X 36 3/4" Solid OakFluted Trim (Front)41 1/2" X 36"3/4" Solid OakCorner Trim23/4" X 36"3/4" Solid OakSide Corner Trim (Front)42" X 16 1/4"3/4" Solid OakTop and Bottom Trim (Side)21" X 26"3/4" Solid OakDecorative Frame (Top and Bottom)
5 21" X 18"3/4" Solid OakDecorative Frame (Sides)12" X 51"3/4" Solid OakBottom Horizontal Trim (Back)13 1/4" X 51"3/4" Solid OakTop Horizontal Trim (Back)21 1/2" X 21"3/4" Solid OakVertical Divider Trim (Back)21 1/2" X 40"3/4" Solid OakVertical Corner Trim (Back)21 1/2" X 14 1/2"3/4" Solid OakDrawer Divider Trim (Back)Copyright 2005 by Robert E Reedy, Vandalia, OhioCopyright2005 by Robert E. Reedy, Vandalia, OhioCFront Panel DimensionsPage 2 Drill pocket holes on the front sides of the center panel as shown above. These pocket holes are used to attach the three front panels together. The pocket holes will be covered with the trim 1/8"Right Front Panel41"6"10"10"10"Center Front Panel6 1/2"Left Front Panel6 1/2"Copyright2005 by Robert E. Reedy, Vandalia, OhioCSide Panel & Vertical Divider 14"23 1/2"Dividers(2 Required)Cut two side panels 14" wide and 41 1/2" high from 3/4 inch oak veneered plywood.
6 Cut two vertical divider panels 14" wide and 23 1/2" high from the same two pieces of 3/4" oak veneered plywood 52 1/2" wide by 14" deep. One is for the cabinet bottom and the other for the main work "52 1/2"(2 Required)free picnic table plansPage 341 1/8"14"(2 Required)CabinetSidesCopyright2005 by Robert E. Reedy, Vandalia, OhioCKick Panel, Shelf, & CleatsPage 43"52 1/2"Kick Panel5"3/4"Cut the Kick Panel 52 1/2" long by 5" wide from 3/4" oak plywood. Cut the notches and drill pocket holes as shown. The location of the pocket holes is not Shelf14"16"Cut the small shelf 16" wide by 14" deep from 3/4" oak veneered "14"Cut fifteen cleats 14" long by 2" wide from 3/4" oak veneered plywood. Seven of these cleats require pocket holes. All fifteen cleats require three 3/16" diameter holes for mounting screws. The screw holes need to be countersunk. The pocket holes should be about 1 1/2" from each end and one in the center.
7 The screw holes 1/2" from the pocket holes as reason only seven require pocket holes is that five of these cleats will be used only for drawer slide mounts for the three drawers and do not require pocket holes. This will be illustrated in the assembly instructions2"19"Front CleatsCut two cleats 19" long by 2" wide from 3/4" oak veneered plywood. Drill pocket holes and mounting screw holes as for the 14" cleats. These are for securing the workshelf and bottom to the cabinet frontCopyright2005 by Robert E. Reedy, Vandalia, OhioCFront TrimPage 5 Cut two pieces of 3/4" oak 36" long by 2 1/2" wide for the fluted front trim. These pieces will cover the joint and pocket holes that are used to join the three front panels together. The flutes are not necessary but if you have a router table, I think they are worth the extra your router with a 1/2" core box bit to cut the flutes. The center flutes should be about 4" from each end and the edge flutes should be about 4 3/4" from each end.
8 I recommend using some scrap wood to practice making the flutes. You will need to use your router table and fence for this if you have one. "4 3/4"45/8"1 1/4"Tip: make pencil marks on your router table fence on each side of the router bit, one 4" from the center of the bit and the other 4 3/4". Then, you can use these marks to determine the start and stop point of the 1/2"36"Fluted Trim2"55 1/2"45 Angle45 AngleFront Top & Bottom Trim (2 Required)Top ViewSide TrimPage 6 Copyright2005 by Robert E. Reedy, Vandalia, OhioC36"1 1/2"36"3/4"16 1/4"2"Top View45 AngleFor the corner trim, you'll need four pieces of 3/4" oak 36" long by 1 1/2" wide. For the front corner trim, you'll also need two pieces of 3/4" oak 36" long by 3/4" the Top and Bottom Side trim, you'll need four pieces of 3/4" oak 16 1/4" by 2". One end of the top and bottom trim requires a 45 degree miter cut because it must mate with the front top and bottom Frame 26"1"18"1"End View of MoldingCut two pieces of molding 26" long for the frame top.
9 Cut two pieces of molding 18" long for the frame sides. All corners must have 45 degree miters. I made the molding from 3/4" by 1" wide oak and used a round over bit and ogee bit to give it the shape shown above. If you don't want to go with the above shape, you could simply round over both sides, use a beading bit, or any other design you choose.(2 Required)Sides(2 Required)Top & Bottom CornerTrim (4 Required)Side Corner Trim (2 Required)Side Trim (4 Required)Rear TrimPage 07 Copyright2005 by Robert E. Reedy, Vandalia, OhioC51"3 1/4"Rear Top Horizontal Trim2"51"Rear Bottom Horizontal TrimDrawer Divider Trim (2 Required)Please Note! The dimensions given are based on using 3/4" thick plywood. However, much of the plywood on the market today is actually a metric size and is slightly less than 3/4" thick. You will need to adjust the dimensions of the rear trim accordingly if your plywood is less than 3/4" top and bottom horizontal trim may need to be slightly longer if your plywood is less than 3/4" thick.
10 The vertical divider trim needs to be exactly twice the thickness of the plywood. So, if your plywood is less than 3/4" thick, the width of these pieces will be a little less than 1 1/2". The pocket holes pictured on some of the pieces above are optional but you may want to use them to assemble the trim before attaching it to the cabinet. Vertical Divider Trim (2 Required)21"1 1/2"40"Back Corner Trim (2 Required)1 1/2"14 1/2"1 1/2"Rear Trim ArrangementPage 8 Copyright2005 by Robert E. Reedy, Vandalia, OhioCAttach the top horizontal trim piece 10" from the top of the side trim pieces with pocket hole screws as the vertical divider trim to the top horizontal trim as shown. Attach the bottom horizontal trim to the vertical side trim and vertical divider trim as the drawer divider trim as "5"4"Top Horizontal TrimDrawer Divider TrimDrawer Divider TrimVertical Divider TrimVertical Divider TrimBack Corner TrimBack Corner TrimBottom Horizontal Trim21"10"14 1/2"14 1/2"Materials List for the Top & Armrest Molding DimensionsPage 10126 Ft2 FtRockler item number 42768 Rockler item number 42777 Oak Arm Rest MoldingOak Arm Rest Molding163 1/2" X 19"Countertop3/4" Oak Plywood140 1/2" X 1 1/2"Countertop cutout trim3/4" Solid Oak28" X 1 1/2"Countertop cutout trim3/4" Solid Oak215 1/8"X 1 1/2"Countertop cutout trim3/4" Solid Oak44 3/4" X 2"Countertop risers5/8" Pine34 1/4" X 2"Countertop risers5/8" Pine210 3/4" X 2"Countertop risers5/8" Pine225" X 2"Countertop risers5/8" Pine27 3/4" X 22"End soffit1/2" Oak Plywood154" X 7 1/4"Center soffit1/2" Oak