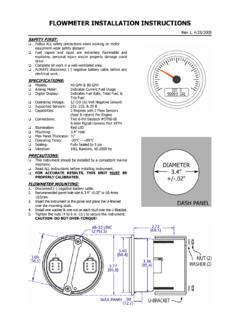
FLOWMETER INSTALLATION INSTRUCTIONS
FLOWMETER INSTALLATION INSTRUCTIONS - 1 - Rev 1, 4/25/2005 SAFETY FIRST: Follow ALL safety precautions when working on motor equipment-wear safety glasses! Fuel vapors and liquid are extremely flammable and explosive, personal injury and/or property damage could
Download FLOWMETER INSTALLATION INSTRUCTIONS

Information
Domain:
Source:
Link to this page:
Documents from same domain

NMEA 0183 GPS Receivers - Livorsi Marine
www.livorsi.comHIGHLIGHTS • 1Hz unit outputs NMEA0183 data at 4800 baud, 8 data bits, 1 stop bit, no parity (NMEA 0183 standard). • 10Hz unit outputs same

FUEL LEVEL SENDER - 3 TERMINAL WATER LEVEL …
www.livorsi.comFUEL LEVEL SENDER - 3 TERMINAL WATER LEVEL SENDER - 3 TERMINAL Model # GSFLC All Lengths Model # GSWLC All Lengths Installation Instructions FUEL SENDING UNITS 1. Measure the depth of your tank from the outside top to the tank bottom.

THROTTLES AND CONTROLS - Livorsi Marine
www.livorsi.comTHROTTLES AND CONTROLS Model # TH SERIES (All Configurations) Installation Instructions Thank you for choosing Livorsi Marine® controls. Your new marine engine controls feature a 1 year

VESSELVIEW INSTALLATION INSTRUCTIONS
www.livorsi.comVESSELVIEW INSTALLATION INSTRUCTIONS 90-898278002 MAY 2008 Page 3 / 17 4. Remove the template and insert the VesselView into the panel to ensure fit.
Livorsi DTS Controls Single/Dual Engine Digital …
www.livorsi.comLivorsi DTS Controls- Single/Dual Engine Installation May 2016 Page 6 of 12 . Installing the Control to the Console . 1. Secure the control to the console using 4 x #10 screws and rubber O-Rings.

TEMPERATURE GAUGE and SENDER - Livorsi Marine
www.livorsi.comTemperature Gauge and Senders Trouble Shooting STEP ONE(this usually solves the problem) - Before you do anything else, check for defective wiring or grounds, as …

DIESEL TACHOMETER with SENDER - Livorsi Marine
www.livorsi.comDIESEL TACHOMETER with SENDER Models #GL4000MSGD All Colors ... Mechanical Take-off Rubber Washer Adaptor Sending Coupling Unit 2 of 2 1. Thread adaptor coupling onto sending unit and tighten. 2. Place rubber washer in large end of adaptor coupling. 3. Insert square end of drive tip into sending unit.

Installation and Operation Manual - livorsi.com
www.livorsi.comInstallation and . Operation Manual. ... operation manual provides users with a resource to realize the full potential and capabilities of Vantage View® instrumentation. Covered in this manual are display options, menu navigation and : menu function usage.

Installation and Operation Manual - Livorsi Marine
www.livorsi.comInstallation and Operation Manual ... instructions. FWA Warning Gauge Installation Vantage View® Installation Manual. g Installation Guide ... Installation Guide • Fuel Sender Compatibility Float Arm and Fuel/Water Level Senders are compatible with the Vantage View system. As well as 3

Parameter Range Analog Input LCD Display Name
www.livorsi.com75 Vantage View® Operation Manual ... Engine Oil Temperature 1 175 65262 0-500 ºF Eng Oil Temp Engine Total Hours of Operation 247 65253 0-999999 Hours Engine Hours Engine Speed 190 61444 0-10,000 RPM Engine Speed Engine Exhaust Gas Temperature 173 65270 0-3000 ºF Exh Gas Temp.
Related documents

C2610, C2611 Installation Instructions 2000-2006 Chevy/GM ...
4x4media.infoC2610 Installation - pg. 3 INSTALLATION INSTRUCTIONS 1. Park the vehicle on a flat, clean surface and block the rear wheels for safety. 2. Disconnect the positive and negative battery cables.

Installation Instructions - Concrete Sealants Inc.
conseal.comInstallation Instructions CS-55 Black Proper preparation should be followed to ensure adequate coating adhesion to concrete and to optimize product performance.
VHF 110/210 AIS SERIES This device generates and radiates ...
static.garmin.comConnecting a VHF Antenna 1 Mount the VHF antenna (sold separately) according to the installation instructions provided with the antenna. 2 Connect the VHF antenna to the antenna port on the back of the radio. NMEA 2000 Device Connections NOTICE If you are connecting this device to an existing NMEA 2000

Dual Technology Ceiling Mounted Line Model # OAC-DT …
www.cooperindustries.comInstallation Instructions Model # OAC-DT-2000-MV Model # OAC-DT-2000-DMV Dual Technology Ceiling Mounted Line Voltage Occupancy Sensor • Read all instructions on both sides of …

NovaT installation instructions - Lutron Electronics
www.lutron.comWiring diagrams Wiring Diagram 5 Live Black Red Yellow Green or Bare Ground Fan Light Neutral Control 120 V~ 60 Hz Wiring Diagram 6 Live Black or Blue Cap off second BlueType
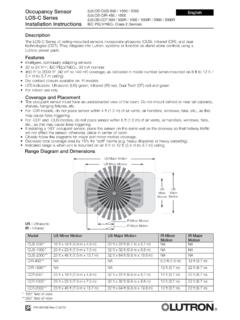
Occupancy Sensor LOS-C Series Installation Instructions ...
www.lutron.comEnglish P/N 031260 Rev C 03/13 * 180° field of view ** 360° field of view Occupancy Sensor LOS-C Series Installation Instructions Description The LOS-C Series of ceiling-mounted sensors incorporate ultrasonic (CUS), infrared (CIR), and dual

Installation Instructions 2000 and up non abs - Shotgun Shock
www.shotgunshock.com10. Pivot shock into horizontal position, ensuring stock grommets are installed ( you may need to raise the swing arm using the adjustable jack, in order for the shock to clear frame, once it
HARDIPLANK Installation Instructions
www.structuretech1.comJUNE 2001 JH recommends Makita® #5044KB 4” or #5057KB 7-1/4” saw with dust collection.Call 800-4MAKITA. Hitachi® HARDIBLADE® w/4 PCD Diamond Teeth.Call Hitachi® at 800-546-1666 for nearest dealer. SNAPPER SHEAR™ electric, pneumatic, or hand shear. Call 800-297-7487 for tool information.