Transcription of Replacing & Rewiring the Digital Knight Controller ...
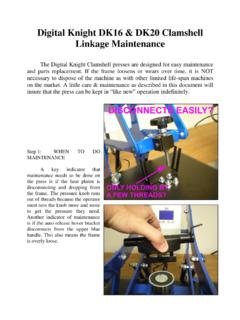
1 Replacing & Rewiring the Digital KnightDigital KnightDigital KnightDigital Knight Controller Processor/Power Board TIME/PRS (black 6-pos plug) TEMPERATURE (Lime green plug) AUX SIGNAL (auto/mag) HOT (black wire from on/off switch) PRESS (white fiberglass fabric wire) PRESS (white fiberglass fabric wire) NEUT (white wire from on/off switch) KEYPAD RIBBON (delicate!) FACTORY COMM (do NOT use!) Processor Board Power Board EASY ONLINE VIDEO INSTRUCTIONS: The Digital Knight Controller is made up of two circuit boards.
2 One is the Power board, which is visible from the inside. The other is the Processor board, which contains the LCD display panel. When Replacing the processor board alone, there is no need to disconnect any wires from the Power board. Follow these steps: 1. Unplug the machine & open the control panel that houses the Controller . 2. Remove the 3 or 4 long hex nuts that hold the power board in place. 3. Gently but firmly pull the power board away from the processor board, unplugging it from the processor board.
3 The wires can be left plugged in if the power board is not being replaced. 4. Unplug the keypad connector ribbon & other connectors from the LCD processor board. 5. Remove the processor board from the posts, saving the white spacers that are on the threaded posts. Note that the smaller white spacers go in between the keypad & the LCD screen, the larger white spacers go in between the two circuit boards. 6. Repeat the steps in reverse. TIP: Squeeze the white spacers tightly on one end with pliers so they don t slide off the posts when reassembling the boards, if you need to.
4 NOTE: Both boards must MATE together make sure both boards are plugging into each other via the 6-pin connector in between the boards. ** TURN PAGE OVER FOR PROGRAMMING INSTRUCTIONS ** Digital Knight Power Socket Kit Instructions Please replace ALL items included with this kit, regardless of which components have failed or you feel need to be replaced. Use the new wires included with the kit. You may need to use the existing wires in your press if smaller black and white wires are merged with the power wires (as in the case of automatic presses).
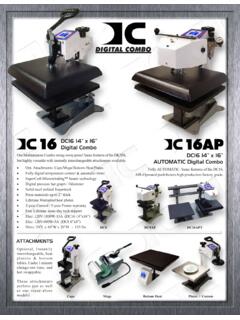
5 1. Snap out the old switch and inlet socket. You may need to break the tabs from the inside of the control panel to do this. 2. Snap in the new components. They can be pressed in by hand tightly. (For presses dating prior to 2004, the new on/off switch may be larger than the hole. File open the hole, or grind down the plastic body of the on/off switch so it fits tightly, all the way in.) 3. Connect the black and white wires. Please refer to the diagram below: On/Off Switch Power Cord Inlet Socket Short Black Wire Short White Wire Long Black Wire B W to HOT on circuit board Long White Wire to NEUT on circuit board Green Ground Wire 4.
6 Make sure the power cord is plugged in to the wall, and into the power socket, and test the press. Digital Knight Controller Programming You must set your new Controller for your specific model machine: 1. Turn the press OFF. 2. Hold both the UP & DOWN ARROW keys firmly while turning the press ON. <<Keep Holding>> 3. Once the screen shows Clear Presets? and NO flashing, let go of the arrow keys. Press PRG. 4. MDL displays on the top of the screen. Skip flashes on the bottom. 5. Use the UP ARROW key to select your model.
7 If you model has more than 4-digits (ie: Maxi-3040, DK20SP, DK20-AUTO) wait for the bottom display to scroll the full model number across the screen. 6. Once you see your specific model, press PRG. The press will reset all settings for that model. Contact the factory at 800-525-6766 or if further assistance is needed.