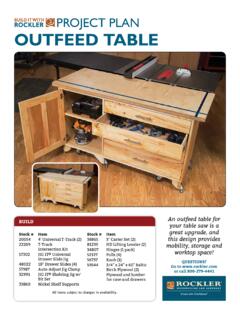
Transcription of 42826 Steam Box - go.rockler.com
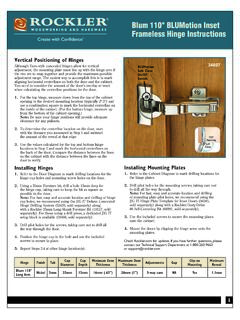
1 Steam Box Plan Steam Box Components Kit Contents 1. A Top/Bottom 1 Steam Generator B Sides 2 Steam Hose C Rear Cap 3 Brass Fitting A. D Door 4 Hinges H C. E Gasket/Seal 5 Latch/Clasp F Support Dowels G Feet 2. 3. H Thermometer F. 4. CAUTION: Burn Hazard. Steam , dripping water, and heated workpieces are hot. Keep hands and face away from Steam box when opening. Use protective gloves when handling the Steam box and steamed workpieces. Read and understand all safety information and instructions that come with the Steam generator. Introduction Low pressure Steam is an age-old method of B. softening wooden components for bending them into curved shapes. The heat and high 5a moisture soften the fibers of the wood, E.
2 Allowing it to bend in the shape of a press or 5b D G. form. As the wood cools, it retains the shape that it was formed into with only minor spring-back. The key elements for Steam bending are a shaped form, a Steam source, Steam and Support and an enclosed Steam box. This Rockler Steam kit contains the Drill a 9/16" hole in the center of the Rear Cap to install the portable Steam generator and hardware necessary to construct a brass Steam fitting. Steam box using your wood. (See Kit Contents above.) For maximum cross-flow of the Steam while maintaining good Steam Box Construction Steam capacity, build the box as tight as possible, and drill a Your Steam box should be as small as possible while still small vent hole in the lower face of the front door.
3 Accommodating all of your workpieces. The smaller the box, the A meat thermometer can be used to monitor the internal less Steam energy it takes to bring it to temperature and keep it box temperature there. The box should also have a flow-through design so that Dowels are used to elevate the workpiece off the bottom of Steam enters at one end and exits at the other end, but is relatively the box. tight so that most of the Steam and heat remain within the box. Heat rises, so the workpiece should be elevated to be near the Here are some tips for constructing a Steam box: top of the box. General The box can be constructed from either solid wood or plywood (exterior grade preferred).
4 Thermometer Hole The box should be sloped upward slightly on a set of legs so that condensed water runs to the back, but also so the Steam flows toward the front. Assembling the box using simple butt-joints with screws (without glue) will allow you to disassemble the box and reuse some parts for making other sizes. Condensate Drip Hole Vent Hole Wooden dowel stock is available from Rockler or most home Basic Operation centers. Don't use metal rods. Observe all safety warnings that accompany your Steam The dowel holes can be through-holes, but stopped holes will generator. keep the dowels captured between the sides without 1. Make sure the Steam generator is unplugged from fasteners, and also prevent Steam from leaking out.
5 Electrical power. Rear Cap and Door 2. Fill the Steam generator with water to the "Max" indicator on Note that the Rear Cap (where the Steam line connects) butts the side (approximately quarts). Use hot water to to the outside of the box instead of being captured between decrease the initial heating time. the sides. 3. Connect the flexible Steam hose between the Steam generator This allows you to remove the Rear Cap (and therefore the and the brass fitting on your Steam box. brass fitting) without taking the rest of the box apart. 4. Connect the Steam generator to electrical power. Make sure you install the brass fitting into the Rear Cap 5. While the Steam generator is heating the water, load your before securing the Rear Cap to the rest of the Steam box.
6 Steam box with the material to be steamed. If you are For best results, seal the door with 1/8" weather stripping. steaming more than one piece, make sure there is enough Using the provided hinges and quick acting latch allows you air space between pieces for Steam to reach all sides of to remove one workpiece at a time without losing too much the material. heat from the box. 6. Close the door on the Steam box and observe the Steam Box Sizing temperature of the box. When the internal temperature The practical limitation on the size of the Steam box is how much reaches 212 F (100 C), count the length of steaming time Steam you have available to heat it, and the efficiency of the box based on the approximation of 1-hour per inch of thickness for heating up and staying hot.
7 Individual results will vary, but of wood. The steaming time may vary depending on the boxes larger than 6" x 6" x 4' or thicker materials may require species of wood, the degree of bending required, and the compensation to achieve sufficient Steam energy, as described in actual thickness. the following sections. 7. When the steaming is complete, you need to work quickly to Thicker Materials get the workpiece into your forms while it is still hot. Leave The general rule of thumb is that each inch of material thickness the remaining workpieces in your Steam box until you are requires 1 hour of steaming. For thicker materials this may ready to clamp them in the forms.
8 Exceed the length of time a single Steam generator can supply Further Reading For additional reading and techniques on Wood Bending, the following books are available from Rockler: Catalog # Title 41028 Wood Bending Made Simple 36247 Woodworker's Guide to Bending Wood 65913 Complete Manual of Wood Bending Steam without refilling. To increase the length of time that Steam is available without cooling down while fresh water is being heated, use two Steam generators with staggered start times so that one generator is producing Steam while the other is heating the water. Larger Steam Boxes The larger the Steam box, the greater the volume of Steam required to maintain the temperature.
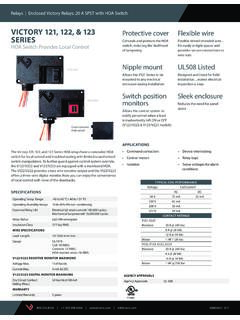
9 A simple solution is to use two Steam generators at the same time for a greater volume. Attention Rockler Plan User However, there are a few other things that can be done to extend Before starting, please read the plan completely. Check for updates that may not be included on this copy. the efficiency of the existing Steam : If you have further questions, please contact our Technical Heating up the Steam box itself can take a significant volume Support Department, 1-800-260-9663 or of your Steam energy. You can pre-heat the Steam box and then replenish your Steam generator while you load the workpieces into the box for final steaming. To reduce the amount of Steam energy lost to heating the box, reduce the thickness of the box material and insulate the exterior of the box.
10 However, make sure to use insulation capable of sustaining at least 212 F (100 C). 42826 . Rev. 06/11. 2011 Rockler Woodworking and Hardwar