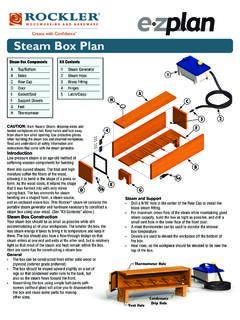
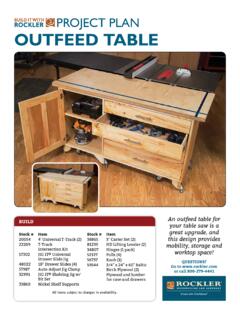
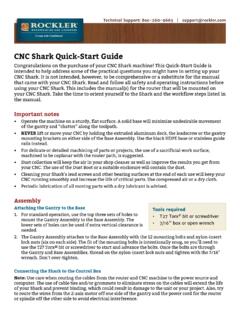
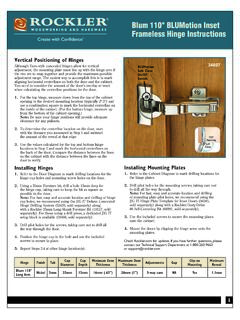
Transcription of CNC Shark Quick-Start Guide
1 Important notes Operate the machine on a sturdy, flat surface. A solid base will minimize undesirable movement of the gantry and chatter along the toolpath. NEVER lift or move your CNC by holding the extruded aluminum deck, the leadscrew or the gantry mounting brackets on either side of the Base Assembly. Use the black HDPE base or stainless Guide rails instead. For delicate or detailed machining of parts or projects, the use of a sacrificial work surface, machined to be coplanar with the router path, is suggested. Dust collection will keep the air in your shop cleaner as well as improve the results you get from your CNC. The use of the Dust Boot or a suitable enclosure will contain the dust. Cleaning your Shark s lead screws and other bearing surfaces at the end of each use will keep your CNC running smoothly and increase the life of critical parts. Use compressed air or a dry cloth. Periodic lubrication of all moving parts with a dry lubricant is the Gantry to the Base1.
2 For standard operation, use the top three sets of holes to mount the Gantry Assembly to the Base Assembly. The lower sets of holes can be used if extra vertical clearance is The Gantry Assembly attaches to the Base Assembly with the 12 mounting bolts and nylon-insert lock nuts (six on each side). The fit of the mounting bolts is intentionally snug, so you ll need to use the T27 Torx bit or screwdriver to start and advance the bolts. Once the bolts are through the Gantry and Base Assemblies, thread on the nylon-insert lock nuts and tighten with the 7/16" wrench. Don t the Shark to the Control BoxNote: Use care when routing the cables from the router and CNC machine to the power source and computer. The use of cable ties and/or grommets to eliminate stress on the cables will extend the life of your Shark and prevent binding, which could result in damage to the unit or your project. Also, try to route the wires from the Z-axis motor off one side of the gantry and the power cord for the router or spindle off the other side to avoid electrical Shark Quick-Start GuideCongratulations on the purchase of your CNC Shark machine!
3 This Quick-Start Guide is intended to help address some of the practical questions you might have in setting up your CNC Shark . It is not intended, however, to be comprehensive or a substitute for the manual that came with your CNC Shark . Read and follow all safety and operating instructions before using your CNC Shark . This includes the manual(s) for the router that will be mounted on your CNC Shark . Take the time to orient yourself to the Shark and the workflow steps listed in the Support: 8oo-260-9663 | required T27 Torx bit or screwdriver 7/16" box or open wrenchTechnical Support: 8oo-260-9663 | The CNC Shark has three stepper motors, one for each axis of movement: X, Y and Z. Serial cables extending from the motors are marked as such and must be connected to the corresponding ports on the back of the Control Box ( , X to X, Y to Y and Z to Z). Be sure to make these connections before supplying power to the Controller Connect the power cable to the Control Box and plug in to a power source.
4 (Use of a surge suppressor power strip is recommended. Connecting all of the CNC components, including the computer, to a surge suppressor power strip or Uninterrupted Power Supply will minimize the effects of voltage variations in the power lines in your shop.)Installing/adjusting the routerNote: Router maintenance should be completed according to the manufacturer s Loosen the two vertical screws near the front of the Router Loosen the horizontal Router Collar Locking Bolt(s) on the front of the clamp Install the router and adjust it so that it sits as far down as possible in the Router Collar and all controls are conveniently located. 4. Tighten the horizontal Router Collar Locking Bolt(s) on the front of the clamp assembly. 5. Tighten the two vertical screws near the front of the Router software and adjusting your computer1. Install and register the VCarve Pro and Cut3D software. Write the license code numbers below for easy Pro Registered to: License Code: Cut3 DRegistered to: License Code: 2.
5 Some settings on your computer might need to be changed to ensure that the computer does not shut off when you are running a job on your CNC Shark . Your monitor should be set to shut off after 5 minutes when on battery power, but NEVER when on AC power. Your hard drive should be set to shut off after 5 minutes when on battery power, but NEVER when on AC power. Your system standby should be set to activate after 5 minutes when on battery power, but NEVER when on AC power. Your system should be set to hibernate after 5 minutes when on battery power, but NEVER when on AC : Always leave your computer connected to the CNC when running a Install the most recent CNC Shark Control Panel driver software and register your control box at The following icons should be visible on your computer desktop: CNC Shark Control Panel VCarve Pro Cut3 DNote: Additional folders may have been added if the Vectric sample files were pre-loaded onto the desktop, if other file samples have been added or if you installed more than one version of the Control Panel up your systemStart up your CNC Shark system by following these steps (in order): 1.
6 Power up and log on to the computer. 2. Power up the CNC Shark and verify that the lights on the front of the Control Panel go on. 3. Connect the USB cable to the computer (you should hear a tone acknowledging the identification of a new USB device). 4. Open the CNC Shark Control Panel application by clicking on the icon on your desktop. Identifying the working envelope of your CNC Shark1. Secure the V-groove bit in the Using the jog function on the CNC Shark Control Panel, move the router to the near left corner of the table. Lower the bit to within 1/8" of the table and make a mark. (You can use tape, a permanent marker or even a scratch awl.) This is the first of the four corner boundaries of the envelope. 3. Repeat the process at the other three corners to establish those boundary points. Your workpiece may extend beyond these boundaries, but the Shark can machine only within these Panel Software Control Panel 1 version:* Control Panel 2 version:* CNC Shark Control BoxRegistration Key:* Serial number: (optional)* You can verify or change these settings by opening the CNC Shark Control Panel on the desktop.
7 Select HELP and Registration Support: 8oo-260-9663 | Shark resourcesHardware support NextWave Automation Help Desk (8 Monday-Friday): 419-491-4520 (The CNC Shark owner s manual is available in the Down-loads section of the NextWave website.) support and user groups and patterns Vector logos Free fonts and dingbats Free fonts and dingbats 2D vector graphics 3D models 3D models 3D models 3D modeling art (requires Vectric Aspire software) Unique VCarve extensions and gadgets Vector logosBasic carving bits and accessories Rockler 3-Piece Signmaking Bit Set Item no. 26694 Includes 19/32" diameter x 33/64" high carbide -tipped , 60 V-groove bit; 1/2" diameter 90 V-groove bit; and 3/8" diameter x 3/8" high core box bit. All three bits have 1/4" shanks. Rockler 60 Signmaking Bit Item no. 91428 19/32" diameter x 33/64" high x 1/4" shank Onsrud 1/4" Spiral Up-Cut End Mill Item no.
8 62984 High-speed steel. 1" cutter height, 1/4" shank Onsrud 1/4" Spiral Up-Cut End Mill Item no. 82652 Solid carbide . 1" cutter height, 1/4" shank Rockler 1/8" Spiral Up-Cut End Mill Item no. 84228 1/2" cutter height, 1/4" shank Rockler Hold Down Clamp for T-Track Item no. 21912 Aluminum clamp, T-bolt and knob Rockler Auto Lock T-Track Inline Clamp Item no. 58616 Fast auto-adjust inline clamping Rockler Auto Lock T-Track Hold Down Clamp Item no. 54280 Fast auto-adjust hold-down clampingTechnical Support: 8oo-260-9663 |