Transcription of Queen-size Deluxe Murphy Bed Plan
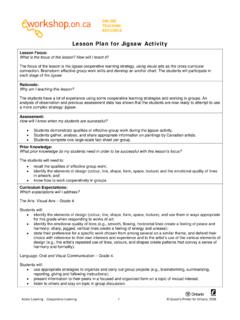
1 Easy-to-Build Queen-size Deluxe Murphy Bed PlanPlansFor more plans, tools and hardware visit a Queen-size Deluxe Murphy Bed complete with decorative molding and matching side cabinets! What you ll find inside: Elevation drawings Complete materials list Step-by-step plansFor use with vertical Queen-size Deluxe Murphy Bed Hardware Kit (43707)1203 4"657 8"211 2"78"907 8 "1087 8"Front View2143 4"157 8"87"Installation Space RequirementsBe sure you have sufficient space for installation. A Queen-size bed will extend about 7'3" into the room when open, and the width of the bed cabinet plus the side cabinets will be just more than 9'.The unit must sit flush against the wall. If the room has base molding, you will need to make relief cuts on the back edges of the Bed Cabinet Verticals and Cabinet Sides or remove and cut the room molding to 8 "Side ViewProduct Stock # Queen-size Deluxe Murphy BedHardware Kit, vertical.
2 437071/4" Black Shelf Pins (16) ..227811/4" Black Shelf Pin Supports (16) ..22872 JIG IT Shelving Jig ..329919/32" Self-centering Bit ..34368 Satin Nickel Handles ..26114 Satin Nickel " Centerline Lifetime 757 Slides (black) ..44664 Veneer Edge Banding (cherry) ..44027 Drawer Lock Router Bit ..22637 Rule Joint Router Bit Set ..26318 Items used in building the cabinets and products that can make construction of Materials - Deluxe Murphy Bed Pieces Qty. T x W x L1. Inner Frame Strut Piece (10) 3/4" x 11 2" x 601 2"2. Inner Frame Side (2) 3/4" x 11 2" x 80"3. Side Rail (must be plywood) (2) 3/4" x 57 8" x 811 2"4. Foot rail (1) 3/4" x 3" x 62"5. Head Rail (1) 3/4" x 77 8" x 62"6. Bed Face Panel (2) 3/4" x 32" x 813 4"7. Bed Headboard (1) 3/4" x 157 8" x 643 8"8. Bed Cabinet Vertical (2) 3/4" x 157 8" x 901 8"9. Header Board (1) 3/4" x 143 8" x 643 8"10. Front Header Rail (1) 3/4" x 53 4" x 643 8"11.
3 Rear Header Rail (1) 3/4" x 53 4" x 643 8"12. Header Mounting Cleat (2) 3/4" x 41 2" x 143 8"13. Leg Support Rail (1) 3/4" x 3/4" x 601 4"14. Mattress Support (plywood) (2) 1/4" x 31" x 80"15. Faux Headboard End Stile (2) 1/4" x 21 2" x 157 8"16. Faux Headboard Center Stile* (1) 1/4" x 21 2" x 11"17. Faux Headboard Rail (2) 1/4" x 21 2" x 593 8"18. Faux Drawer Front (4) 1/4" x 63 16" x 3115 16"19. Faux Face Panel Stile (16) 1/4" x 21 2" x 341 2"20. Faux Face Panel Rail* (16) 1/4" x 21 2" x 107 8"21. Bed Top Side Molding* (2) 3/4" x 51 4" x 163 4"22. Bed Top Front Molding* (1) 3/4" x 51 4" x 671 2"23. Bed Side Crown* (2) 3/4" x 11 2" x 171 2"24. Bed Front Crown* (1) 3/4" x 11 2" x 691 16"25. Bed Toe Kick Molding (1) 3/4" x 13 4" x 643 8"26. Vertical Ball Stud Plate (2) 27. Bed Ball Stud Plate (2) 28. Male Metal Pivot (2) 29.
4 Female Metal Pivot (2) 30. Bed Stop (2) 31. Metal Pivoting Leg (2) 32. Gas Spring (not shown) (2) 33. Black Screws (18) #10 x 3/4" 34. T-Nuts (16) 35. Machine Screws (16) 36. Plastic Spacer (2)37. "E" Clip (2) 38. Silver Screws (12) #12 x 3/4"39. Leg Support Rail Screws (2) 1/4" x 21 2"40. 3/4" Finish Nails or Brads (1 box) 41. 11 4" Finish Nails (1 box) 42. 11 2" Finish Nails (1 box) 43. 2" Finish Nails (1 box) 44. 11 4" Coarse Thread Screws (1 box) #8 x 11 4"45. 15 8" Coarse Thread Screws (1 box) #8 x 15 8"46. 2" Coarse Thread Screws (1 box) #8 x 2"47. Retaining Strap (not shown) (2) 48.
5 Veneer Edge Banding (2) 13/16" x 50' Pieces Qty. T x W x L393334353028292726* Lengths are approximate. Rough cut pieces slightly longer and trim or miter to fit on final assembly. 3/4" Cherry veneer plywood795050514676767676767141818181819 1520162020201919191751514949525453534949 1011555555556868541/4" Solid cherry3/4" Cherry veneer plywood3/4" Cherry veneer plywood3/4" Cherry veneer plywood3/4" Cherry veneer plywood1/4" Cherry veneer plywood1/4" Cherry veneer plywood33 6 Board LayoutThe cut list and diagrams on these pages are for both the Murphy bed cabinet and the side cabinets. They include items listed in both materials used cherr y hardwood and cherr y veneer plywood, but you can substitute the species of your " Baltic birch plywood3/4" Solid poplar3/4" Solid cherry56561/4" Cherry veneer plywoodCut List - Deluxe Murphy Bed Pieces Qty. T x W x L1 x 2 x 6 Solid Poplar (10) 3/4" x 11 2" x 72"1 x 2 x 8 Solid Poplar (2) 3/4" x 11 2" x 96"1 x 6 x 4 Solid Poplar (1) 3/4" x 51 2" x 48"1 x 4 x 6 Solid Cherry (1) 3/4" x 31 2" x 72"1 x 6 x 8 Solid Cherry (3) 3/4" x 51 2" x 96"1 x 8 x 8 Solid Cherry (2) 3/4" x 71 4" x 96"1/4" x 3 x 8 Solid Cherry (10) 1/4" x 21 2" x 96"1/4" x 8 x 8 Solid Cherry (2) 1/4" x 71 4" x 96"3/4" plywood (Cherry veneer) (5) 3/4" x 48" x 96"1/4" plywood (Cherry veneer) (3) 1/4" x 48" x 96"1/2" plywood (Baltic birch) (1) 1/2" x 48" x 48" 7 Congratulations on the purchase of your Deluxe Murphy Bed hardware!
6 There are a few important things to keep in mind as you prepare to build your new Murphy bed. This plan is for a Queen-size bed with vertical Murphy Bed hardware. The mattress can be no larger than 60" x 80" x 12" and 65-80 pounds. Be sure you have sufficient space where you plan to install your Murphy bed unit. A Queen-size bed will extend about 7'3" into the room when open, and the width of the bed cabinet plus the side cabinets will be just more than 9'. The Murphy bed unit must sit flush against the wall. If the room has base molding, you will need to make relief cuts on the back edges of the Bed Cabinet Verticals and Cabinet Sides or remove and cut the room molding to fit. Cut all pieces to size before beginning assembly. Note that lengths cited for pieces marked with an asterisk (*) are approximate; you should cut them slightly longer and then trim or miter them to fit on final these instructions completely and watch the video included with your Murphy bed hardware before beginning assembly.
7 Note that, because of the addition of the side cabinets, the steps in these instructions might be in a different order from those depicted in the video. We recommend following the order outlined here. Follow all steps the Inner Bed Frame1. Arrange two Inner Bed Frame Strut Pieces (1) into an L shape to make the Frame Struts. Make sure the ends are flush, then drill 1/8" pilot holes about 8" apart and join the pieces with 15 8" Coarse Thread Screws (45). Repeat to make four other Frame Position the Frame Struts between the Inner Frame Sides (2) 20" apart. Fig. 1. Drill pilot holes through the Inner Frame Sides (2) into each end of the Frame Struts and attach with 2" Coarse Thread Screws (46).Install the Pivoting Leg Hardware1. Mark the radius on the top front edges of both Side Rails (3) and the locations of the 5/8" and 1/4" holes on the Side Rails (3) inside faces.
8 Shop Cut the rounded corners with a jigsaw and sand smooth. Apply Veneer Edge Banding (48) along the top edges and radiused ends. Trim 1 - Inner Bed Frame20"11112221111111111 83. Drill the 5/8" diameter holes 1/2" deep on the inside faces of the Side Rails (3). Fig. Position the correct Metal Pivoting Leg (31) for each Side Rail (3) in place, inserting the pivot in the hole you just drilled. Make sure the pivot plate is square to the edges of the Side Rail (3), then mark the locations of the bottom two screw Remove the Metal Pivoting Leg (31) and drill 1/4" through holes in the locations you just marked, using a backer board to avoid From the outside face of each Side Rail (3), insert a T-nut (34) in each 1/4" hole. Align the Metal Pivoting Leg s (31) plate with the holes and secure with machine screws (35) threaded into the T-nuts (34). Drive Black Screws (33) in the remaining holes in each plate.
9 Fig. Remove the Metal Pivoting Leg (31) hardware from each Side Rail (3).8. Locate the center on each end of the solid-wood Leg Support Rail (13) by drawing diagonal lines from corner to corner. Drill a 7/32" hole 11 2" deep centered on the mark at each end. Don t attach the rail to the Metal Pivoting Legs (31) at this time; wait until the piece has been "Install the Ball Stud Plates and Metal Pivots1. Mark and drill 1" diameter through holes for the Female Metal Pivots (29) toward the back of the Side Rails (3) as specified on the Shop Drawing. Use a backer board to avoid On the inside of each Side Rail (3), position a Female Metal Pivot (29) with the pivot in the 1" through hole. Use a square to align the plate, then attach with Silver Screws (38).3. Mark and drill 1/4" through holes for the Bed Ball Stud Plates (27) as specified on the Shop Drawing. Use a backer board to avoid For each Side Rail (3), position a Bed Ball Stud Plate (27) on the outside face, aligning its holes with the 1/4" holes in the Side Rail (3).
10 Make sure there s 5/16" clearance between the bottom of the ball and the top of the Side Rail (3). Fig. From the inside face of each Side Rail (3), insert a T-nut (34) in each hole. Secure the Bed Ball Stud Plate (27)with Machine Screws (35) threaded into the T-nuts (34). Drive Black Screws (33) in the Bed Ball Stud Plate s (27) remaining two 8"21 2"Fig. 2 Fig. 35/8" diameter 1/4" diameter 1/4" diameter 9 Attach Head, Foot and Side Rails to frame1. Apply Veneer Edge Banding (48) to the top edges of the Head Rail (5) and Foot Rail (4). Trim Position the Foot Rail (4) against the foot end of the inner frame, making sure that the bottom edges are aligned and the ends of the Foot Rail (4) are flush with the Inner Frame Sides (2). Fig. Drill five evenly spaced 1/8" pilot holes through the Inner Frame Struts (1) and into the inside face of the Foot Rail (4), being careful not to drill all the way through.