Transcription of Accuracy and Precision of Laboratory Glassware ...
1 Accuracy and Precision of Laboratory Glassware : Determining the Density of Water During the semester in the general chemistry lab, you will come into contact with various pieces of Laboratory Glassware . beakers Erlenmeyer Flasks volumetric flasks pipettes burets graduated cylinders Some of these pieces ( beakers, Erlenmeyer Flasks) are used primarily to hold liquids during experiments. Upon closer inspection, you will also notice that they have graduations on the side to measure volumes. All of the Glassware listed above can measure volumes. Why do we have so many pieces of Glassware if they all do the same basic job of measuring volumes? Laboratory Glassware can generally be divided into two main types based on how they measure volumes: those that are manufactured to contain certain volumes those that are manufactured to deliver certain volumes One of the first things that needs to be discussed before we can use any measuring device in the lab is something called significant figures.
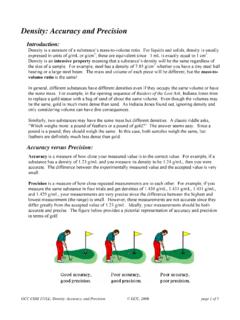
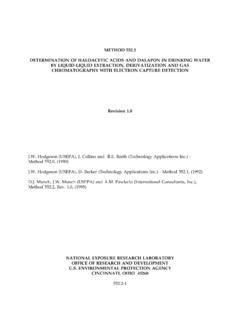
2 The first thing to realize is that there is no such thing as a perfect measurement. Even when using expensive lab equipment there some degree of uncertainty in measurement. The general rule of thumb is: you can estimate one more digit past the smallest division on the measuring device. If you look at a 10mL graduated cylinder, for example, the smallest graduation is tenth of a milliliter ( ). That means when you read the volume, you can estimate to the hundredths place ( ). Use the bottom of the meniscus to determine the volume in the 10mL graduated cylinder. Since the smallest division (graduation) is a tenth of a milliliter, we can estimate to a hundredth of a milliliter ( ). Portion of a 10mL graduated cylinder GCC CHM151LL: Accuracy and Precision of 2013 GCC Page 1 of 9. Laboratory Glassware : Determining the Density of Water However, some Glassware such as volumetric flasks and volumetric pipettes only have a single line to indicate volume.
3 This is because they are made to measure just one specific volume. In the case of the Glassware used in general chemistry lab, both the 10mL volumetric pipette and 50mL volumetric flask will have two sig figs after the decimal point ( and ). For the 150mL beaker and the kitchen measuring cup, assume that has two sig figs (it will not be obvious based on the volume markings). Recording and analyzing lab data: If a metal rod has known a length of cm and you measure its length using three different measuring devices (A, B, and C), you obtain the following data. Data Table: Measured Lengths of Device A, B, and C. Device A Device B Device C. (cm) (cm) (cm). Trial 1 Trial 2 Trial 3 Trial 4 The first thing we like to is to find an average from our multiple trials. As you may know, there are different types of averages. The types you may have heard about in your math classes are most likely mean, median, and mode.
4 Many times when we say average or simple average we are actually referring specifically to the mean. A mean is calculated as follows: add all of the values together and divide by the number of values. For example: ( ). 275 or (Based on sig. figs.). 4. The 2 is underlined in the unrounded answer because based on the addition rule, when the answer is rounded, it should have three total sig figs. If I want to use the unrounded number for another calculation in the future, the underline will remind me of the sig figs that number actually has. The 4 that it is in the denominator of the equation is an exact number and therefore has an infinite number of sig figs. Using the same formula we can then calculate a mean for the other measuring devices: Device A (cm) Device B (cm) Device C (cm). Average How do we describe how good these measuring devices are based on our measurements and means?
5 There are two ways we can describe these measurements by their Accuracy and Precision . Accuracy is a measure of how close your measured value is to the true value or other standard. Although sometimes we use qualitative (verbal) words to describe the Accuracy (such as good Accuracy and bad Accuracy ), a quantitative (numerical) measure is more useful when comparing GCC CHM151LL: Accuracy and Precision of 2013 GCC Page 2 of 9. Laboratory Glassware : Determining the Density of Water measuring devices based on Laboratory data. Our quantitative measure of Accuracy is called percent error. (Experimen tal Value - Theoretical Value). Percent Error x 100. Theoretical Value So, for each measuring device, using the averages calculated previously, we can calculate a percent error. If you use the values from Device A: 275 - Percent Error x 100 16%.
6 The lower the percent error is, the more accurate the measuring device is. In this case the mean for Device A had a 16% error from the true value of the length of the metal rod. (Notice that when calculating percent error, we used some extra significant figures from our calculation of the mean. This is done to minimize rounding errors; errors that come from rounding and then using a rounded number in the next calculation. Remember it's always best to round only when you need to report a number, as in a table. If you need to use a calculated number in another calculation, use the unrounded number.). Device A Device B Device C. (cm) (cm) (cm). Percent Error 16% You're probably wondering why the percent error for device A has two significant figures while the others only have one. If you look at the formula for percent error, you will notice that the first step is subtraction.
7 Thus, we must use the addition/subtraction rule. So, for device A, when we take (unrounded average) and subtract we get Since the numbers that are being subtracted each has two sig figs after the decimal point, based on the addition/subtraction rule, the answer can only have two sig figs after the decimal point: Then, once we divide the answer by and multiply by 100 (an exact number), we have a number with two sig figs, divided by a number with three sig figs. Based on the multiplication/division rule, our answer can only have two sig figs. The same logic gives only one sig fig for device A and B (do the calculations step by step to see for yourself). Precision is a measure of how close repeated measurements are to each other. Like Accuracy , we can describe Precision in qualitative terms (such as high Precision and low Precision ).
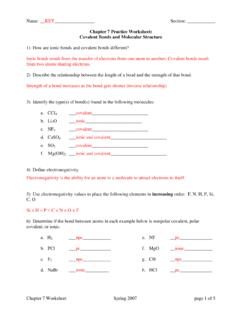
8 So, which measuring device is best to use? We want a device that is both accurate and precise. Based on our experimental data, using the percent error we calculated, we can see that Devices B and C have better Accuracy than A. Therefore, we will need to look at the Precision of these devices in order to make our final selection. Looking at the measurements, we can see that Device B has a higher degree of Precision (lower standard deviation) than C. Therefore, Device B has the best combination of Accuracy and Precision . GCC CHM151LL: Accuracy and Precision of 2013 GCC Page 3 of 9. Laboratory Glassware : Determining the Density of Water Using a buret Filling the buret: Close the stopcock. Use the beaker of water and a funnel to fill the buret about 1 mL above the 0 mark. Place a container under the buret tip and open the stopcock slowly.
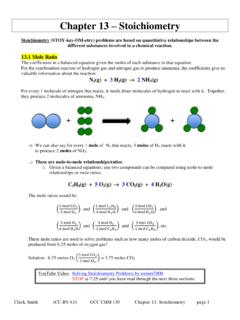
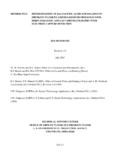
9 The buret tip should fill with Like other pieces of solution, leaving no air bubbles. If the tip does Glassware , the level in a not fill with solution, ask the instructor for help. buret is read at the bottom Continue to let out solution until the liquid level of the meniscus. However, is at 0 or below. the graduations are upside Reading the buret: Record the volume by down compared to the noting the bottom of the meniscus. (Be sure other Glassware . that the meniscus is at eye level). If this reading is exactly 0, record mL. Otherwise, count the number of markings between each number, and estimate to the nearest mL. Portion of a 50mL buret Using a pipette Place the pump loosely on the top of the pipet. Place it just far enough on the pipete to get an air-tight seal. Position the tip of the bulb below the liquid level in the beaker.
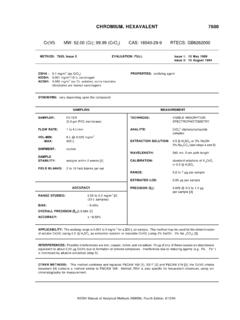
10 With your thumb, roll the wheel on the pump allowing the water to enter the tip of the pipete. Fill the pipet well above the calibration line (etched or marked above the wide center section of the pipet), taking care not to get liquid into the pipet pump. Slide the pump off the pipet while quickly sliding your index finger or thumb over the top of the pipet. Move your finger slightly and rotate the pipet to allow the liquid level to drop to the calibration line on the pipet. Then press down harder with your finger and transfer the tip of the pipet into a position over the container. Portion of a 10mL pipete Remove your finger and allow most of the liquid to drain out. Then hold the tip of the pipet against the inside of the container for about 10 seconds to allow more liquid to drain. Do not try to remove the small amount of liquid remaining in the tip.