Transcription of Altera DE0 Board - Intel
1 Altera DE0 Board Version Copyright 2009 Terasic Technologies Altera DE0 Board ii CONTENTS Chapter 1 DE0 1 Package Contents .. 1 The DE0 Board 2 Getting Help .. 2 Chapter 2 Altera DE0 3 Layout and Components .. 3 Block Diagram of the DE0 Board .. 5 Power-up the DE0 Board .. 7 Chapter 3 DE0 Control Panel .. 9 Control Panel Setup .. 9 Controlling the LEDs and 7-Segment Displays .. 11 Switches and Buttons .. 13 SDRAM and Flash Controller and 14 PS2 Device .. 15 SD CARD .. 16 VGA .. 17 Chapter 4 Using the DE0 Board .. 19 Configuring the Cyclone III 19 Using the LEDs and 22 Using the 7-segment 25 Clock 27 Using the LCD 27 Using the Expansion 30 Using VGA .. 32 RS-232 Serial Port .. 35 PS/2 Serial Port .. 36 SD Card Socket .. 37 Using SDRAM and Flash.
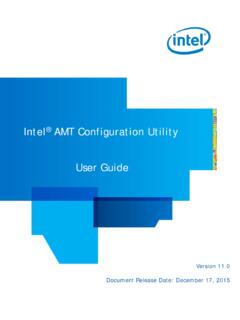
2 37 Chapter 5 Examples of Advanced Demonstrations .. 42 DE0 Factory 42 SD 43 VGA Color Pattern Demonstration .. 47 Chapter 6 Appendix .. 51 Revision History .. 51 Altera DE0 Board iii Copyright Statement .. 51 DE0 User Manual 1 Chapter 1 DE0 Package The DE0 package contains all the components needed to use the DE0 Board in conjunction with a computer that runs the Microsoft Windows software. Package Contents Figure shows a photograph of the DE0 package. Figure The DE0 package contents. DE0 User Manual 2 The DE0 package includes: The DE0 Board USB Cable for FPGA programming and control DE0 System CD containing : o Altera s Quartus II Web Edition and the Nios II Embedded Design Suit Evaluation Edition software o the DE0 documentation and supporting materials, including the User Manual, the Control Panel utility, reference designs and demonstrations, device datasheets, tutorials, and a set of laboratory exercises Clear plastic cover for the Board DC wall-mount power supply The DE0 Board Assembly To assemble the included stands for the DE0 Board .
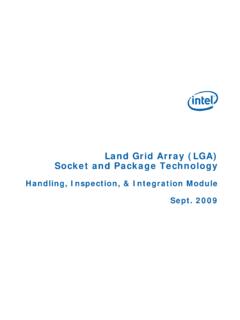
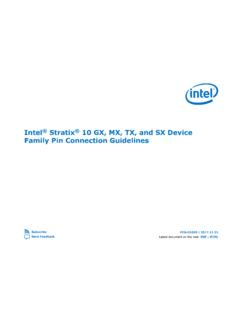
3 Assemble a rubber (silicon) cover, as shown in Figure , for each of the four copper stands on the DE0 Board The clear plastic cover provides extra protection, and is mounted over the top of the Board by using additional stands and screws Figure The feet for the DE0 Board . Getting Help Here are the addresses where you can get help if you encounter problems: DE0 User Manual 3 Altera Corporation 101 Innovation Drive San Jose, California, 95134 USA Email: Terasic Technologies No. 356, Sec. 1, Fusing E. Rd. Jhubei City, HsinChu County, Taiwan, 302 Email: Web: Chapter 2 Altera DE0 Board This chapter presents the features and design characteristics of the DE0 Board . Layout and Components A photograph of the DE0 Board is shown in Figure It depicts the layout of the Board and indicates the location of the connectors and key components.
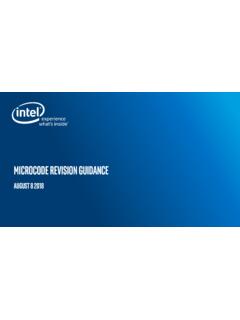
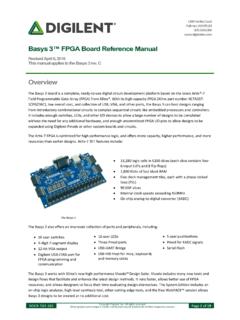
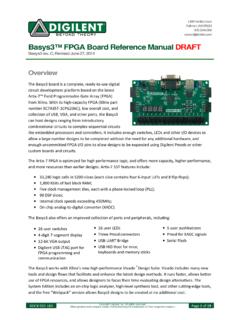
4 DE0 User Manual 4 Slide Switches (10)PushButton Switches (3)User LEDs (10)SDRAM (8 Mbytes)Expansion Headers (2)Cyclone III EP3C16F484 FLASH (4 Mbytes)USB Blaster Circuit7 -Segment Display (4)RUN/PROG Switch forJTAG/AS Modes16 x 2 LCD InterfacePower ON/OFF SwitchTriple 4 - bit VGA DACPS/2 PortSD Card SocketRS - 232 Interface50 - MHz OscillatorUSB Blaster ConnectorPower Supply InputAltera EPCS 4 Configuration Device Figure The DE0 Board . The DE0 Board has many features that allow the user to implement a wide range of designed circuits, from simple circuits to various multimedia projects. The following hardware is provided on the DE0 Board : Altera Cyclone III 3C16 FPGA device Altera Serial Configuration device EPCS4 USB Blaster (on Board ) for programming and user API control; both jtag and Active Serial (AS) programming modes are supported 8-Mbyte SDRAM 4-Mbyte Flash memory SD Card socket 3 pushbutton switches 10 toggle switches 10 green user LEDs 50-MHz oscillator for clock sources VGA DAC (4-bit resistor network) with VGA-out connector DE0 User Manual 5 RS-232 transceiver PS/2 mouse/keyboard connector Two 40-pin Expansion Headers Block Diagram of the DE0 Board Figure gives the block diagram of the DE0 Board .
5 To provide maximum flexibility for the user, all connections are made through the Cyclone IIII FPGA device. Thus, the user can configure the FPGA to implement any system design. RS-232 Transceiver7-Segment Display (4)EP3C16F48416X2 LCD ModuleFlash (4 Mbytes)User LEDs (10)PS/2 Slide Switches (10)PushButton Switches (3)Expansion Headers (2)SDRAM (8 Mbytes)Triple 4-bit VGA DACSD Card SocketEPCS4 Config DeviceUSBB laster16X2 LCD Interface Figure Block diagram of the DE0 Board . Following is more detailed information about the blocks in Figure : Cyclone IIII 3C16 FPGA 15,408 LEs 56 M9K Embedded Memory Blocks 504K total RAM bits 56 embedded multipliers 4 PLLs 346 user I/O pins DE0 User Manual 6 FineLine BGA 484-pin package Built-in USB Blaster circuit On- Board USB Blaster for programming and user API (Application programming interface) control Using the Altera EPM240 CPLD SDRAM One 8-Mbyte Single Data Rate Synchronous Dynamic RAM memory chip Supports 16-bits data bus Flash memory 4-Mbyte NOR Flash memory Support Byte (8-bits)/Word (16-bits) mode SD card socket Provides both SPI and SD 1-bit mod SD Card access Pushbutton switches 3 pushbutton switches Normally high.
6 Generates one active-low pulse when the switch is pressed Slide switches 10 Slide switches A switch causes logic 0 when in the DOWN position and logic 1 when in the UP position General User Interfaces 10 Green color LEDs (Active high) 4 seven-segment displays (Active low) 16x2 LCD Interface (Not include LCD module) Clock inputs 50-MHz oscillator VGA output Uses a 4-bit resistor-network DAC With 15-pin high-density D-sub connector Supports up to 1280x1024 at 60-Hz refresh rate DE0 User Manual 7 Serial ports One RS-232 port (Without DB-9 serial connector) One PS/2 port (Can be used through a PS/2 Y Cable to allow you to connect a keyboard and mouse to one port) Two 40-pin expansion headers 72 Cyclone III I/O pins, as well as 8 power and ground lines, are brought out to two 40-pin expansion connectors 40-pin header is designed to accept a standard 40-pin ribbon cable used for IDE hard drives Power-up the DE0 Board The DE0 Board comes with a preloaded configuration bit stream to demonstrate some features of the Board .
7 This bit stream also allows users to see quickly if the Board is working properly. To power-up the Board perform the following steps: 1. Connect the provided USB cable from the host computer to the USB Blaster connector on the DE0 Board . For communication between the host and the DE0 Board , it is necessary to install the Altera USB Blaster driver software. If this driver is not already installed on the host computer, it can be installed as explained in the tutorial Getting Started with Altera 's DE0 Board . This tutorial is available in the directory DE0\DE0_user_manual on the DE0 System CD-ROM. 2. Connect the adapter to the DE0 Board 3. Connect a VGA monitor to the VGA port on the DE0 Board 4. Turn the RUN/PROG switch on the left edge of the DE0 Board to RUN position; the PROG position is used only for the AS Mode programming 5.
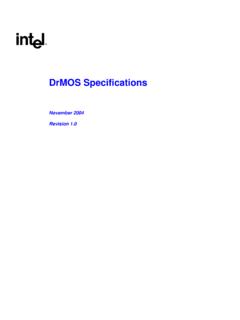
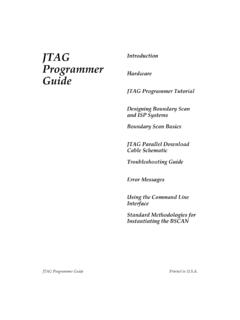
8 Turn the power on by pressing the ON/OFF switch on the DE0 Board At this point you should observe the following: All user LEDs are flashing All 7-segment displays are cycling through the numbers 0 to F The VGA monitor displays the image shown in Figure DE0 User Manual 8 Figure The default VGA output pattern. DE0 User Manual 9 Chapter 3 DE0 Control Panel The DE0 Board comes with a Control Panel facility that allows users to access various components on the Board from a host computer. The host computer communicates with the Board through an USB connection. The facility can be used to verify the functionality of components on the Board or be used as a debug tool while developing RTL code. This chapter first presents some basic functions of the Control Panel, then describes its structure in block diagram form, and finally describes its capabilities.
9 Control Panel Setup The Control Panel Software Utility is located in the DE0_Control_panel folder in the DE0 System CD-ROM. To install it, just copy the whole folder to your host computer. To activate the Control Panel, perform the following steps: 1. Make sure Quartus II and USB-Blaster Driver are installed successfully on your PC. 2. Connect the supplied USB cable to the USB Blaster port, connect the power supply, and turn the power switch ON 3. Set the RUN/PROG switch to the RUN position 4. Start the executable on the host computer. The Control Panel user interface shown in Figure will appear. 5. When the control panel window appears, it will automatically download the bit stream file .sof into the FPGA. If any error message shows up as shown in Figure , please check steps 1 to 3 has been performed.
10 Then, click Download Code button to program FPGA again. Note, the Control Panel will occupy the USB port until you close that port; you cannot use Quartus II to download a configuration file into the FPGA until you close the USB port. 6. The Control Panel is now ready to be use; experiment by setting the value of the LEDs display and observe the result on the DE0 Board . DE0 User Manual 10 Figure The DE0 Control Panel. Figure The error message of the DE0 Control Panel. The concept of the DE0 Control Panel is illustrated in Figure The Control Codes that perform the control functions is implemented in the FPGA Board . It communicates with the Control Panel window, which is active on the host computer, via the USB Blaster link. The graphical interface is used to issue commands to the control codes.