Transcription of AN2586 Application note - st.com
1 November 2011 Doc ID 13675 Rev 71/28AN2586 Application noteGetting started with STM32F10xxx hardware developmentIntroductionThis Application note is intended for system designers who require a hardware implementation overview of the development board features such as the power supply, the clock management, the reset control, the boot mode settings and the debug management. It shows how to use the low-density value line, low-density, medium-density value line, medium-density, high-density, XL-density and connectivity line STM32F10xxx product families and describes the minimum hardware resources required to develop an STM32F10xxx reference design schematics are also contained in this document with descriptions of the main components, interfaces and Low-density value line devices are STM32F100xx microcontrollers where the Flash memory density ranges between 16 and 32 Kbytes.
2 Low-density devices are STM32F101xx, STM32F102xx and STM32F103xx microcontrollers where the Flash memory density ranges between 16 and 32 Kbytes. Medium-density value line devices are STM32F100xx microcontrollers where the Flash memory density ranges between 64 and 128 Kbytes. Medium-density devices are STM32F100xx, STM32F101xx, STM32F102xx and STM32F103xx microcontrollers where the Flash memory density ranges between 64 and 128 Kbytes. High-density value line devices are STM32F100xx microcontrollers where the Flash memory density ranges between 256 and 512 Kbytes. High-density devices are STM32F101xx and STM32F103xx microcontrollers where the Flash memory density ranges between 256 and 512 Kbytes.
3 XL-density devices are STM32F101xx and STM32F103xx microcontrollers where the Flash memory density ranges between 768 Kbytes and 1 Mbyte. Connectivity line devices are STM32F105xx and STM32F107xx ContentsAN25862/28 Doc ID 13675 Rev 7 Contents1 Power supplies .. A/D converter supply and reference voltage .. backup .. regulator .. supply schemes .. and power supply supervisor .. on reset (POR) / power down reset (PDR) .. voltage detector (PVD) .. reset .. 92 Clocks .. OSC clock .. source (HSE bypass) .. crystal/ceramic resonator (HSE crystal).
4 OSC clock .. source (LSE bypass) .. crystal/ceramic resonator (LSE crystal) .. security system (CSS) .. 143 Boot configuration .. mode selection .. pin connection .. boot loader mode .. 164 Debug management .. debug port (serial wire and JTAG) .. and debug port pins .. debug port pins .. SWJ-DP pin assignment .. pull-up and pull-down resistors on JTAG pins .. debug port connection with standard JTAG connector .. 19AN2586 ContentsDoc ID 13675 Rev 73/28 5 Recommendations .. circuit board .. position .. and power supply (VSS, VDD).
5 Signals .. I/Os and features .. 216 Reference design .. mode .. interface .. supply .. references .. 237 Revision history .. 27 List of tablesAN25864/28 Doc ID 13675 Rev 7 List of tablesTable modes.. 15 Table port pin assignment .. 18 Table I/O pin availability .. 18 Table components .. 23 Table components .. 23 Table connection for all packages.. 25 Table revision history .. 27AN2586 List of figuresDoc ID 13675 Rev 75/28 List of figuresFigure supply overview .. 6 Figure supply scheme.. 8 Figure on reset/power down reset waveform.
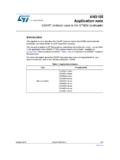
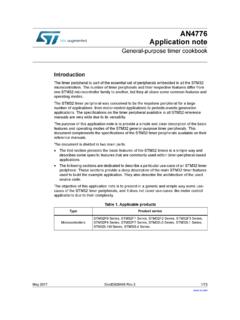
6 8 Figure thresholds .. 9 Figure circuit .. 10 Figure clock .. 11 Figure resonators .. 11 Figure clock .. 13 Figure resonators .. 13 Figure mode selection implementation example .. 15 Figure connection .. 17 Figure connector implementation .. 19 Figure layout for VDD/VSS pair .. 21 Figure (T6) microcontroller reference schematic .. 24 Power suppliesAN25866/28 Doc ID 13675 Rev 71 Power IntroductionThe device requires a V to V operating voltage supply (VDD). An embedded regulator is used to supply the internal V digital real-time clock (RTC) and backup registers can be powered from the VBAT voltage when the main VDD supply is powered supply overviewNote:VDDA and VSSA must be connected to VDD and VSS, Independent A/D converter supply and reference voltageTo improve conversion accuracy, the ADC has an independent power supply that can be filtered separately, and shielded from noise on the PCB.
7 The ADC voltage supply input is available on a separate VDDA pin an isolated supply ground connection is provided on the VSSA pinWhen available (depending on package), VREF must be tied to 100-pin and 144-pin packagesTo ensure a better accuracy on low-voltage inputs, the user can connect a separate external reference voltage ADC input on VREF+. The voltage on VREF+ may range from V to converterVDDVSSI/O RingBKP registersTemp. sensorReset blockStandby circuitryPLL(Wakeup logic,IWDG)RTCV oltage regulatorCorememories'digital peripheralsLow voltage detector(VSSA) VREF VDDA domainVDD V domainBackup domainLSE crystal 32 KHz oscillatorRCC BDCR registerai14863(from V up to VDDA) VREF+(VDD) VDDA(VSS) VSSA(VDD) VBATAN2586 Power suppliesDoc ID 13675 Rev 77/28 On packages with 64 pins or lessThe VREF+ and VREF- pins are not available, they are internally connected to the ADC voltage supply (VDDA) and ground (VSSA).
8 Battery backupTo retain the content of the Backup registers when VDD is turned off, the VBAT pin can be connected to an optional standby voltage supplied by a battery or another VBAT pin also powers the RTC unit, allowing the RTC to operate even when the main digital supply (VDD) is turned off. The switch to the VBAT supply is controlled by the power down reset (PDR) circuitry embedded in the Reset no external battery is used in the Application , it is highly recommended to connect VBAT externally to Voltage regulatorThe voltage regulator is always enabled after reset.
9 It works in three different modes depending on the Application modes. in Run mode, the regulator supplies full power to the V domain (core, memories and digital peripherals) in Stop mode, the regulator supplies low power to the V domain, preserving the contents of the registers and SRAM in Standby mode, the regulator is powered off. The contents of the registers and SRAM are lost except for those concerned with the Standby circuitry and the Backup Power supply schemesThe circuit is powered by a stabilized power supply, VDD. Caution: If the ADC is used, the VDD range is limited to V to V If the ADC is not used, the VDD range is V to V The VDD pins must be connected to VDD with external decoupling capacitors (one 100 nF Ceramic capacitor for each VDD pin + one Tantalum or Ceramic capacitor (min.))
10 F F). The VBAT pin can be connected to the external battery ( V < VBAT < V). If no external battery is used, it is recommended to connect this pin to VDD with a 100 nF external ceramic decoupling capacitor. The VDDA pin must be connected to two external decoupling capacitors (100 nF Ceramic + 1 F Tantalum or Ceramic). The VREF+ pin can be connected to the VDDA external power supply. If a separate, external reference voltage is applied on VREF+, a 100 nF and a 1 F capacitors must be connected on this pin. In all cases, VREF+ must be kept between V and VDDA. Additional precautions can be taken to filter analog noise: VDDA can be connected to VDD through a ferrite bead.