Transcription of Basic IPv6 WAN and LAN Configuration - Netgear
1 Basic ipv6 WAN and LAN. Configuration This quick start guide provides Basic ipv6 WAN and LAN Configuration information for the ProSafe Wireless-N 8-Port Gigabit VPN Firewall FVS318N. For complete ipv6 Configuration information, see the Reference Manual. This quick start guide contains the following sections: Set Up an ipv6 internet Connection Configure the Basic ipv6 LAN Settings ipv6 Connection Troubleshooting Tips Note: For more information about the topics covered in this guide, visit the FVS318N support website at You will also find the Reference Manual at the support website. Set Up an ipv6 internet Connection Default ipv6 Settings and Required ISP Information Configure the ipv6 Routing Mode Use a DHCPv6 Server to Configure an ipv6 internet Connection Configure a Static ipv6 internet Connection Enable 6to4 Automatic Tunneling Configure ISATAP Automatic Tunnelling 1.
2 ProSafe Wireless-N 8-Port Gigabit VPN Firewall FVS318N. Default ipv6 Settings and Required ISP Information Table 1. Default ipv6 WAN settings Item Default Setting WAN ipv6 mode Disabled (IPv4 mode only). WAN MAC address Use default MAC address of the wireless VPN firewall WAN MTU size 1500 bytes; 1492 bytes for PPPoE connections Port speed AutoSense If you intend to configure a static ipv6 address, before you start the Configuration process, use the following table to list the information that you need to have collected from your ISP. If you use an external DHCPv6 server to configure a dynamic ipv6 internet address, you do not need to collect any information. Table 2. ISP information required to configure a static ipv6 internet connection Item Collected information from your ISP. ipv6 address ipv6 prefix length Default ipv6 gateway Primary DNS server address Secondary DNS server address Configure the ipv6 Routing Mode By default, the wireless VPN firewall supports IPv4 only.
3 To use ipv6 , you need to enable the wireless VPN firewall to support both devices with IPv4 addresses and devices with ipv6 . addresses. To configure the ipv6 routing mode: 1. Select Network Configuration > WAN Settings. The WAN Mode screen displays. 2. Select the IPv4 / ipv6 mode radio button to enable the wireless VPN firewall to communicate with both devices that have IPv4 addresses and devices that have ipv6 . addresses. 3. Click Apply to save your changes. The wireless VPN firewall reboots. Basic ipv6 WAN and LAN Configuration 2. ProSafe Wireless-N 8-Port Gigabit VPN Firewall FVS318N. Use a DHCPv6 Server to Configure an ipv6 internet Connection The wireless VPN firewall can autoconfigure its ISP settings through a DHCPv6 server by using either stateless or stateful address autoconfiguration. These options are explained in the following procedure.
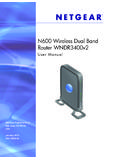
4 To automatically configure the WAN port for an ipv6 connection to the internet : 1. Select Network Configuration > WAN Settings > Broadband ISP Settings. 2. In the upper right of the screen, select the ipv6 radio button. The ISP Broadband Settings screen displays the ipv6 settings: Figure 1. 3. In the internet Address section of the screen, from the ipv6 drop-down list, select DHCPv6. 4. In the DHCPv6 section of the screen, select one of the following radio buttons: Stateless Address Auto Configuration . The wireless VPN firewall generates its own IP address by using a combination of locally available information and router advertisements, but receives DNS server information from a DHCPv6 server. The IP. address is a dynamic address. Stateful Address Auto Configuration . The wireless VPN firewall obtains an interface address, Configuration information such as DNS server information, and other parameters from a DHCPv6 server.
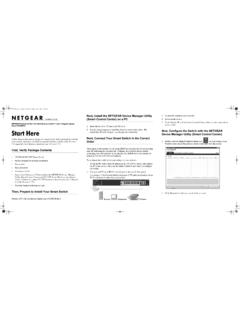
5 The IP address is a dynamic address. Basic ipv6 WAN and LAN Configuration 3. ProSafe Wireless-N 8-Port Gigabit VPN Firewall FVS318N. 5. As an optional step: If you have selected the Stateless Address Auto Configuration radio button, you can select the Prefix Delegation check box: Prefix delegation check box is selected. A prefix is assigned by the ISP's stateful DHCPv6 server through prefix delegation. For example, 2001:db8:: /64. The wireless VPN firewall's stateless DHCPv6 server can assign this prefix to its ipv6 LAN clients. For information, see the Stateless DHCPv6 Server With Prefix Delegation section in Chapter 3, LAN Configuration , of the Reference Manual. Prefix delegation check box is cleared. Prefix delegation is disabled. This is the default setting. 6. Click Apply to save your changes. 7. To verify the connection, click the Status option arrow in the upper right of the screen to display the Connection Status pop-up screen (the following figure contains examples): Figure 2.
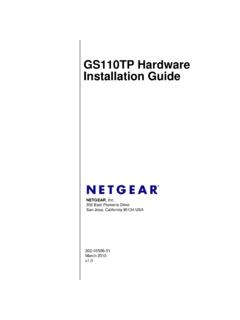
6 The Connection Status screen should show a valid IP address and gateway, and you are connected to the internet . If the Configuration was not successful, see ipv6 Connection Troubleshooting Tips on page 12. Configure a Static ipv6 internet Connection To configure a static ipv6 internet connection, you need to enter the ipv6 address information that you should have received from your ISP (see Table 2 on page 2). To configure static ipv6 broadband ISP settings: 1. Select Network Configuration > WAN Settings > Broadband ISP Settings. 2. In the upper right of the screen, select the ipv6 radio button. The ISP Broadband Settings screen displays the ipv6 settings: Basic ipv6 WAN and LAN Configuration 4. ProSafe Wireless-N 8-Port Gigabit VPN Firewall FVS318N. Figure 3. 3. In the internet Address section of the screen, from the ipv6 drop-down list, select Static ipv6 .
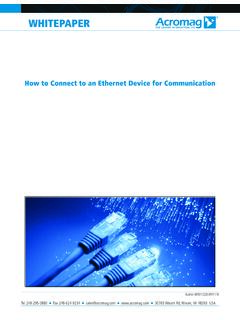
7 4. In the Static IP Address section of the screen, enter the settings as explained in the following table. Table 3. Broadband ISP Settings screen settings for a static ipv6 connection Setting Description ipv6 Address The IP address that your ISP assigned to you. Enter the address in one of the following formats (all four examples specify the same ipv6 address): 2001:db8:0000:0000:020f:24ff:febf:dbcb 2001:db8:0:0:20f:24ff:febf:dbcb 2001:db8::20f:24ff:febf:dbcb 2001:db8:0:0:20f:24 ipv6 Prefix Length The prefix length that your ISP assigned to you, typically 64. Default ipv6 Gateway The ipv6 IP address of the ISP's default ipv6 gateway. Primary DNS Server The ipv6 IP address of the ISP's primary DNS server. Secondary DNS Server The ipv6 IP address of the ISP's secondary DNS server. 5. Click Apply to save your changes. 6. To verify the connection, click the Status option arrow in the upper right of the screen to display the Connection Status pop-up screen (the following figure contains examples): Basic ipv6 WAN and LAN Configuration 5.
8 ProSafe Wireless-N 8-Port Gigabit VPN Firewall FVS318N. Figure 4. Enable 6to4 Automatic Tunneling If your network is an isolated ipv6 network that is not connected to an ipv6 ISP, you need to make sure that the ipv6 packets can travel over the IPv4 internet backbone by enabling automatic 6to4 tunneling. There are two requirements for 6to4 tunnelling: If the wireless VPN firewall functions as the endpoint for 6to4 tunnels in your network: Make sure that the wireless VPN firewall has a static IPv4 address. A dynamic IPv4. address can cause routing problems on the 6to4 tunnels. If you do not use a stateful DHCPv6 server in your LAN: Configure the Router Advertisement Daemon (RADVD), and set up 6to4 advertisement prefixes for 6to4 tunneling to function correctly. For information, see the Configure the ipv6 Router Advertisement Daemon and Advertisement Prefixes for the LAN section in Chapter 3, LAN Configuration , of the Reference Manual.
9 Typically, 6to4 tunnel addresses start with a 2002 prefix (decimal notification). On the wireless VPN firewall, a 6to4 tunnel is indicated by sit0-WAN1. To enable 6to4 automatic tunneling: 1. Select Network Configuration > WAN Settings > 6 to 4 Tunneling. 2. Select the Enable Automatic Tunneling check box. 3. Click Apply to save your changes. Configure ISATAP Automatic Tunnelling If your network is an IPv4 network or ipv6 network that consists of both IPv4 and ipv6 . devices, you need to make sure that the ipv6 packets can travel over the IPv4 intranet by enabling and configuring Intra-Site Automatic Tunnel Addressing Protocol (ISATAP). tunneling. If you do not use a stateful DHCPv6 server in your LAN: Configure the Router Advertisement Daemon (RADVD), and set up ISATAP advertisement Basic ipv6 WAN and LAN Configuration 6. ProSafe Wireless-N 8-Port Gigabit VPN Firewall FVS318N.
10 Prefixes (which are referred to as Global/Local/ISATAP) for ISATAP tunneling to function correctly. For information, see the Configure the ipv6 Router Advertisement Daemon and Advertisement Prefixes for the LAN section in Chapter 3, LAN Configuration , of the Reference Manual. To configure an ISATAP tunnel: 1. Select Network Configuration > WAN Settings > ISATAP Tunnels. The ISATAP. Tunnels screen displays. (The following figure shows some examples.). Figure 5. 2. Click the Add table button under the List of Available ISATAP Tunnels table. The Add ISATAP Tunnel screen displays: Figure 6. 3. Specify the tunnel settings as explained in the following table. Table 4. Add ISATAP Tunnel screen settings Setting Description ISATAP Subnet Prefix The ipv6 prefix for the tunnel. Local End Point From the drop-down list, select the type of local address: Address LAN.