Transcription of Camera User Guide
1 1 ENGLISHB efore UseBasic GuideAdvanced Guide1 Camera Basics2 Auto Mode3 Other Shooting Modes5 Playback Mode6Wi-Fi Functions7 Setting Menu8 Accessories4P Mode9 AppendixIndexCamera User Guide CANON INC. 2016 CT0-D068-000-F101-A Make sure you read this Guide , including the Safety Precautions (= 11) section, before using the Camera . Reading this Guide will help you learn to use the Camera properly. Store this Guide safely so that you can use it in the future. Click the buttons in the lower right to access other pages. : Next page : Previous page : Page before you clicked a link To jump to the beginning of a chapter, click the chapter title at UseBasic GuideAdvanced Guide1 Camera Basics2 Auto Mode3 Other Shooting Modes5 Playback Mode6Wi-Fi Functions7 Setting Menu8 Accessories4P Mode9 AppendixIndexInitial InformationPackage ContentsBefore use, make sure the following items are included in the anything is missing, contact your Camera PackNB-11LH*Battery ChargerCB-2LF/CB-2 LFEW rist StrapLens Cap(with cord)* Do not peel off the adhesive covering from a battery pack.
2 Printed matter is also included. A memory card is not included (= 2).Before UseCompatible Memory CardsThe following memory cards (commercially available) can be used, regardless of capacity. SD memory cards* SDHC memory cards* SDXC memory cards** Cards conforming to SD standards. However, not all memory cards have been verified to work with the UseBasic GuideAdvanced Guide1 Camera Basics2 Auto Mode3 Other Shooting Modes5 Playback Mode6Wi-Fi Functions7 Setting Menu8 Accessories4P Mode9 AppendixIndexConventions in This Guide In this Guide , icons are used to represent the corresponding Camera buttons on which they appear, or which they resemble. The following Camera buttons and controls are represented by icons. Also, the numbers in parenthesis indicates the numbers of the buttons and controls on Part Names (= 4). [] Up button (9) on back [] Left button (13) on back [] Right button (11) on back [] Down button (12) on back Shooting modes and on-screen icons and text are indicated in brackets.
3 : Important information you should know. : Notes and tips for expert Camera use. = xx: Pages with related information (in this example, xx represents a page number). The symbols Still Images and Movies below titles indicate how the function is used whether for still images or movies. Instructions in this Guide apply to the Camera under default settings. For convenience, all supported memory cards are simply referred to as the memory card .Preliminary Notes and Legal Information Take and review some test shots initially to make sure the images were recorded correctly. Please note that Canon Inc., its subsidiaries and affiliates, and its distributors are not liable for any consequential damages arising from any malfunction of a Camera or accessory, including memory cards, that result in the failure of an image to be recorded or to be recorded in a way that is machine readable.
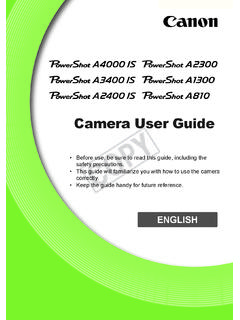
4 Images recorded by the Camera shall be for personal use. Refrain from unauthorized recording that infringes on copyright law, and note that even for personal use, photography may contravene copyright or other legal rights at some performances or exhibitions, or in some commercial settings. The Camera warranty is valid only in the area of purchase. In case of Camera problems while abroad, return to the area of purchase before contacting a Canon Customer Support Help Desk. Although the screen is produced under extremely high-precision manufacturing conditions and more than of the pixels meet design specifications, in rare cases some pixels may be defective or may appear as red or black dots. This does not indicate damage. This does not affect recorded images either. When the Camera is used over an extended period, it may become warm. This does not indicate UseBasic GuideAdvanced Guide1 Camera Basics2 Auto Mode3 Other Shooting Modes5 Playback Mode6Wi-Fi Functions7 Setting Menu8 Accessories4P Mode9 AppendixIndex(7)(8)(10)(11)(12)(1)(5) (6)(4)(14)(13)(15)(3)(2)(9)(1) Speaker(2) Microphone(3) AV OUT (Audio/video output) / DIGITAL terminal(4) Screen (Monitor)(5) Indicator (back)(6) [ (Playback)] button(7) Movie button(8) [ (Auto)] button(9) [ (Exposure compensation)] / [ (Single-image erase)] / Up button(10) (Function/Set) button(11) [ (Flash)] / Right button(12) [ (Information)] / Down button(13) [ (Macro)] / Left button(14) [ (Wi-Fi)] button(15) [ (Menu)] buttonPart Names(3)(6)(8) (9)(7)(1)(2) (3) (4)(5)(10)(1) Zoom leverShoot Only: [ (telephoto)] / [ (wide angle)]Playback.
5 [ (magnify)] / [ (index)](2) Shutter button(3) Strap mount(4) Power button(5) Flash(6) Lamp(7) Lens(8) Tripod socket(9) Memory card/battery cover(10) [] (N-Mark)** Used with NFC feature (= 79).5 Before UseBasic GuideAdvanced Guide1 Camera Basics2 Auto Mode3 Other Shooting Modes5 Playback Mode6Wi-Fi Functions7 Setting Menu8 Accessories4P Mode9 AppendixIndexTable of ContentsBefore UseInitial Information ..2 Package Contents ..2 Compatible Memory 2 Preliminary Notes and Legal Information ..3 Conventions in This Guide ..3 Part Names ..4 Common Camera Operations ..10 Safety Precautions ..11 Basic GuideBasic 14 Initial 14 Attaching Accessories ..14 Holding the Camera ..15 Charging the Battery Pack ..15 Inserting the Battery Pack and Your Memory Card (Commercially Available) ..16 Removing the Battery Pack and Memory Card ..16 Setting the Date and Time ..17 Changing the Date and Time.
6 17 Display Language ..18 Trying the Camera Out ..19 Shooting (Smart Auto) ..19 Viewing ..20 Erasing Images ..21 Advanced Guide1 Camera Basics ..22On/Off ..22 Power-Saving Features (Auto Power Down) ..23 Power Saving in Shooting Mode ..23 Power Saving in Playback Mode ..23 Shutter Button ..23 Shooting Display Options ..24 Using the FUNC. Menu ..24 Using the Menu Screen ..25On-Screen 26 Indicator Display ..27 Clock ..272 Auto Mode ..28 Shooting with Camera -Determined Settings ..28 Shooting (Smart Auto) ..28 Still Images/Movies ..30 Still Images ..30 Movies ..31 Scene Icons ..31 Image Stabilization Icons ..32On-Screen Frames ..33 Common, Convenient Features ..33 Zooming In Closer on Subjects (Digital Zoom) ..33 Using the Self-Timer ..34 Using the Self-Timer to Avoid Camera Shake ..34 Customizing the Self-Timer ..35 Adding a Date Stamp ..35 Continuous Shooting ..36 Image Customization Features.
7 376 Before UseBasic GuideAdvanced Guide1 Camera Basics2 Auto Mode3 Other Shooting Modes5 Playback Mode6Wi-Fi Functions7 Setting Menu8 Accessories4P Mode9 AppendixIndexChanging the Aspect Ratio ..37 Changing Image Resolution (Size) ..37 Guidelines for Choosing Resolution Based on Paper Size (for 4:3 Images) ..37 Changing Movie Image Quality ..38 Helpful Shooting Features ..38 Displaying Grid Lines ..38 Magnifying the Area in Focus ..39 Customizing Camera Operation ..39 Deactivating the AF-Assist Beam ..39 Deactivating the Red-Eye Reduction Lamp ..40 Changing the Image Display Style after Shots ..40 Changing the Image Display Period after Shots ..40 Changing the Screen Displayed after Shots ..413 Other Shooting Modes ..42 Brightness / Color Customization (Live View Control) ..42 Specific Scenes ..43 Applying Special Effects ..44 Shooting with a Fish-Eye Lens Effect (Fish-Eye Effect).
8 44 Shots Resembling Miniature Models (Miniature Effect) ..45 Playback Speed and Estimated Playback Time (for One-Minute Clips).. 45 Shooting with a Toy Camera Effect (Toy Camera Effect) ..46 Shooting in Monochrome ..46 Special Modes for Other Purposes ..47 Using the Face Self-Timer ..47 Shooting Long Exposures (Long Shutter) ..474 P Mode ..49 Shooting in Program AE ([P] Mode) ..49 Image Brightness (Exposure) ..50 Adjusting Image Brightness (Exposure Compensation) ..50 Changing the Metering Method ..50 Changing the ISO Speed ..51 Correcting Image Brightness (i-Contrast) ..51 Image Colors ..52 Adjusting White Balance ..52 Custom White Balance ..52 Changing Image Color Tones (My Colors) ..52 Custom 53 Shooting Range and Focusing ..54 Shooting Close-Ups (Macro) ..54 Shooting Distant Subjects (Infinity) ..54 Digital Tele-Converter ..54 Changing the AF Frame Mode ..55 Center ..55 Face AiAF.
9 56 Choosing Subjects to Focus On (Tracking AF) ..56 Shooting with Servo AF ..57 Changing the Focus Setting .. 58 Changing the Flash Mode ..58 Auto ..58On ..58 Slow Synchro ..58 Off ..58 Other Settings ..59 Changing the Compression Ratio (Image Quality) ..59 Changing the IS Mode Settings ..59 Shooting Movies with Subjects at the Same Size Shown before Shooting ..605 Playback Mode ..61 Viewing ..617 Before UseBasic GuideAdvanced Guide1 Camera Basics2 Auto Mode3 Other Shooting Modes5 Playback Mode6Wi-Fi Functions7 Setting Menu8 Accessories4P Mode9 AppendixIndexSwitching Display Modes ..63 Overexposure Warning (for Image Highlights) ..63 Histogram ..63 GPS Information Display ..63 Browsing and Filtering Images ..64 Navigating through Images in an Index ..64 Finding Images Matching Specified Conditions ..64 Image Viewing Options ..65 Magnifying Images ..65 Viewing Slideshows ..66 Changing Slideshow Settings.
10 66 Auto Playback of Related Images (Smart Shuffle) ..66 Protecting Images ..67 Using the Menu ..68 Choosing Images Individually ..68 Selecting a Range ..68 Protecting All Images at Once ..69 Clearing All Protection at Once ..69 Erasing Images ..70 Erasing Multiple Images at Once ..70 Choosing a Selection Method ..70 Choosing Images Individually ..70 Selecting a Range ..71 Specifying All Images at Once ..71 Rotating Images ..71 Using the Menu ..71 Deactivating Auto Rotation ..72 Tagging Images as Favorites ..72 Using the Menu ..72 Editing Still Images ..73 Resizing Images ..73 Cropping ..74 Changing Image Color Tones (My Colors) ..75 Correcting Image Brightness (i-Contrast) ..75 Correcting Red-Eye ..76 Editing Movies ..776 Wi-Fi 78 Available Wi-Fi Features ..78 Sending Images to a Smartphone ..79 Sending Images to an NFC-Compatible Smartphone ..79 Connecting via NFC When Camera Is Off or in Shooting Mode.