Transcription of DOOR GLASS INSTALLATION INSTRUCTIONS - Zabitat
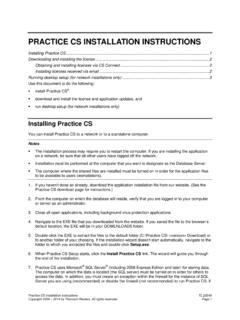
1 This booklet contains INSTALLATION INSTRUCTIONS for the following:REPLACING your existing door GLASS Pages 3-6 ADDING door GLASS to a panel or flush door without GLASS Pages 7-10 INCREASING the size of door GLASS in a door with existing glassPages 11-15 FINISHING INSTRUCTIONS Page 16 PAGE 1 DOOR GLASS INSTALLATION INSTRUCTIONSFor more information, please visit , or contact customer service at 855-813-3111 STATEMENT OF INTENDED USEDoor GLASS panels are for use in 1-3/4" thick residential steel and fiberglass doors . May be used in wood doors when panel dimensions and door thickness dimension match specified ARE NOT DESIGNED FOR USE IN doors THAT DO NOT HAVE RIGID STEEL FRAMES, OR AS WINDOWS IN A WALL ANY MISUSE OR INSTALLATION OTHER THAN STATED WILL VOID THE FIND A HELPER Safety Gloves Safety Glasses Dry Wall Screw (size optional) Power Screw Driver with Phillips Head Bit Putty Knife Window Cleaner Tape Measure Pencil Painter's Tape Drop ClothCAUTIONWhen working with GLASS and frames, care should be taken.
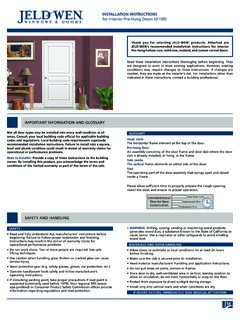
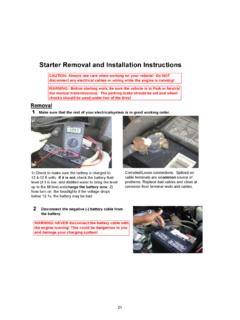
2 Door GLASS is made of tempered safety GLASS but should be carefully supported at all times. We recommend that you install the door off the hinges and lying GLASS kits may be heavy and of an awkward size, so two installers may be required to remove the old GLASS from the opening and lift the door !PAGE 2IF YOU NEED TO CUT AN tools will be needed. 2 Saw-horses Drill with 3/8" or 1/2" bit Jigsaw with a short-stroke blade Ear Protection FOR 1-3/4" THICK doors TOOLS YOU WILL NEED MEASURE TWICE FOR ACCURACYE xisting door GLASS must be removed prior to installing this product. Removal may make the existing door GLASS or sidelight unusable. If you have questions or concerns, consult an Zabitat Customer Service Representative at for help. IF YOU ARE ADDING GLASS MOVE TO STEP 1 ON PAGE 7. IF YOU ARE INCREASING GLASS MOVE TO STEP 1 ON PAGE 11. FOR REPLACING GLASS CONTINUE GLASS INSTALLATION INSTRUCTIONSDOOR GLASS CONSTRUCTIONOUTSIDE FRAME & DOOR GLASSThe outside frame section and THE EXISTING OPENING1 PAGE 3 FOR 1-3/4" THICK doors MEASURE THE THICKNESS of the existing door.
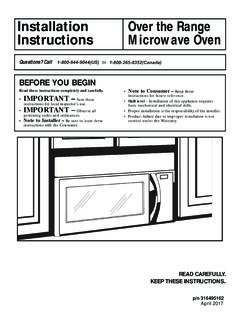
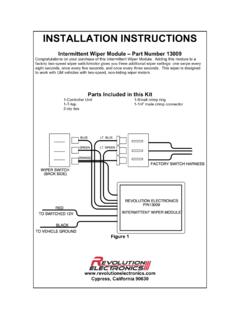
3 Door GLASS is designed to FIT doors THAT ARE 1-3/4" 1/16" THICK. MEASURE THE WIDTH AND HEIGHT of the existing doorglass. If the measurements correspond to the chart, our GLASS will fit your FRAMEThe inside frame section with holes for the attachment screws. OUTSIDE GLASS & FRAME INSIDE FRAME WITH SCREWSThe attachment screws are placed into the door GLASS from the inside of the home for added & SCREW PLUGS WIDTH X HEIGHT HAVE A HELPER SUPPORT THE GLASSPAGE 4C. LOOSEN OUTER FRAME Apply painter's tape to protect the outside surface. INSERT THE PUTTY KNIFE between the outer frame and the door to break the old caulk seal. B. REMOVE INNER FRAME Once the screws are removed, have a helper stand on the outside of the door and hold the frame. REMOVE THE INNER FRAME. CAREFULLY PRY FRAME LOOSE E. CLEAN & PREPARE DOOR SURFACE After the door GLASS has been safely removed, CAREFULLY SCRAPE any old or excess caulk and dirt from the inside and outside wearing safety glasses and gloves, GENTLY REMOVE THE EXISTING GLASS .
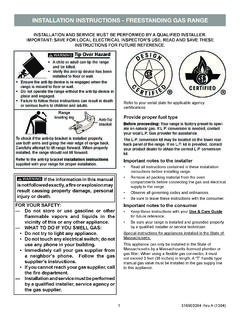
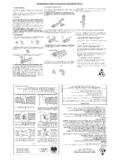
4 REPLACING GLASS INSTALLATION INSTRUCTIONS REMOVE EXCESS CAULK & DIRT USE DRYWALL SCREW TO REMOVE SCREW HOLE PLUGSINSIDETIP: Spray window cleaner around outer frame's edge to help release REMOVE EXISTING DOOR GLASSBCEAA REMOVE EXISTING DOOR GLASSDREMOVE FRAME & GLASSA. LOCATE SCREWS AND REMOVE THEMOld paint, putty, or caulk may need to be removed from the screw plugs first. REMOVE ALL SCREW PLUGS AND ALL ATTACHMENT 5 REPLACING GLASS INSTALLATION INSTRUCTIONSPREPARE DOOR3 PREPARE DOORATIP: To ensure that the GLASS is correctly installed the temper stamp should appear on the bottom of the door. LAY NEW FRAME INTO POSITION LAY DOOR OVER DOOR GLASSA. Lay down the exterior frame over the sawhorses, then add the GLASS Carefully lay the door over the door GLASS . To properly distribute the weight of the door GLASS , place the bottom edge of the door opening snugly to bottom of the door CUTTING A STEEL OR FIBERGLASS DOORA. REMOVE DOOR FROM HINGES B. REMOVE HANDLE SET FROM DOORAB4 installing NEW DOOR GLASSPAGE 6 REPLACING GLASS INSTALLATION INSTRUCTIONSINSTALLING NEW DOOR GLASS CONTINUED ALIGN THE FRAMES AND INSERT SCREWS PLACE DOOR BACK ON HINGESE.
5 Insert each screw working from side to side. Tighten firmly so that the frame fits snugly against the door and the seal is compressed. AVOID OVER TIGHTENING THE SCREWS to allow the window to expand and contract. Recommended torque setting around 4 to Place the door back on it's hinges. Use standard window cleaner to make your new door GLASS shine!DGF. Align the screw plugs with the frame profile. Insert and tap each one into PAGE 16 FOR FRAME FINISHING PLACE INTERIOR FRAMEC. Place interior frame with exposed screw holes over the inside of the Align the frames by matching the screw hole guides. IF DOOR GLASS IS NOT CURRENTLY PRESENT OR A LARGER SIZE DOOR GLASS IS BEING INSTALLED, FOLLOW THESE STEPS:ADDING GLASS INSTALLATION INSTRUCTIONSPREPARE DOOR12 CUTTING A STEEL OR FIBERGLASS DOORA. REMOVE DOOR FROM HINGES B. REMOVE HANDLE SET FROM DOORC. LAY DOOR ACROSS SAWHORSESMEASURE, MARK, AND CUTPAGE 7A. Refer to THE MEASUREMENT GUIDE on , MEASURE AND MARK THE CUTTING AREA of front side of door.
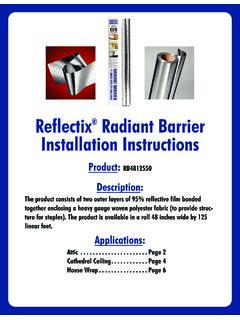
6 If your door is flush (no emboss-ments), measure corner to corner of the cutout marking to make sure opening is APPLY PAINTER S TAPE around cutting area to prevent damage while DRILL 3/8" OR 1/2" STARTER HOLE in all 4 corners of the AND MARKBAPPLY PAINTER'S TAPECDRILL STARTER HOLESACPAGE 8 ADDING GLASS INSTALLATION INSTRUCTIONSD. Do not attempt to cut all the way through the door. The up-stroke should not leave the door and the down-stroke should not exceed 1" into the Using starter hole, INSERT JIG SAW with a short-stroke blade into the inner core of the door and CUT ALONG MARKED GUIDELINES, corner to corner. F. You will be cutting through material of a different density near the lock, you will feel slightly more FLIP DOOR OVER AND REPEAT STEPS A TO E for the back side of REMOVE TAPE AND DEBRISI. REMOVE all packaging from the door GLASS SEPARATE the inner frame from the outer frame and GLASS , MARK, AND CUT CONTINUED DON'T CUT THROUGH DOORECUT ALONG GUIDEDIFFERENT DENSITY NEAR LOCKGFLIP DOOR OVER AND REPEATHREMOVE TAPE AND DEBRISDF2 PAGE 9 ADDING GLASS INSTALLATION INSTRUCTIONSINSTALLING NEW DOOR GLASS LAY DOWN OUTSIDE DOOR GLASS LAY DOOR OVER DOOR GLASS PLACE INTERIOR FRAMEA.
7 Lift the door off of the sawhorses and lay down the outside frame over the sawhorses, then add the GLASS Carefully lay the door over the door GLASS . To properly distribute the weight of the door GLASS , place the bottom edge of the door opening snugly to bottom of the door Place interior frame with exposed screw holes over the inside of the : To ensure that the GLASS is correctly installed the temper stamp should appear on the bottom of the 10 ADDING GLASS INSTALLATION INSTRUCTIONSINSTALLING NEW DOOR GLASS CONTINUED ALIGN THE FRAMES INSERT SCREWS PLACE DOOR BACK ON HINGESD. Align the frames by matching the screw hole Insert each screw working from side to side. Tighten firmly so that the frame fits snugly against the door and the seal is compressed. AVOID OVER TIGHTENING THE SCREWS to allow the window to expand and contract. Recommended torque setting around 4 to Place the door back on its hinges. Use standard window cleaner to make your new door GLASS shine!
8 DEGF. Align the screw plugs with the frame profile. Insert and tap each one into PAGE 16 FOR FRAME FINISHING 11 ADD/INCREASE GLASS INSTALLATION INSTRUCTIONS HAVE A HELPER SUPPORT THE GLASSC. LOOSEN OUTER FRAME Apply painter's tape to protect the outside surface. INSERT THE PUTTY KNIFE between the outer frame and the door to break the old caulk seal. B. REMOVE INNER FRAME Once the screws are removed, have a helper stand on the outside of the door and hold the frame. REMOVE THE INNER FRAME. CAREFULLY PRY FRAME LOOSE E. CLEAN & PREPARE DOOR SURFACE After the door GLASS has been safely removed, CAREFULLY SCRAPE any old or excess caulk and dirt from the inside and outside wearing safety glasses and gloves, GENTLY REMOVE THE EXISTING GLASS . REMOVE EXCESS CAULK & DIRT USE DRYWALL SCREW TO REMOVE SCREW HOLE PLUGSINSIDETIP: Spray window cleaner around outer frame's edge to help release REMOVE EXISTING DOOR GLASSBCEAA REMOVE EXISTING DOOR GLASSDREMOVE FRAME & GLASSA.
9 LOCATE SCREWS AND REMOVE THEMOld paint, putty, or caulk may need to be removed from the screw plugs first. REMOVE ALL SCREW PLUGS AND ALL ATTACHMENT 12 ADD/INCREASE GLASS INSTALLATION INSTRUCTIONS PREPARE DOOR3 REMOVE ALL DOOR ACCESSORIESA. Remove door knob or handle and any locksets and carefully set them aside until after the door GLASS is Remove door from hinges. Lay door across , MARK, AND CUTA. Refer to THE MEASUREMENT GUIDE on , MEASURE AND MARK THE CUTTING AREA of front side of door. If your door is flush (no embossments), measure corner to corner of the cutout marking to make sure opening is APPLY PAINTER S TAPE around cutting area to prevent damage while DRILL 3/8" OR 1/2" STARTER HOLE in all remaining corners to be cut EXISTING DIMENSIONSBAPPLY PAINTER'S TAPECDRILL STARTER HOLESAB2 PAGE 13 ADD/INCREASE GLASS INSTALLATION INSTRUCTIONSD. Do not attempt to cut all the way through the door. The up-stroke should not leave the door and the down-stroke should not exceed 1" into the Using starter hole, INSERT JIG SAW with a short-stroke blade into the inner core of the door and CUT ALONG MARKED GUIDELINES, corner to corner.
10 F. You will be cutting through material of a different density near the lock, you will feel slightly more FLIP DOOR OVER AND REPEAT STEPS A TO E for the back side of REMOVE TAPE AND DEBRISI. REMOVE all packaging from the door GLASS SEPARATE the inner frame from the outer frame with , MARK, AND CUT CONTINUED DON'T CUT THROUGH DOORECUT ALONG GUIDEDIFFERENT DENSITY NEAR LOCKGFLIP DOOR OVER AND REPEATHREMOVE TAPE AND DEBRISDF3 PAGE 14 ADD/INCREASE GLASS INSTALLATION INSTRUCTIONSINSTALLING NEW DOOR GLASS LAY DOWN OUTSIDE DOOR GLASS LAY DOOR OVER DOOR GLASS PLACE INTERIOR FRAMEA. Lift the door off of the sawhorses and lay down the outside frame over the sawhorses, then add the GLASS Carefully lay the door over the door GLASS . To properly distribute the weight of the door GLASS place the bottom edge of the door opening snugly to bottom of the door Place interior frame with exposed screw holes over the inside of your : To ensure that the GLASS is correctly installed the temper stamp should appear on the bottom of the 15 ADD/INCREASE GLASS INSTALLATION INSTRUCTIONSINSTALLING NEW DOOR GLASS CONTINUED ALIGN THE FRAMES INSERT SCREWS PLACE DOOR BACK ON HINGESD.