Transcription of Starter Removal and Installation Instructions
1 Starter Removal and Installation Instructions 1 Make sure that the rest of your electrical system is in good working ) Check to make sure the battery is charged to volts. If it is not, check the battery fluid level (if it is low, add distilled water to bring the level up to the fill line) and charge the battery now. 2) Now turn on the headlights if the voltage drops below , the battery may be bad. Corroded/Loose connections. Spliced on cable terminals are a common source of problems. Replace bad cables and clean allcorrosion from terminal ends and cables. 2 RemovalFusible LinkDisconnect the negative (-) battery cable from the battery. CAUTION: Always use care when working on your vehicle! Do NOT disconnect any electrical cables or wiring while the engine is running!WARNING: Before starting work, be sure the vehicle is in Park or Neutral (for manual transmissions). The parking brake should be set and wheel chocks should be used under two of the tires!WARNING: NEVER disconnect the battery cable with the engine running!
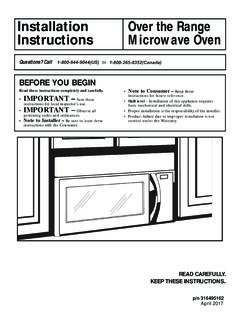
2 This could be dangerous to you and damage your charging system! 21 Remove the start terminal lead (small lead). 34 Remove positive (+) cable from the Starter . 5 Remove mounting bolts or hardware and remove Starter from lead may be attached to the Starter with a spade connector, plug, nut, or : Some vehicles have a relay (or R) terminal lead. This lead may look very similar to the start terminal lead. If this second lead exists mark it and the corresponding terminal on the Starter with a piece of tape or some white out. This will eliminate confusion when it comes time to install your new : Many Ford or Motocraft starters will NOT have an start terminal (if so, move on to step 4). Don't RemoveThis cable will be secured to the Starter 's solenoid with a large nut. Some starters may have a rubber boot covering the nut. Start Terminal+ Cable TerminalThe mounting bolts may be accessible from either the Starter side or the bell housing side (as shown in the photo).
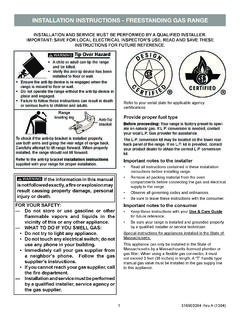
3 1) Remove all mounting bolts and hardware2) slide the Starter out of the vehicle. NOTE: In some vehicles it may be necessary to rotate or change the angle of the Starter or loosen the exhaust system to get enough clearance to slide the Starter out. Refer to a repair manual or contact MPA's Technical Hotline (800-228-9672)1222 CAUTION: CHECK THE CONDITION OF THE FLYWHEEL NOW!A damaged flywheel will cause a good Starter to make noise and go bad. Now is the time to check your flywheel teeth-- while the Starter is out. A) Use a flashlight to look inside the hole where the nose of the Starter sits (use a mirror if necessary). Look for uneven wear: chipped, missing or severely rounded teeth. B) Using a large screw driver rotate the flywheel until a new set of teeth are visible. Repeat this process until all teeth have been inspected. Replace flywheel as necessary. 6 Does the pinion gear have the same numberof teeth?Are the mounting holes the same size and thread type ?
4 Make sure you have the correct part number for your vehicle. Hold the two starters up sideby side and inspect for differences in the "Key Check Points". Key Check PointsDoes the start terminal look thesame?Is the + cable postin the same : Some starters may look different, but may be correct. If you are not sure you have the right one, call the MPA Technical Support Line at (800) Starter . 21 Installation1) Position Starter in bell ) Secure with mounting bolts or hardware. HINT: Start all mounting bolts by hand and tighten finger tight. This will make it easier to start all of the bolts and will prevent damage to your new Starter from cross threading or cracked mounting : ENGINE DOESN'T TURN OVER (NO SOUND)Start Lead Test. Disconnect the start terminal lead from the Starter . Using a volt meter, place the (+) red probe against the end of the start lead on the vehicle. Place the (-) black probe on the bare metal housing of the Starter case. While doing this have a friend turn the ignition key to the FULL start position.
5 If the meter reads:a) 1) There is a problem with the start circuit that runs through your ignition switch. This should be diagnosed and repaired by a qualified auto ) Or, the Start terminal and R terminal leads have been installed to the wrong the electrical connections. Install the positive (+) cable and start terminal : Your new Starter will probably sound slightly different than your old one, since it has a new/re-manufactured pinion gear. The new pinion gear will produce a different tone when engaging with the old flywheel. Re-connect the battery (-) cable and start the engine. Start the vehicle 3 more times to be sure the new Starter is working properly. If the vehicle doesn'tstart or produces a grinding noises, refer to the Basic Trouble Shooting section Trouble Shooting9 CAUTION: Some starters may have a relay (or R) terminal. These terminals may look very similar. If this second lead exists use the mark described in step 3 to determine which lead goes on which terminal.
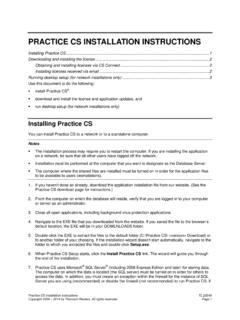
6 If the leads are similar, but not marked, refer to the Start Lead Test in the Basic Trouble Shooting section that Terminal+ Cable TerminalCAUTION: Before doing any trouble shooting or tests, be sure the transmission is in Park or Neutral. (if manual transmission) and the parking brake is set. The ignition key should be in the off position unless specified otherwise : Before starting any trouble shooting check the battery , its cables and connections (refer to Removal step 1). Without a good battery with a full charge it is NOT possible to trouble shoot the system! Start terminal leadStart terminalGroundNOTE: DO NOT OVER TIGHTEN the positive (+) battery connection. This may break the solenoid cap damaging your new ) Call the MPA Technical Support Line for further : ENGINE DOESN'T TURN OVER (BUT MAKES "CLICK" SOUND)Positive Cable Test (does NOT include vehicles with remote mounted solenoid, such as those with early Motocraft).Remove the positive (+) cable from the Starter .
7 Using a volt meter, place the red (+) probe on the cable end and the black (-) probe on the bare metal housing of the the meter reads:a) There is a problem with the positive (+) cable or its connections. Check the whole cable from the battery to the Starter . Make sure all connections are cleanand tight. Also check for a burned fusible link. This is done by looking for soft spots or melted insulation along the cable. If the cable or any part of it are in poor condition replace with factory style cableb) Call MPA Technical Support for further : LOUD GRINDING NOISESI nspect the flywheel teeth. With the Starter in the vehicle this is best done by a transmission shop. There will probably be a small charge for this service, but if you flywheel is damaged they can perform the necessary work. If your flywheel teeth have not been damaged, remove the Starter and verify that you have the correct Starter for the vehicle though the MPA Technical Support Line. Problem: ENGINE TURNS OVER VERY SLOWLYI nspect all positive and negative connections.
8 Slow turn over usually is the result of either a weak batteryor poor electrical connections. Refer to Removal step 1. Additionally, check the following connections:a) battery negative (-) cable to engine block b) Starter to engine block (paint, oil or other foreign material can weaken this connection)c) positive cable (battery to Starter ). Check for loose or dirty intermediate connections, such as at a relay or junction box. Also look for any sign that this cable may be shorting to ground. If the cable or any parts of it are in poor condition, replace with factory style cable. For further assistance call the MPA Technical Support Line at (800) cable terminalPositive terminalHINT: If you are not sure which lead is the start terminal lead and which is the R (relay) terminal lead, perform the following disconnect both leads from the Starter . While a friend holds the key in the Full start position, check for a voltage at the terminal end of each lead. The lead with a voltage is the start terminal lead.
9 The one without a voltage is the R terminal lead. 9